
- Forums
- GT40 Replica Manufacturers' Corner
- RCR Forum - RCR40/SLC/917/Superlite Aero
- The SLC Clubhouse
You are using an out of date browser. It may not display this or other websites correctly.
You should upgrade or use an alternative browser.
You should upgrade or use an alternative browser.
S2's Build Thread
- Thread starter sswartz
- Start date
Terry Oxandale
Skinny Man
Why is it I loved the PC-7 better than the SLC?
Scott
Lifetime Supporter
David, I spent a lot of time thinking about it before I did the cut. The hole shouldn't decrease the stiffness of the monocoque because the removable side impact bars are welded to a 1/4" steel plate with welded nuts that receive the upper suspension mounting points. There is a similar welded plate that ties it into the floor. In addition, I'm going to have a 1" x 2" x 1/8" tube TIG welded to the top of the foot box alongside of the hole. So, the only thing left to do was charge up my man card. I took this guy's approach as an inspiration ;-)You are a braver man than I, cutting a hole like that into the frame.
Summer's Eve Cleansing Wash TV Commercial, 'Mistaken Body Wash' - YouTube
Terry, I like it because it's done, I'm not allowed to do anything mechanical on it and there are no speed limits!Why is it I loved the PC-7 better than the SLC?
That said, as I was figuring out how to buckle into the parachute and six-point plane harness, the instructor quickly explained that while red usually denotes emergency items, in this plane red was for the weapon systems (deactivated) and yellow was for the emergency items... and there was a fair amount of yellow. He showed me the fire suppression handle. He then said if we're having a really bad day and needed to bail there's the emergency canopy ejection lever which will likely result in the rudder being torn off... he further explained that I should run down either the left or right wing and jump and then immediately pull this handle to pop your chute... I then asked him what the best glide speed was as I was trying to imagine how I be able to stay on the wing long enough to clear the stabilizer. The PC-9 has ejection seats.
So, the down side is I'm nowhere near able to take it out on my own and you really don't want to have a bad day in a plane.
Last edited:
Scott
Lifetime Supporter
Mesa, I put on ChapStick before going to a meeting the other day and I remember people looking funny at me. When I got home I went to put on more and realized that it was basically a combo lipstick / ChapStick type of thing! It looked like a ChapStick... there should be a law requiring those types of products to be packaged in hot pink.That was close
On another note, H asked me if I could design and 3D print a part that adapts Restomod Air's oval shape to the GT's 3" ID circle on the dashboard. He could make something by hand, but it's a fiddly part and he needs three, so 3D printing offers a good solution.
I kept trying to draw a hollow oval and a hollow circle and loft the two surfaces. I then recalled that SolidWorks is best at solids, so I extruded solid shapes, lofted their faces and then used the shell feature to hollow out the interior. Once I figured that out it was easy to design the part including a barb, mounting bosses, etc. -- I mailed it to him yesterday, so we'll have to see if it works.
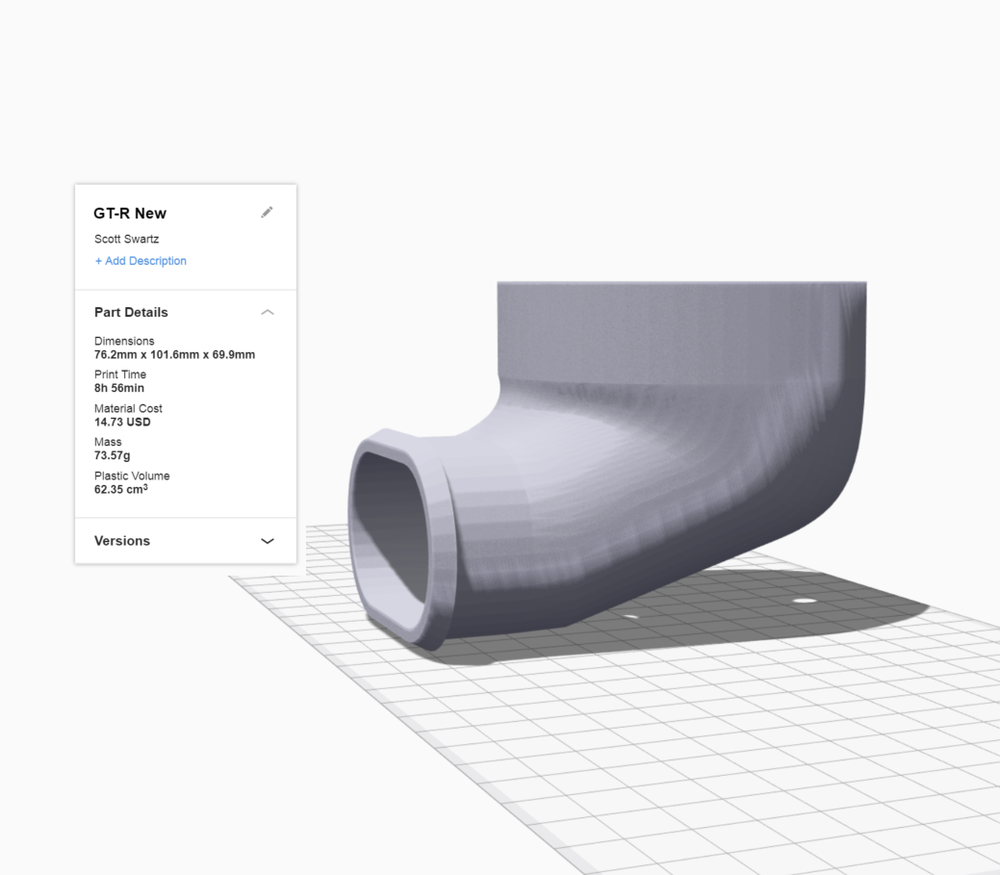

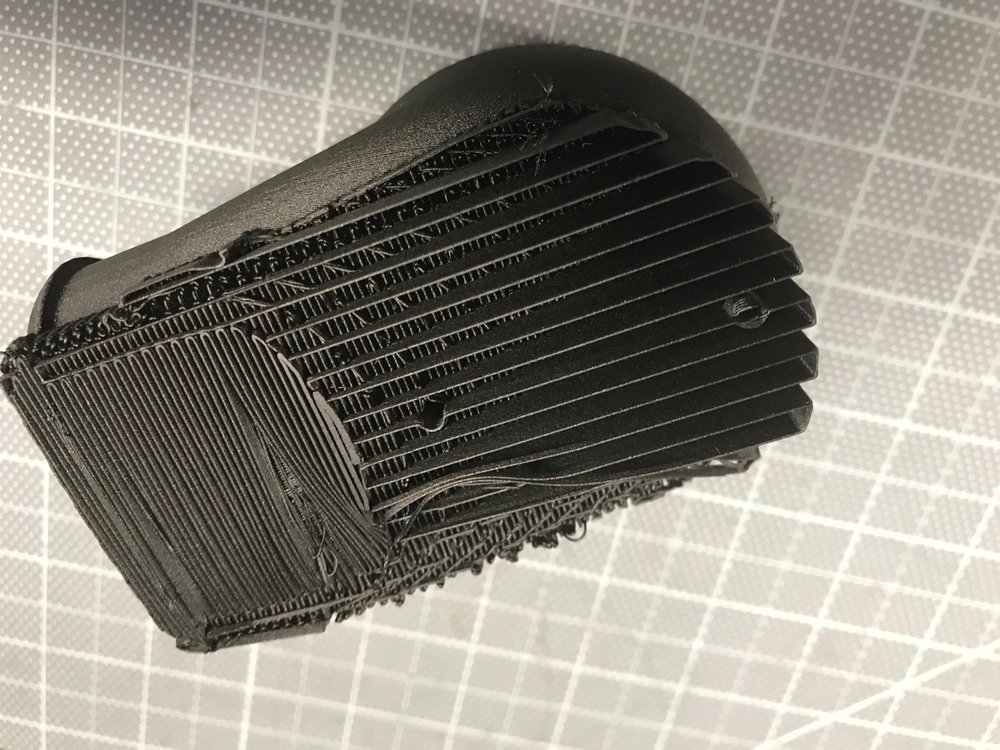
In the screenshot of the 3D slicer you will note it now indicates the estimated materials price and the mass of the object. I had requested those features a while ago (I assume that others have requested it) and via the magic of cloud-based software the feature just appeared. The next picture shows another feature that just appeared. It's the bottom of the removable support structure. You will note how much more sparse the section on the right is than the one on the left. They added this "turbo support" feature a while ago to reduce the time and material to support a part. This is used up to a distance near the actual part at which point the support structure because more dense (i.e. the left side).
This was printed in 0.2 mm layers (0.1 mm would have taken a little over twice as long) and it looks pretty good. The bottom didn't look great after the support structure was removed and I continue to wish that they would provide an upgrade path for an additional extruder for water soluble support structures like my Replicator 2X has. That said, this part is buried in the dashboard and won't be seen.
And awesome it looks too, can't wait for it to arrive so I can try it in place. Thanks for your help Scott its much appreciated.
You've got to love technology.
You've got to love technology.
Scott
Lifetime Supporter
Although my climate settings can be controlled via a smartphone app, I want manual controls in case the batteries run out on the phone, I forget my phone or the bluetooth interface has a glitch. IMO Restomod makes the nicest controls on the market. I had their Reactor control on back order, but they announced their Elevate controller at SEMA and I dropped by their booth to check it out. They're less expensive than the Reactor, so that's the only booth visit that saved me money!
Like their other controls the Elevate control are made from billet 6061 aluminum. However, the knobs are completely flush until you push them at which point they pop out. They are very compact, look great and have a nice feel. I went with red LED back lighting, but I can easily change them to white, green, blue or cyan. The only thing thing that I don't like is that each of the four twist in/out LED modules have two wires hanging out the back. I'll need to clean that up when I figure out where I'm installing the controller.
Buttons flush

Buttons popped out
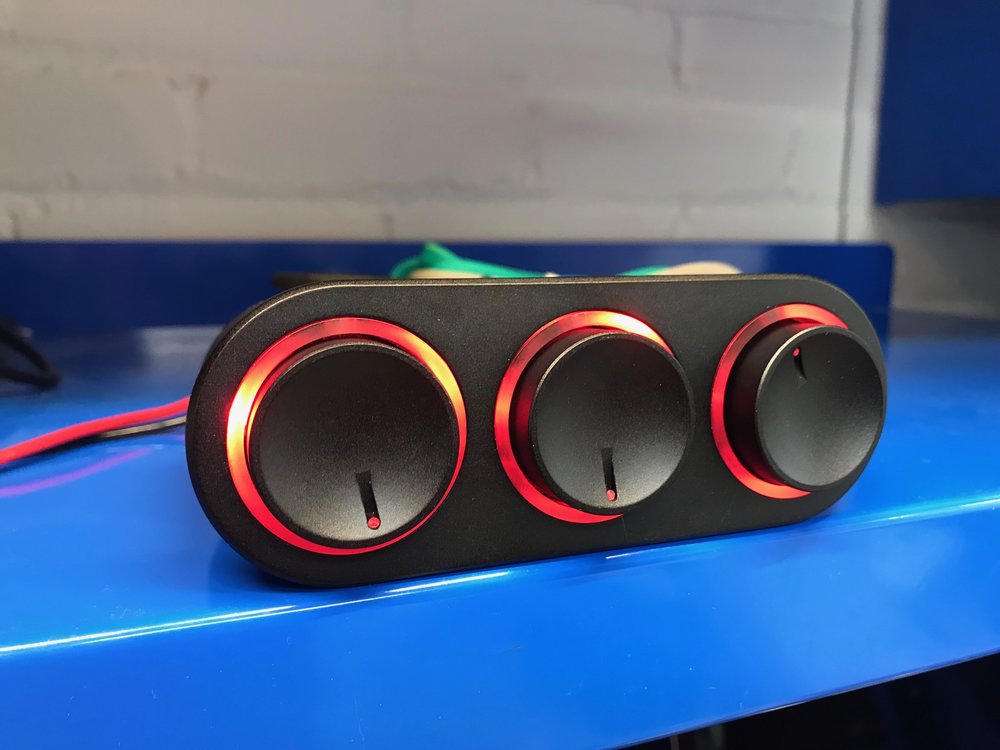
Like their other controls the Elevate control are made from billet 6061 aluminum. However, the knobs are completely flush until you push them at which point they pop out. They are very compact, look great and have a nice feel. I went with red LED back lighting, but I can easily change them to white, green, blue or cyan. The only thing thing that I don't like is that each of the four twist in/out LED modules have two wires hanging out the back. I'll need to clean that up when I figure out where I'm installing the controller.
Buttons flush
Buttons popped out
Last edited:
Scott
Lifetime Supporter
Must. not. look. must. not. look.
YOU are a bad influence.
Mesa, you bought the first one, you put a supercharger in it and you massively modified the tail, so you're the bad influence! Finish it so you don't give me any more ideas... and never post a picture of those fat tires.
--------------
What springs are you guys running up front? I need to pull the shocks to tweak the ride height so now would be a good time to change them. My car will be mostly street with some track. The kit came with 400 pound springs. Pnut upgraded his to 800 pounds and he's very happy.
I need to account for the nitrogen in the Penskes which are inflated to 150 psi. The shock shaft diameter is 0.625” so the area is 0.31 sq-in.; therefore they add 150psi x 0.31= 46.5lb.
So an 800 pound spring would be 846.5 pounds.
Thoughts?
Last edited:
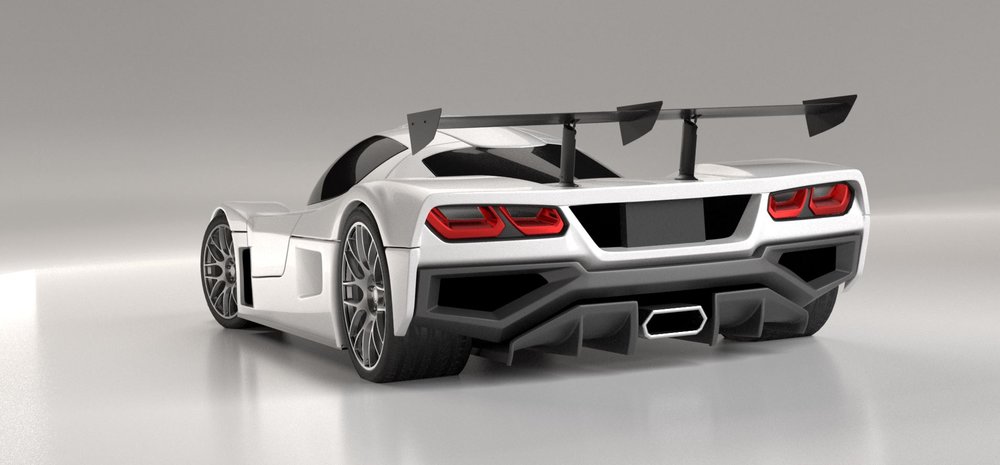

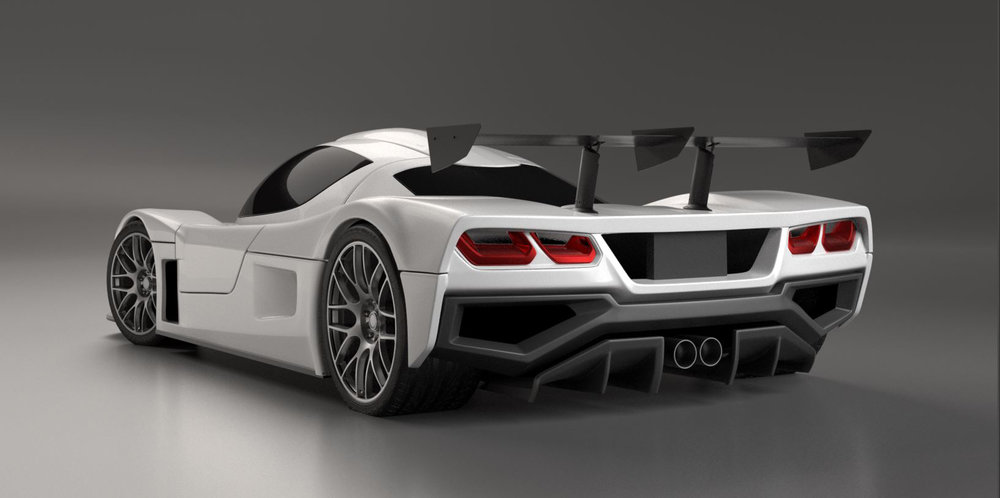
Like I said before, I'm not a fan of the Corvette tail lights, but they really, really work well in this application. I'm liking 3 & 4 a lot, with #3 just slightly ahead. The dual pipes are "traditional", with the oval being more "contemporary". Think the tail light bezels look best in black.
Number two exhaust tip, blacked out lights.
Last edited:
Steven Lobel
Supporter
Ken, thanks for the pointer. I don't want to mount the alternator that high on the driver's side because that's where I plan to put the coolant expansion tank (the passenger's side is full with throttle body and intake). I plan on mounting the alternator close to the block and the compressor where the power steering pump is often placed (see picture).
While the brackets might be a challenge, I don't think I'll have a problem finding the right length belt. I have an 8-rib set up and if you look at the Gates catalog they offer a bunch of shorter and 35 longer 8-rib belts with the longest being ~43" longer. If I had an 11 rib setup like the LS9, I'd have a big problem because they only offer a few lengths!
Another challenge is that the compressor has a 6-rib pulley which presents a challenge because the pulley is integrated with the clutch. CV Racing offers this aftermarket 8 rib upgrade for $97.50, but it's a pain in the ass to install:
Another option would be to go with a SD 709 compressor which comes with an 8-rib pulley. However it has a 6k RPM limit as opposed the 9K limit with the one supplied in the kit. With a pulley ratio of 1.7 that would mean that the RPM window switch would cut the compressor off at 1,364 RPM which seems really low! If anyone has done the above upgrade or has other thoughts, let me know.
Mesa, I spoke with my engine builder and he mentioned that I could mount a 6 rib pulley on the damper and run the compressor and the alternator on it. That way I can keep my current belt and I could run a smaller diameter pulley to optimize the ratio for compressor speed. To your, point that might make it more challenging to get the engine in and out.
Enjoying your build. I am early on in mine for a GT-R. Here is a pic of my motor on the floor. Cut and pasted the SD7B10 Sanden to sit where I think it will go. Dave's and Kwiq make brackets. I'm pretty sure both would need modifications to get the pulley's to line up. All my pulleys are 6 groove.

My alternator is Alternator Part No.8301AN from Advanced. 160AMP Carquest for 2010 Silverado 1500LT . It bolts to block using M10-1.5 75mm bolts. 4 washers shim it so belt lines up perfect. (for now- will adjust once car is running to make sure)
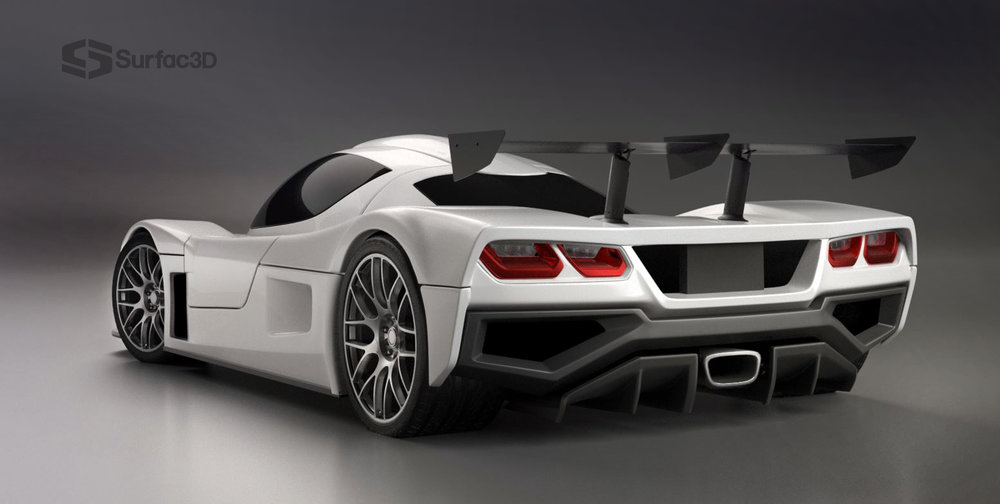
“Here's a couple of new renderings. Lots of small refinements to the shape. These show different exhaust tip shapes and colors (black and stainless) and the tail light bezels vary between body color and black. Thoughts on tip shape/color and tail light bezel color?”
No round or oval exhaust tips on that rear end. But the car will be awesome no matter what you do back there.
No round or oval exhaust tips on that rear end. But the car will be awesome no matter what you do back there.
Last edited:
to quote my son, that looks siiiick. How about 2 square-ish or rectangular-ish tips?
With all that going on in the back, no one is going to look at the exhaust tips. Although I'd probably go with the two round ones as it keeps the back from having everything the same shape.
The bigger choice is in having the surrounds in black, that makes a big difference. I say black looks best.
The bigger choice is in having the surrounds in black, that makes a big difference. I say black looks best.
Roger Reid
Supporter
Scott
Where did you source your sway bar parts you show in post 169.
Thanks, Roger
Where did you source your sway bar parts you show in post 169.
Thanks, Roger
Similar threads
- Replies
- 10
- Views
- 10K
- Replies
- 4
- Views
- 5K