S2's Build Thread

Scott

Lifetime Supporter
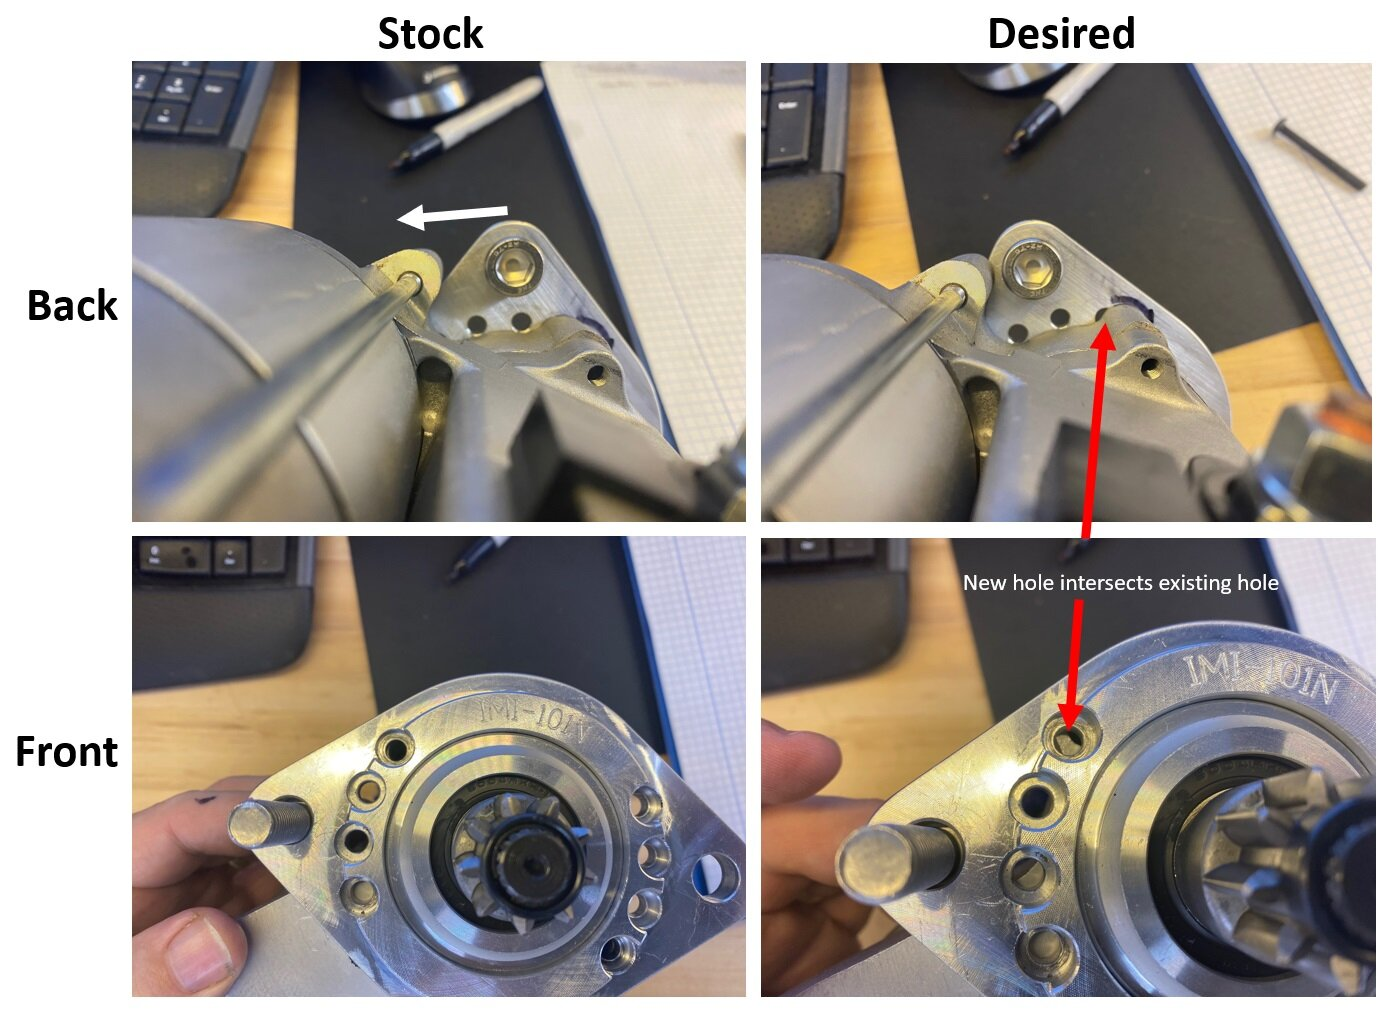
The starter has a machined aluminum flange that allows it to be clocked in four positions. However, even when clocked all of the way up, the starter was hitting the merge collector. D’oh! I unbolted the motor from the bracket, rotated it and confirmed that it could be clocked enough to clear the merge collector if new holes were machined.
1608997156865.png


Two holes shouldn’t be a big deal, right? Not exactly. The new holes intersect the existing holes requiring the existing ones to be welded closed and machined. In addition, the geometry requires both the shoulder that indexes the bell housing and the mounting holes to be machined on an arc that’s concentric with the motor’s shaft. Unless you can write your name on an Etch A Sketch (if you’re too young to know what one is Google it), the best way to accomplish this on a manual mill is with a rotary table.
1608997187681.png

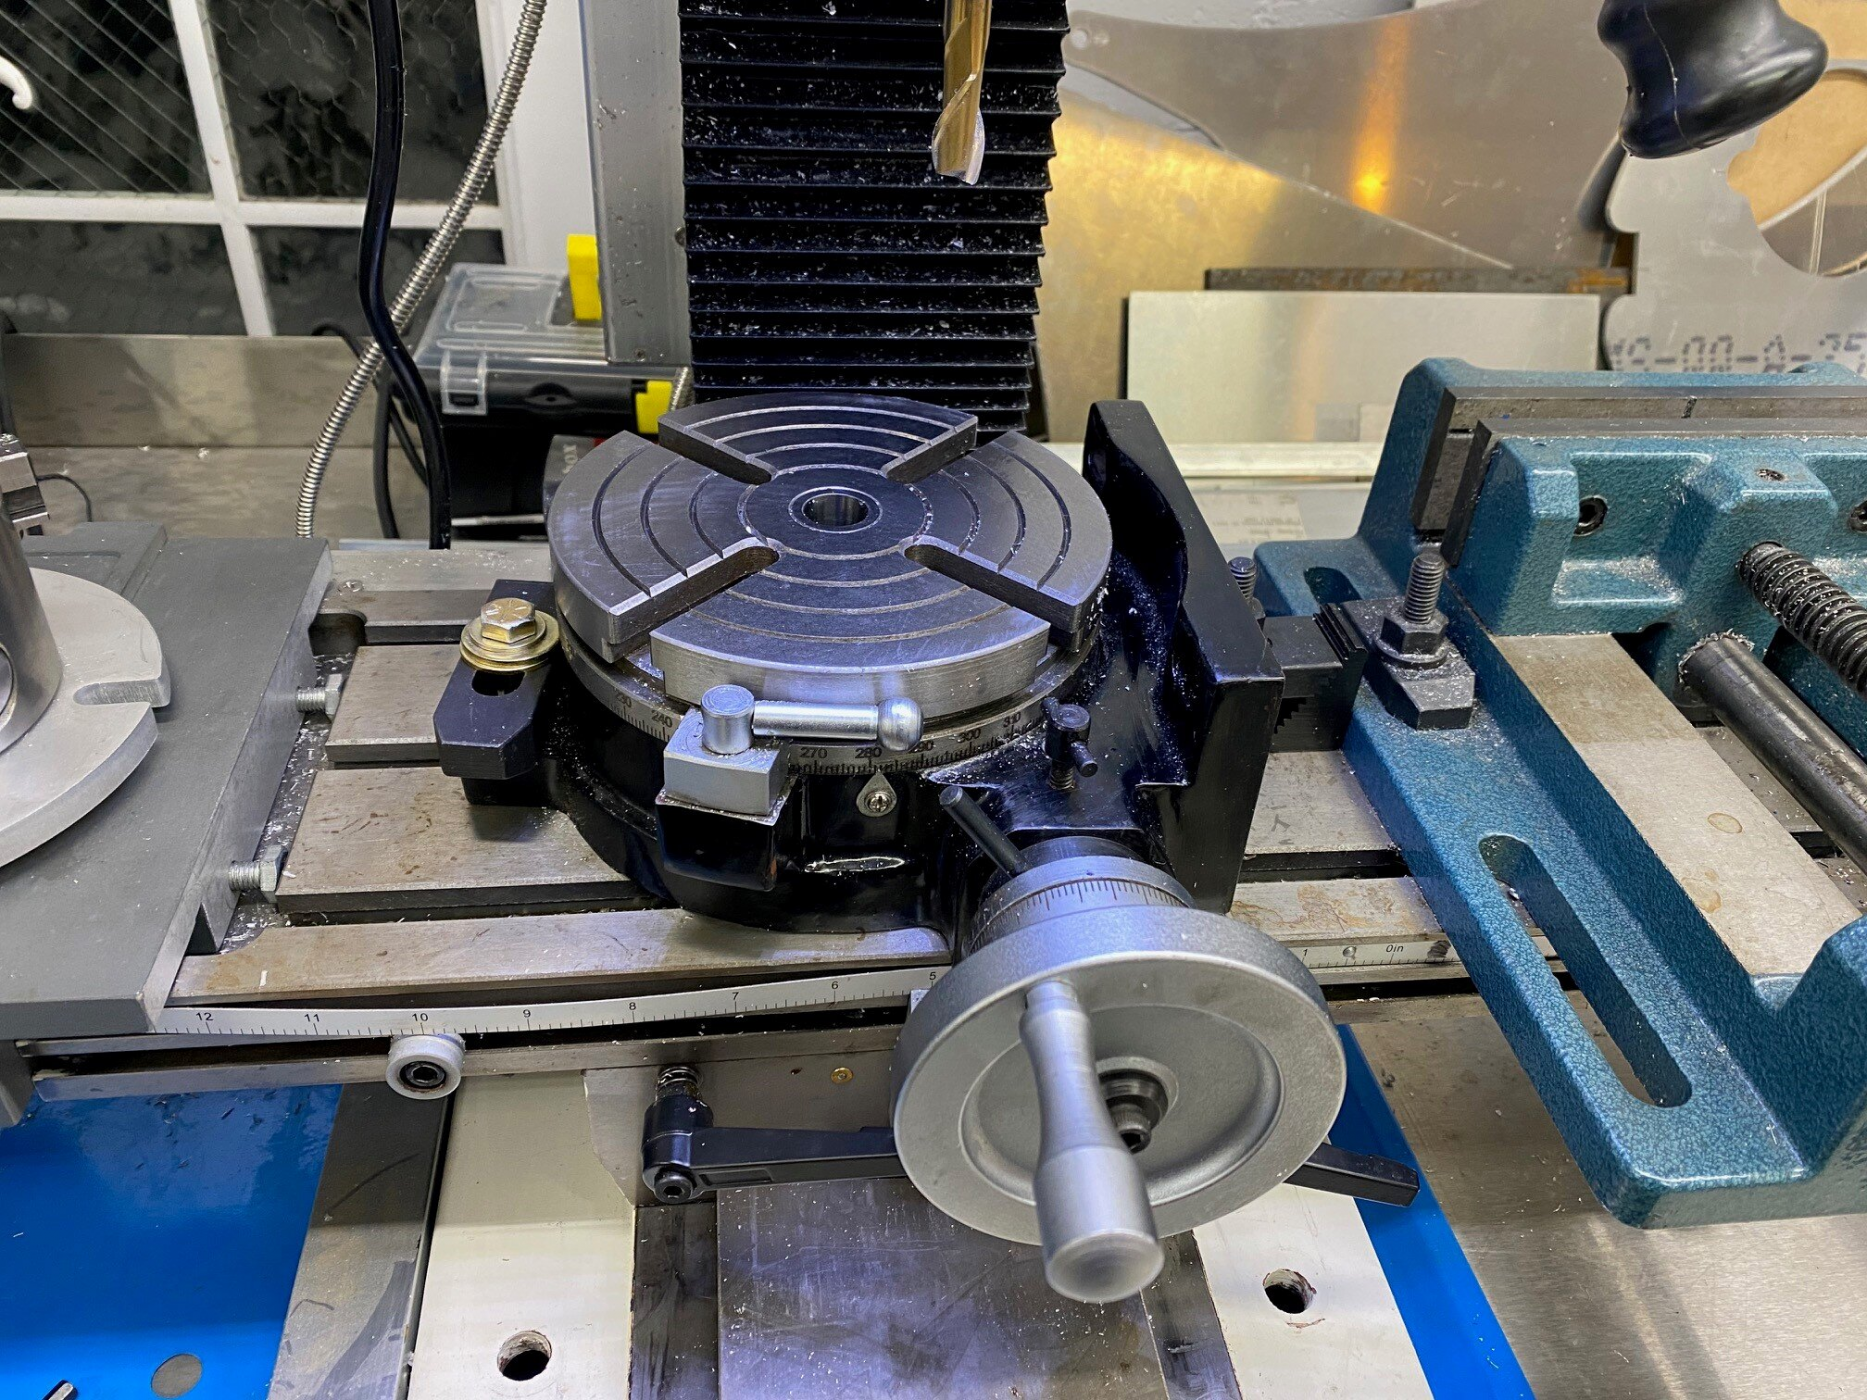
6” rotary table mounted to the X/Y table

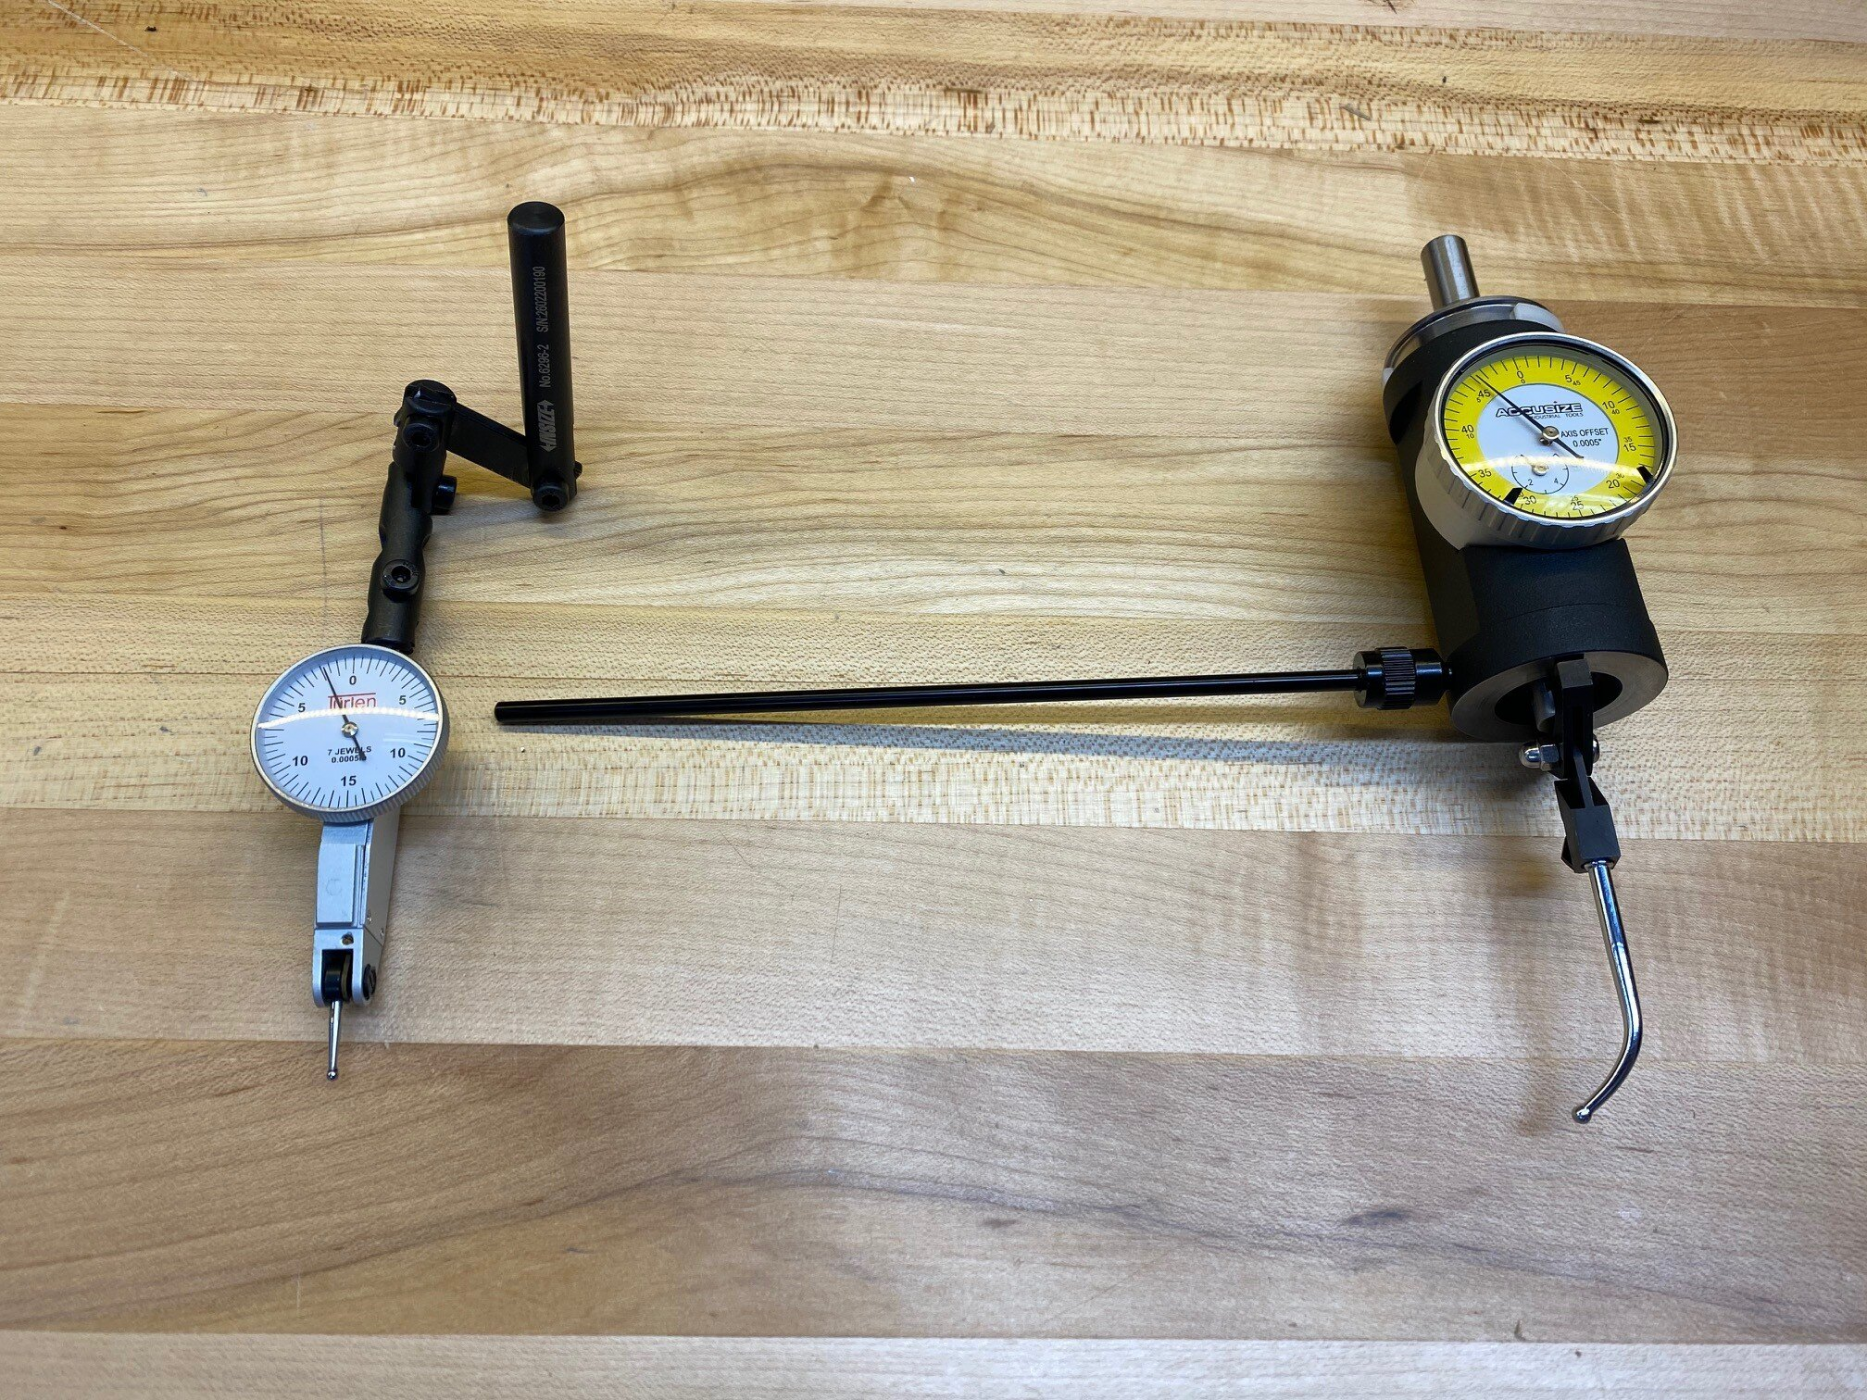
I had been thinking about buying a rotary table for a while so this was a good excuse to get one. Centering the table under the spindle with an indicator mounted to an arm is a real pain-in-the-ass because the gauge rotates with the spindle which makes it hard to read. After doing a little research I bought a coaxial indicator. You hold the long horizonal arm (or let it bind on something) to keep the gauge from spinning. Mine supports a max of 800 RPMs. Anything over a couple of hundred RPMs provides instantaneous feedback to changes, making it easy to figure out which handwheel to rotate in which direction to get everything centered.
1608997234936.png

(Left) indicator mounted to an arm (right) coaxial indicator

The next challenge was centering the part on the rotary table. Centering the rotary table was relatively easy because it’s mounted to the X/Y table and the milling machine’s handwheels reliably move the table one thousand of an inch along the X or Y axis. However, adjustments to the bracket need to be done with your hands and even when you get everything centered you can inadvertaly nudge things when clamping the part.
1608997285017.png

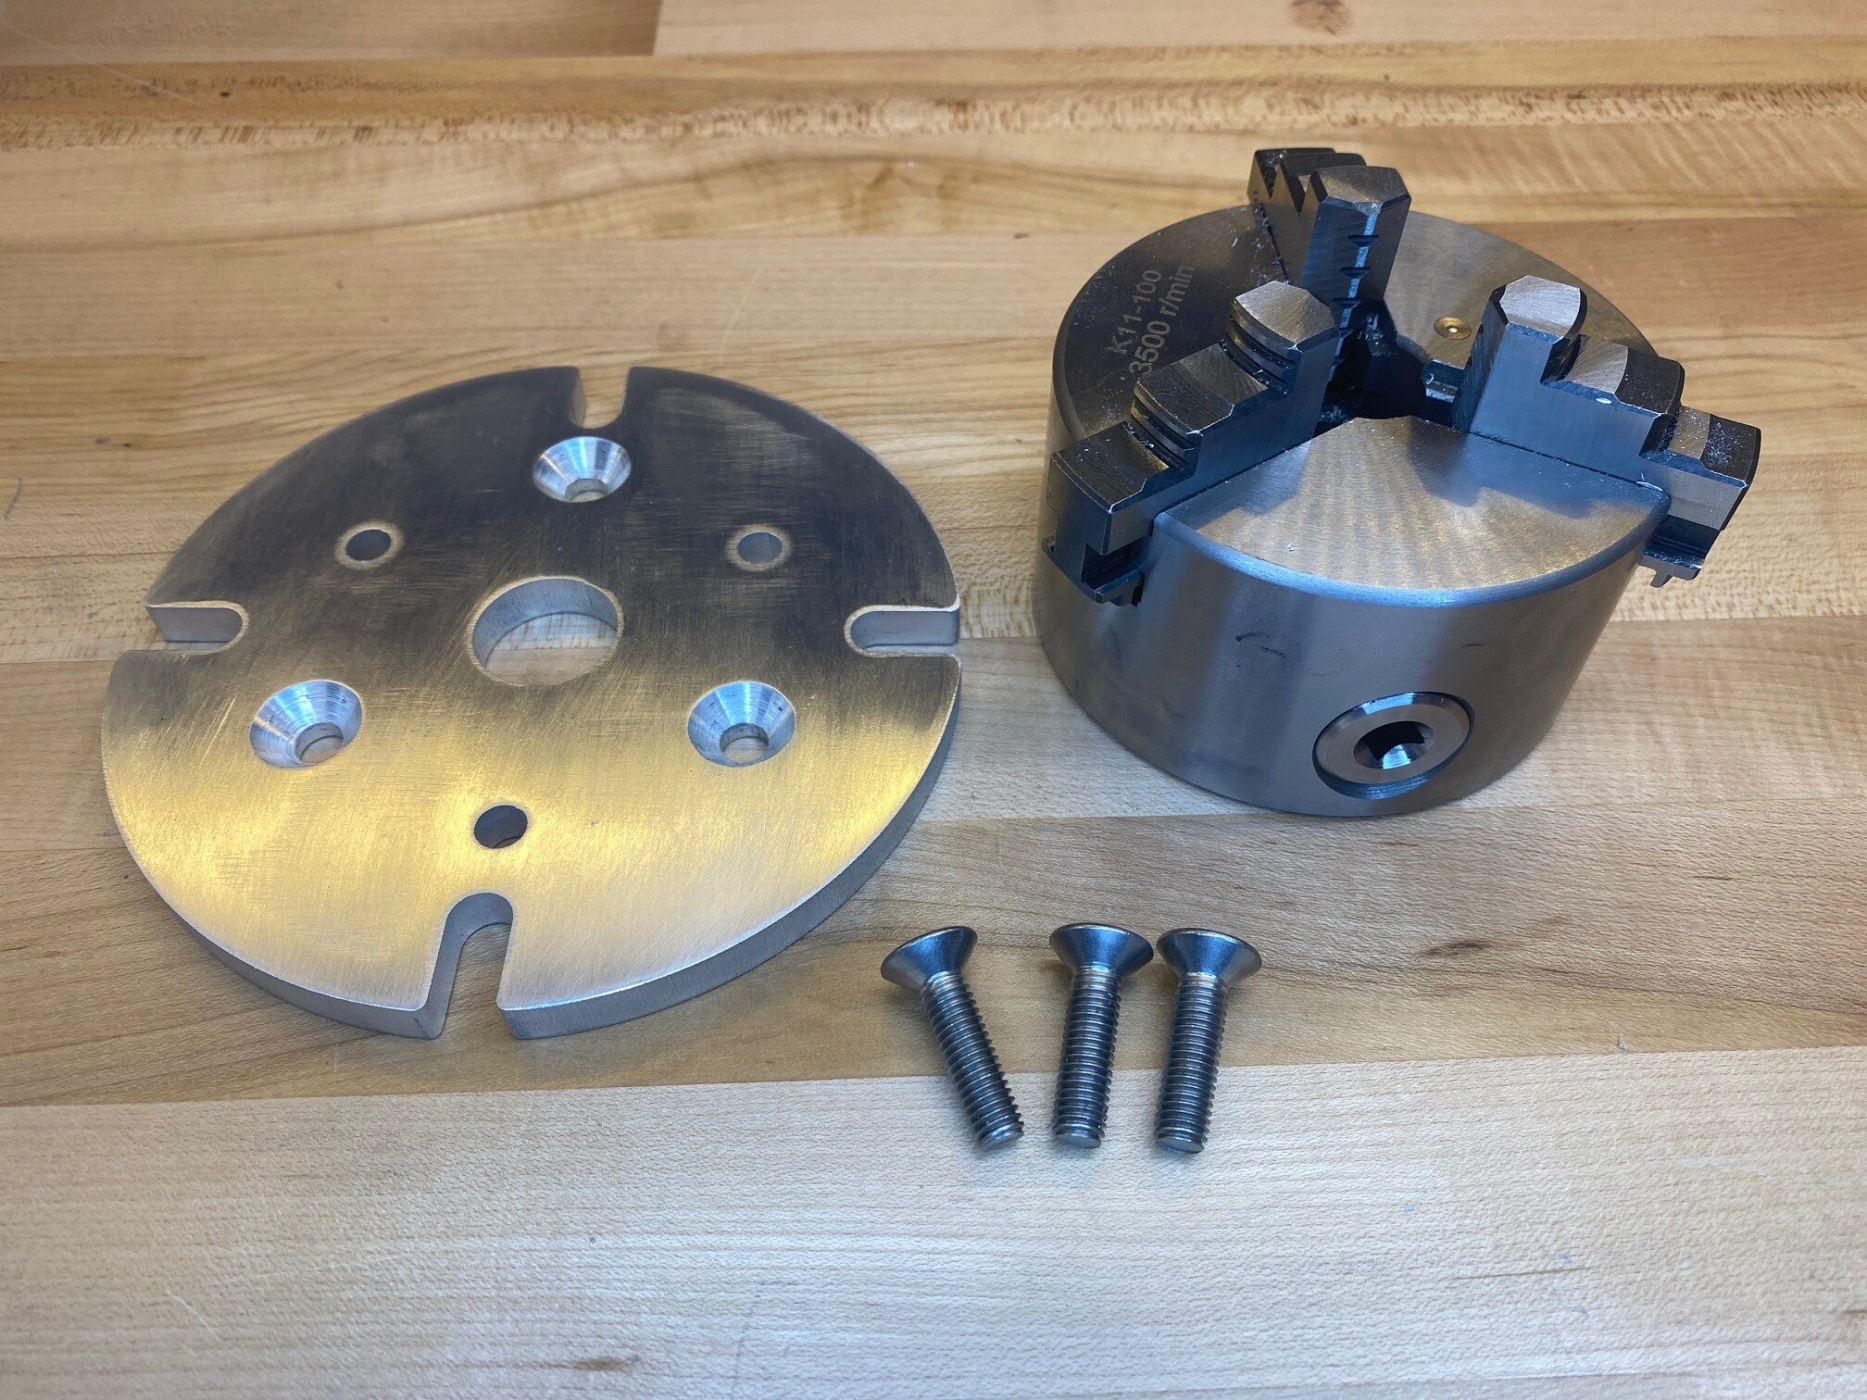
Custom mounting plate and three-jaw, self-centering chuck

Since the starter bracket has a large round opening the solution was to purchase a three-jaw self-centering chuck. To mount the chuck to the rotary table I fabricated a mounting plate from 3/8” aluminum and affixed it with three M10 flathead screws. To center the chuck on the rotary table I did the following:
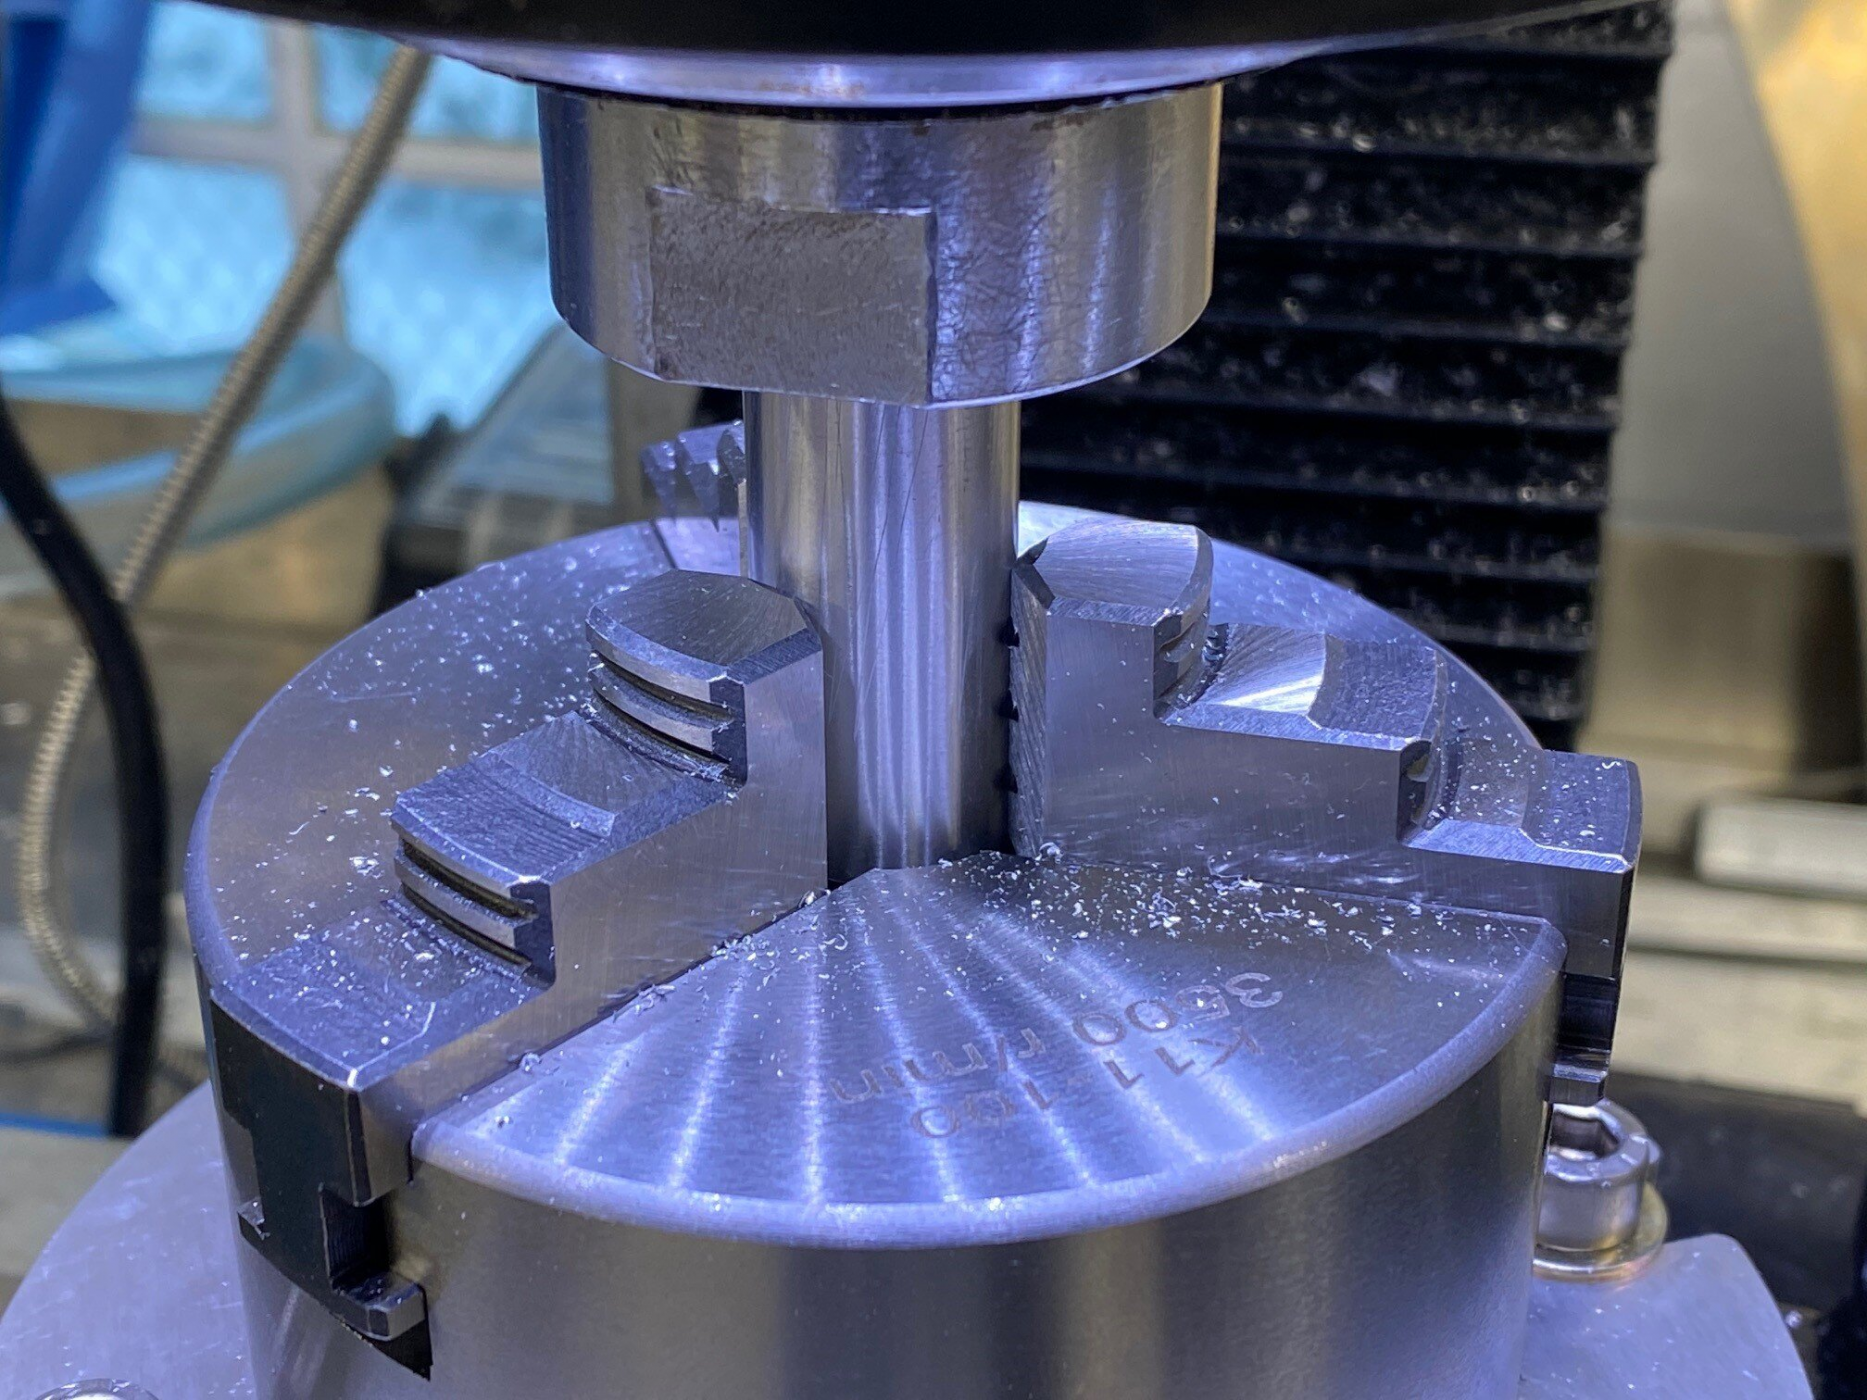
  • Mounted a precision-ground 3/4” stainless rod in the spindle with a 3/4” collet. The drill chuck isn’t as accurate.
  • Positioned the rotary table/chuck assembly under the rod and lined it up by eye.
  • Lowered the rod into the chuck.
  • Tightened the chuck on the rod. Since the adapter plate/chuck haven’t been bolted yet this perfectly centered the chuck on the rod.
  • Bolted the adapter plate to the rotary table.
  • Zero’d the DROs.
1608997806040.png

3/4” precision-ground stainless steel rod used to center the chuck on the rotary table

To indicate the hole circle I positioned the X-Y table such that a tight-tolerance drill bit could be plunged, with the machine off, into one of the existing holes via the quill. To ensure that everything was concentric I rotated the table 180 degrees and validated that I could plunge the bit into the opposite hole. I then determined that the new holes should be 31 degrees from the closest existing hole (the one in between had been welded closed).

Now that everything was fixtured and centered, it was time to stop fiddling and to make some chips so I:
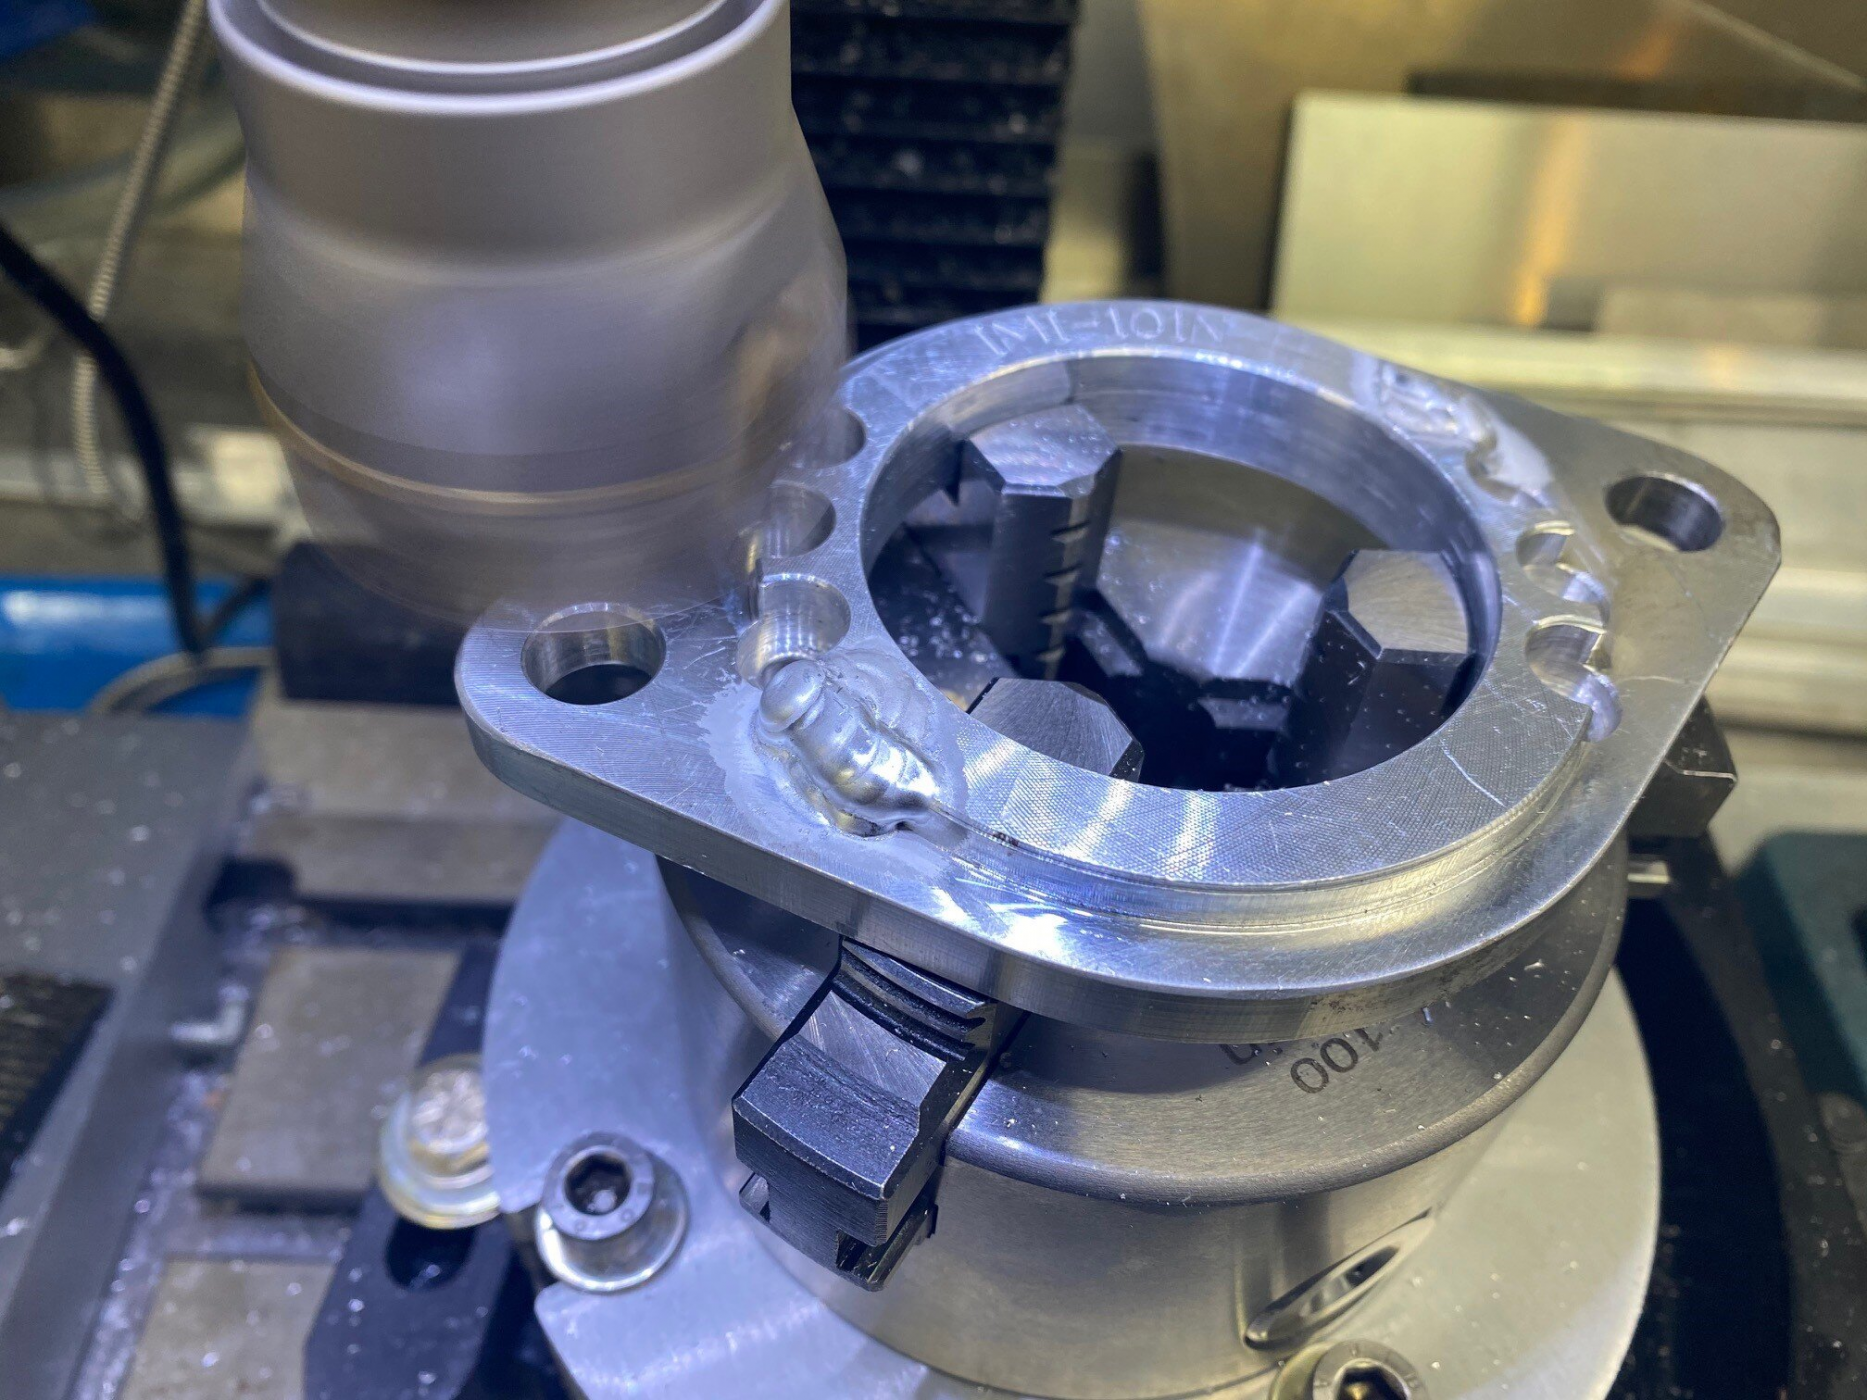
  1. Deeply countersunk the two rear holes to allow the weld to fully fill them.
  2. Welded the holes closed from both the front and back.
  3. Removed the excess weld beads:
    • Faced the back of the flange to ensure that it sits flat against the motor.
    • Faced the top of the shoulder to ensure that it sits flat against in the recess in the bell housing.
    • Machined the OD of the shoulder to ensure that it’s concentric with the hole in the bellhousing.
  4. Drilled the new holes from the back.
  5. Countersunk the new holes from the front so that the screw heads cleared the bell housing.
  6. Deburred all of the edges.
1608997334396.png

The back has been machined and the front is about to be be machined. The weld beads were intentionally large to ensure that the prior holes and countersinks were completely filled.
1608997375031.png

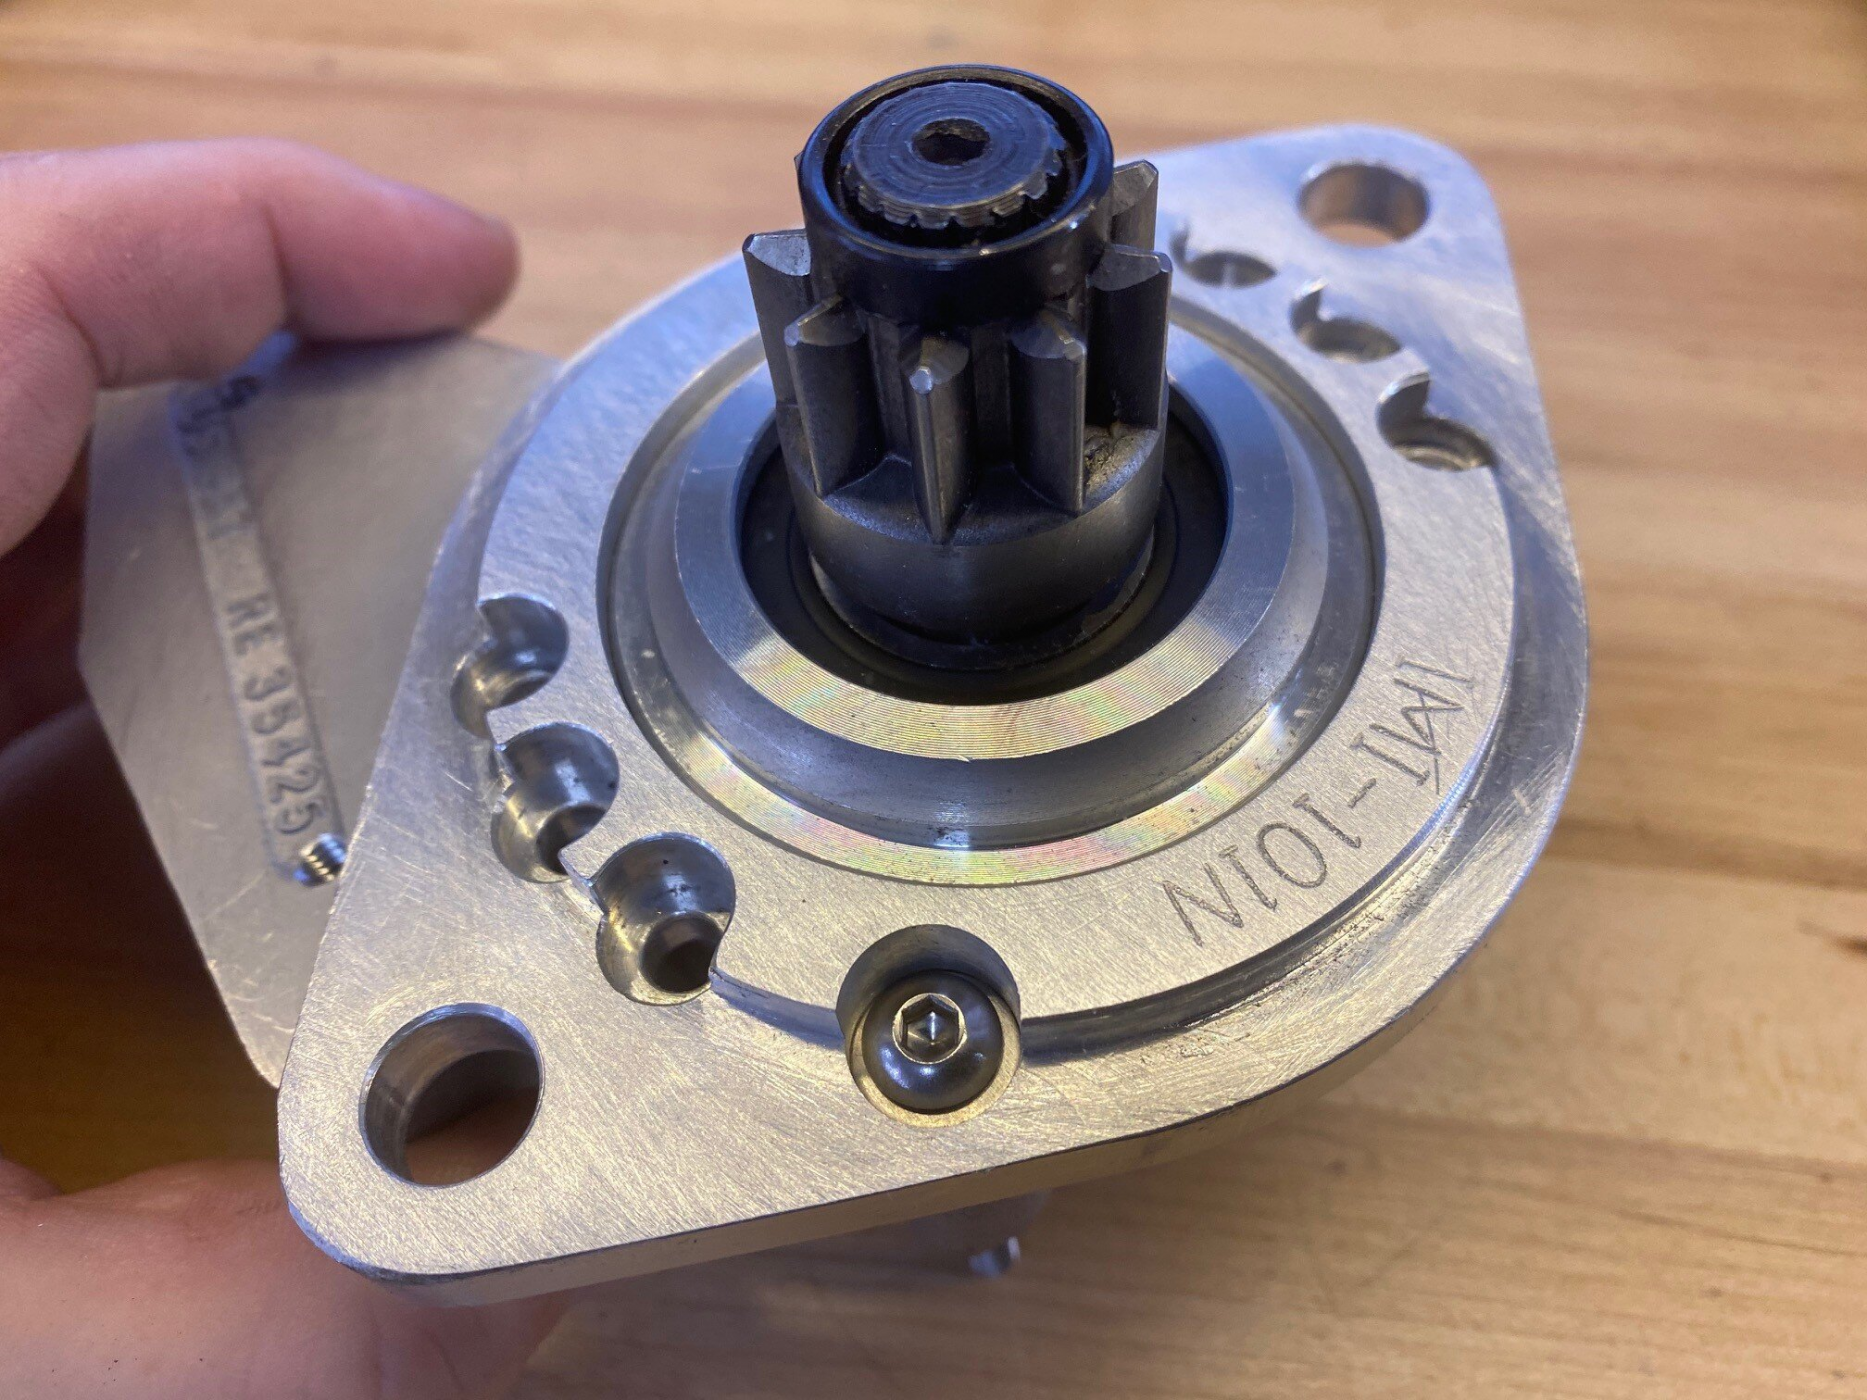
The new hole has a button head screw in it. The old hole and countersink were between it and the next hole, but you can’t tell they were even there which was the whole point of this exercise.

I wasn’t able to get the bracket on the starter once everything was done. WTF?… After a brief panic I realized that I didn’t machine the relevant surfaces. It was a tight fit before and the welding process must have slightly distorted things. Fortunately I had a flap sanding drum that perfectly fit the hole and with a little tweaking everything fit again.
 

Scott

Lifetime Supporter
I'm glad that a few of you guys appreciated the machining of the bracket. My wife wasn't impressed with drilling two holes LOL

The stock approach to mounting the drivetrain utilizes two solid motor mounts, two transaxle adapter plate brackets and, in some cases. a small hanger at the back of the rear chassis brace. While this cantilevered approach works fine, I’d rather have more than two or three mounting points.

Why? The monocoque tub is crazy stiff, but the rear section is a tube ladder without any diagonal bracing. In addition, the stock transaxle adapter plate brackets provide a lot of structure and I need to change them to make room for the merge collectors. Lastly, I don’t want any chance that the engine or transaxle would come free in a bad wreck.

Since the engine is hard mounted, I decided to utilize the transaxle as a stressed member with a total of nine mounting points:
  • A top bracket mounted to the back of the rear chassis brace, the same location that many builders add the aforementioned hanger. The bracket bolts to the transaxle’s billet bulkhead plate.
  • Four indexed tubes with rod ends that connect the top and bottom of the rear billet chassis pieces to the transaxle’s bulkhead plate. The tubes are configured in an “X” pattern which triangulates the gearbox on both sides. These replace the single tube on each side that connects the bottom of the billet piece to the underside of the rear chassis brace. While these stock tubes add some structure they have a very shallow angle (i.e., poor triangulation) to provide room for the standard location for the exhaust. The “X” pattern will significantly increase torsional rigidity in this area.
  • Four dog-bone brackets connecting the middle billet chassis pieces to the billet bellhousing. These replace the stock transaxle adapter brackets.
This approach is similar to how Agile Automotive builds their endurance SL-Cs. The first step is to fabricate a top bracket. This is complicated by the location of the rear sway bar and that my engine is in the stock location (Agile both lowers and slides the engine forward).

1611106024401.png

Rear chassis brace, sway bar and transaxle top bracket

As can be seen in the image above the solution was a removeable bracket that bridges the sway bar. The top and bottom plates are 3/16” 4130 and the side and back plates are 1/8” 4130. I considered recessing flat mounting plates into the top and bottom of the brace’s 1.5” round tube, but I realized that incorporating a 1.5” square tube with a 1/8” wall would be easier to fabricate and would increase the strength of the brace. In addition, the square tube projects beyond the round tube thereby reducing the distance that bracket needs to bridge over the sway bar. Three 4130 crush (I suppose anti crush would be more accurate) tubes are welded into both the rectangular mounting tube and the top bracket.


1611106072511.png

Top bracket (left) and square mounting tube (right), each with three crush tubes (purple)

1611106148359.png

The rectangular mounting tube (green) extends past the brace and reduces the distance that the bracket needs to bridge over the sway bar. Note that the sway bar brackets are too close to the center.

1611106180064.png

The rear chassis brace (shown upside down) has been cut to receive the square mounting tube. The two tabs marked with X’s will be removed.

1611106210218.png

Top bracket finished

1611106243982.png

Two half-inch spacers between the bottom of the bracket and transaxle’s bulkhead plate

The top bracket is finished and the sway bar brackets are welded. The next step is to fabricate four tubes and associated brackets that connect the top and bottom of the rear billet chassis pieces to the transaxle’s bulkhead plate.
 

Howard Jones

Supporter
What diameter ARB is that? I currently have a 3/4 dia 1/8 wall about the same length as yours and with about 6 inches of "arm" on them. I am leaning towards making a 5/8 diameter bar so I can use a slightly shorter arm on them with more adjustability. I would be interested in your method you used to calculate your ARB.

That is a very similar setup as mine and I find it works very well. Are you going to drive it off the bell crank?


By the way. I am currently pondering the decision as to whether to buy a mill or a lathe first?


or maybe second when I can afford it


What do you think?
 
Last edited:

Joel K

Supporter
What diameter ARB is that? I currently have a 3/4 dia 1/8 wall about the same length as yours and with about 6 inches of "arm" on them. I am leaning towards making a 5/8 diameter bar so I can use a slightly shorter arm on them with more adjustability. I would be interested in your method you used to calculate your ARB.

That is a very similar setup as mine and I find it works very well. Are you going to drive it off the bell crank?


By the way. I am currently pondering the decision as to whether to buy a mill or a lathe first?


or maybe second when I can afford it


What do you think?

Hi Howard,

I guess depends what type of parts you will be primarily making. If you add a rotary table many items you would use a lathe for you could make with a Mill with a powered rotary table.

I have a mini mill and small rotary table and have made some nice parts although a more powerful and precise setup is recommended over what I have.

I will say, working the mill is a lot of fun.
 

Scott

Lifetime Supporter
Howard,

I purchased the sway bars from Agile Automotive. They are the same as the ones used on their endurance SL-Cs. The bar diameter and arm length are not relevant to your type of setup. As you are aware, with a fixed-arm setup like yours the bar is a torsion spring. My setup utilizes a cockpit adjustable blade which acts as the spring. My understanding is that Agile used the formulas in Race Car Vehicle Dynamics by Milliken to calculate the ideal bar size and then they increased it by an order of magnitude to ensure that the only spring in the system was the blade. So, the design objective of my bar is the exact opposite of yours.

I will connect the sway bar links to the bell cranks. The bell crank bolt is ½” and a ½” rod end is overkill, so my plan is to machine a ½” shoulder bolt to fit a 3/8” rod end… a good opportunity to use my new lathe.

The choice between a lathe and a mill is tough. It depends on what you think you want to make and if you have a friend that has one or the other that you could use. As Joel pointed out, a rotary table enables you to do some lathe-type operations on the mill.

I bought my mill first and I’m glad that I did. If you get a mill, make sure that you get a three-axis DRO. They are incredibly useful and very affordable these days. For example, I’m always surprised that even when I use layout dye to scribe lines and carefully centerpunch and line up the drill bit, my hole locations aren’t perfect. Now I just use the DRO with no center punching and the hole locations are perfect! I drilled the three holes in the rectangular transaxle mount in the previous post this way. They lined up perfectly with the laser-cut holes in the top and bottom plate.

If you get a mill, get the preinstalled DROs. You’ll also want to get a set of short drill bits. Keep in mind that the Z-axis distance is the distance between the table and the spindle. It’s kind of like looking at a SL-C’s engine compartment before the engine and transaxle are mounted. It looks like you have lots of room and then you wonder where it all went. It’s intuitive that the vice will consume vertical space. However, what surprised me is that the drill chuck extends well below the spindle and consumes a fair amount of vertical space and that’s before you put a drill bit in. Even if a standard-length drill bit would fit, you’ll spend a lot more effort cranking the z-axis up and down when you’re swapping between drilling and milling operations. In addition, the short bits deflect less.

I’ve been pleased with my Precision Mathews mill and I was 50/50 on purchasing a Little Machine Shop 8.5 x 20 lathe or the Precision Mathews 10 x 22 lathe. I think both are really good lathes for a garage. I went with the LMS because I didn’t want to wait for two months for the PM. IMO the PM 10 x 22/30 is the best option so long as you can get the extra 140 pounds on the stand/bench. As you can see below both of my machines are on a bench. This works great because I don’t lose any storage. However, I couldn’t use an engine lift because the legs won’t go under the bench.

IMG_asdfadsf.jpg


There are lots of videos on the internet. I found these ones from blondihacks very useful.

Generic Lathe Buying Guide:

Her lathe tutorial series is the best I’ve seen for a newbe. I haven’t looked at her milling tutorial, but I wish that I had known about it when I bought the mill.
 

Scott

Lifetime Supporter
Five of the nine transaxle mounting points connect to the bulkhead plate, a one inch thick piece of 6061 billet. The top bracket completed in a previous post connects to the top of the plate. The next step is to fabricate four tubes and associated brackets to connect the sides of the bulkhead plate to the top and bottom of the billet chassis pieces. This creates an “X” pattern that triangulates both sides of the transaxle and essentially cross braces the opposite corners of the trapezoid at the rear of the chassis.

The brackets that mount to side of the bulkhead plate are fabricated from three pieces of 1/8” 4130.

1611544768388.png

Transaxle bulkhead plate bracket. Misalignment washers are not shown.

1611544916139.png

The transaxle bulkhead plate bracket is finished. Note that the outer third is discolored from welding. Ignore the mixture of bolts which were used for mocking.

The larger challenge was designing brackets that attach to the top and bottom of the chassis billet pieces. Specifically, they need to be located aft of the billet pieces to clear the sway bar blades and to better align with the transaxle’s bulkhead plate. In addition, I plan to fabricate a 1” OD tube frame that supports the wing, exhaust, transaxle cooler, tail hinges, air jack connector and diffuser while also providing protection should I be rear ended. It makes sense to combine the brackets for the links with the mounting points for the rear frame. This was accomplished with a combination of 1/8” and 3/8” 4130. Both the upper and lower bracket utilize the stock suspension bracket’s mounting screws as well as the bolt for the control arm’s rod end. The upper bracket additionally utilizes the two screws that mount the rear shock mounting plate.

1611544972107.png

Multiple views of the left billet chassis piece and the upper and lower brackets. 3/16” 4130 plate (purple), 1/8” 4130 plate (green), 0.120” x 1” 4130 tube (orange). The orange tube shows the starting point of the the rear frame.

1611545020609.png

The “X” pattern triangulates that transaxle’s bulkhead plate between the top and bottom of the chassis billet pieces. This adds torsional rigidity.

1611545485378.png

Note: the brackets utilize the bolts in the control arm rod end, hex nuts are welded on the tubes and the large holes will be filled with the 1” OD tube frame.

Given that several parts of each bracket intersect at a 90-degree angle it made sense to use tabs and slots. Interestingly, the stock tail hinges which the lower brackets replace have two tabs and slots. Bob Wind forwarded me Experimental optimization of tab and slot plug welding method suitable for unique lightweight frame structures. It’s geared towards structures where the exposed ends of the tabs are plug welded without the need to fillet weld the edges of the parts. The primary reason that I used tabs and slots was to locate the parts and keep them from warping when welded.

The biggest take away from the paper are some of the differences between aluminum and steel. In both cases the tabs should be twice as long as the thickness of the material. Furthermore the inside corners of both the tabs and slots should be relived with a radius less than or equal to 0.5mm. This makes sense for several reasons; the mating corners won’t bind, there are no stress risers and I assume that it facilitates weld penetration. They further recommend tab spacing to be 30-100mm.

1611545170635.png


The primary difference between steel and aluminum is the optimal height of the tab (i.e., how far it sticks into or beyond the slot) as shown in the above image which was copied from the article. Steel tabs are strongest are when they are flush with the top of the slot. Grinding the weld flush for aesthetic reasons has little to no impact on strength. So the strongest looks the best — how often does that happen?

Aluminum is a different animal. The strongest is when the tabs stick 1 mm beyond the top of the slots with a 45-degree chamfer which doesn’t look great. Grinding them flush reduces strength by approximately 30%. So if Bob’s tabs are aesthetically pleasing you’ll know that he chose beauty over science LOL

1611545208436.png

My slot geometry (left) and tab geometry (right)

The image above shows my interpretation of how to relieve the corners. I created a reusable “block” in Solidworks for both a tab and a slot so that I can simply position the profile onto a solid and do an extruded cut wherever I need. If I update a block it will ripple to multiple tabs on multiple parts.

1611545284901.png

Stock hex nut (left) and machined nut (right)

The links are made from 4130 tube. Since they aren’t solid I couldn’t machine wrench flats into them so I welded hex nuts on them. While I could have used a nut whose ID fit over the tube, that would be bulky. Instead I drilled the interior of a smaller nut. This could have been easily done on a drill press or a mill, but I used a lathe because there is no need to line anything up. Just chuck it up and go.

The next step is to fabricate four dog-bone brackets that connect the billet chassis pieces to the bell housing.
 

Scott

Lifetime Supporter
Thanks for the compliments. Mesa, I think your car is already on some walls!

I forgot to mention a couple of things regarding the tabs and slots in my prior post. I found that adding a 0.005” gap around the tab works well. In other words, I make the slots 0.010” longer and wider than the tabs. My Wazer's kerf is too large to support the corner relief geometry. A high-end water jet would probably work, but the 0.5 mm radius lends itself to laser cutting.
 

Scott

Lifetime Supporter
I purchased remote water pump adapters with -12 O-ring boss (ORB) ports, but the AN fittings projected well into the supercharger belt. I had a ORB to AN adapter to mount a 90-degree AN fitting and stacking the two took a lot space. A tight-radius AN fitting might have provided enough clearance, but it would add a lot of restriction. After a little research, I found the perfect fitting; ORB-to-AN, low-profile, swivel, swept radius 90-degree. That said, the new fittings still didn’t fit so I milled 1/4” off of the back of the adapters.

1612030725907.png

Back of adapter being milled

1612030793362.png

Stock adapter (left), machined adapter (right) and a -12 ORB 90-degree swivel clamshell fitting (top)

1612030854318.png

Left remote water pump adapter with two -12 ORB ports. The large chamfers accommodate the O-rings.

1612030890112.png

Machined adapters and clamshell fittings installed. The top is the outlet and the bottom is the inlet. This allows air bubbles to flow upwards and out.
 

Scott

Lifetime Supporter
1612665619588.png

Misleading dimensioned drawing of the A/C compressor (left) and version 1.1 of the front accessory plate (right)

It took me a little while to figure out why the plywood mocking brackets in a previous post didn’t fit the A/C compressor properly. CAD mistake? Error exporting the file? Laser cutting error? Nope, nope and nope. If you look at the dimensioned drawing above, you’ll note that the distance between the two mounting points is 5.787”. I assumed that the shaft would be located midway between those points, but if you look closely you’ll note that the left mounting point is further from the shaft. Vintage Air should have split that dimension into two to make the nuance clear and not require someone to figure it out what the dimensions are! If anyone else is making a bracket, the left dimension is 3.030” and the right is 2.757”.

After installing the engine with the plywood brackets I realized that I needed to tweak the orientation of compressor. I had oriented its ports horizontally so that they pointed directly at the tubes in the side pods. After mocking the flex lines I realized that they would be straight and wouldn’t have slack to actually flex. So I rotated the compressor 10 degrees counterclockwise (red line in image above) to create a slight arc and some slack in the lines.

The next step was to finalize the gap between the front and rear mounting plates which had been cut from 1/4” mild steel. The A/C compressor has a clutch that’s integrated into the pulley which means that you can’t just swap or shim the pulley to align it. So in terms of front-to-back alignment, it has to go where it wants to go. I bolted the compressor to the front mounting plate and aligned it’s pully with the accessory pulley mounted to the front of the super damper. This determined that the front plate needed to be 3.650” in front of the rear plate. Now that the distance was set between the front and rear plates I looked for aluminum spacers that I could trim to size for the M10 screws that go into the block. I wasn’t able to find any that were long enough, so I fabricated five of them from 20 mm 6061 rod.

The required through hole is fairly deep. When hole depth reaches 4x hole diameter, you should “peck” drill. It’s a simple process where you drill a little ways into the material (the peck distance), withdraw some distance to evacuate the chips from the bore, and then plunge again to take another peck. The motion is not dissimilar to a woodpecker. When the depth exceeds 8x the diameter you want to use a parabolic-flute drill bit. Parabolic flutes have a flute geometry with a faster/wider spiral that improves chip extraction vs. a standard twist drill. So I ordered a10mm parabolic drill bit from McMaster.

I used my lathe to cut, face and drill the rod. I withdrew the bit all of the way on each peck and used a brush to clear the chips from the spiral and to apply some cutting fluid.

1612665856771.png


The compressor’s rear tabs have flanged steel bushings which hit the rear plate so I knocked them out with a hammer and punch. This left a gap between the mounting tabs and the rear plate. After measuring the gap I realized that it was only 0.020” more than the flange on the bushing. So I ordered 0.020” stainless steel shims from McMaster. I then slipped the shims over the bushings and knocked them all of the way in. This is a perfect solution because the sleeves capture the shims — the last thing that I need are two more small things to lose.

Not so fast. When I tapped the bushings all of the way they protruded past the other side of the mounting tabs which prevented the nylocs from binding on the mounting tabs. So I knocked the bushings out again, trimmed them and knocked them in again.

1612665881074.png

Modified bushing (left), stock bushing (right) and stainless steel shims (top)

1612665900694.png

A/C compressor installed between the front and rear mounting plates. The brushed cylinder is one of the custom spacers that I fabricated on the lathe. If you look closely at the rear mounting tab with a “C” on it, you’ll see the shim and the bushing’s flange pinched between it and the rear plate.

As far as I can tell, the compressor pulley is within 2-3 thousands of the drive pulley. Next up is the alternator, the automatic tensioner and another version of the mounting plates.
 

Scott

Lifetime Supporter
1613159768330.png


This post is about making some “man glitter” while adding a little bling to serpentine system. I’m not interested in having a hotrod-style serpentine system with chromed covers on everything, but the A/C compressor’s clutch is coyote ugly. I spent a couple of nights searching for a cover, but I couldn’t find one. I finally called Vintage Air and was informed that it’s listed in the print catalog, but not in their web shop. If anyone wants one, the part number for the plain aluminum is 04407-MCA.

While the cover is nicer than the clutch, it’s pretty plain. So I decided to machine some holes in it to give it a little visual interest and reduce weight. This also gave me a good excuse to use the rotary table. One way to think of “occasional” tools is the CapEx per part made (mistakes don’t count LOL). So, a second part cuts that number for the rotary table in half and it helps the milling machine number as well.

1613159793201.png

These were the lightest fluffiest chips I’ve made. The man glitter went everywhere and took a while to clean up. My wife gets upset when this stuff makes it to the sofa so I had to vacuum all of my cloths and hair.

My 3-jaw chuck wasn’t large enough to grab the cover on the OD, so I needed to use the interior jaws to grab it from it’s ID. Because the cover has a profile and the jaws are stepped, I wasn’t sure if the end mill would hit the jaws. I placed a lump of clay on one of the jaws and pushed the cover in place which indicated that I had enough clearance. I aligned the table and chuck per my previous post, loaded a 3/4” end mill, moved the Y-axis to what looked good, locked the milling machine’s X and Y axes, locked the rotary table, and plunged with the z axis. I then rotated the table 60 degrees and plunged again. I repeated that four more times for a total of six holes. The rotary table makes this type of operation easy.

I just need to finish brushing it. Hopefully the A/C compressor is done until it’s time to fabricate the lines.

1613159846051.png
 

Scott

Lifetime Supporter
I’ve been looking for a tensioner for the supercharger for a while. The primary issue is that no one provides any dimensions or specs. Even the aftermarket suppliers only indicate car compatible and something like “50% higher spring rate that he OEM version.” So I had to purchase multiple tensioners to figure out what would work. The requirements were:
  • Automatic; spring loaded
  • Designed for high-HP supercharged engine
  • Clockwise rotation when pulley is located above the body
  • Fits my application
1613488690723.png

1613488730843.png

From left to right: LS7, LS9, LSA and Hellcat

The OEM LS7 tensioner is what was provided in the Harrop supercharger package and it’s a joke for a high-HP supercharged engine. The LS9 tensioner, like a U.K. power plug, is comically large whereas the LSA is a reasonable size. However, both the LS9 and LSA tensioners would require me to orient the body above the pulley which won’t work in my application. After running out of LSx options I tried a Hellcat tensioner. It meets all of the criteria and it’s used on Challenger SRT Demon which, at 808 HP, has the highest HP of the lot.

I then upgraded to a Hellcat racing tensioner from American Racing Solutions, so that’s a total of five tensioners LOL. It’s almost a pound lighter due to the pulley being billet aluminum vs. steel and the spring tension is almost double.

1613488795029.png

Hellcat OEM tensioner (left) and American Racing Solutions aftermarket tensioner (right)

1613488826554.png

Note the flat black spring sticking out of the top of the OEM tensioner (left) vs. the large round silver spring sticking out of the middle of the ARS tensioner (right)

I also upgraded to their ceramic silicon nitride ball bearing option. According to their website, they have the following advantages over steel bearings:
  • 40% less weight
  • 35% less thermal expansion
  • 50% percent less thermal conductivity
  • Greater hardness resulting in at least 10x greater ball life
  • Non-corrosive
This reduces centrifugal loading and skidding, so they can operate up to 50% faster than conventional bearings. This is important in my application because I’m going to run a massive super damper which will result in a higher pulley speed, more about that later. The next step is to fabricate a custom bracket.
 
A large damper pulley allows the option of running a larger blower pulley, which will make for lower traction demand on that pulley. This makes it less likely the belt will slip. Unfortunately, this also increases the belt speed which relates to the following paragraph.

Nice to be able to find that tensioner. Bearing speed will be a concern if you believe the speed rating on any conventional bearing set, nothing in the 1.25-ish dia out there is rated high enough RPM to work on a front drive pulley system. Which begs the question what do OEM bearings look like? Do they just incorporate larger dia idler pulleys to slow the bearing speed down? I tried ceramic bearings on my front drive system, they failed almost immediately. Replaced them with high quality steel and things are fine so far.... Also my tensioner is manual and because I have an 8 rib belt it requires a tighter belt/higher constant load (vs 10 rib) on the bearings relative to a spring tensioned setup.
 

Scott

Lifetime Supporter
Mesa,

You are absolutely correct that increased belt and pulley speed could be an issue. The only load on the supercharger belt is the supercharger so I don't have any issues with water pump or accessory speed. I also kept the tensioner and idler pulley sizes reasonably large to reduce RPMs (see table below).

1613584725006.png

The ceramic bearings are rated to 25,500 RPMs and the highest bearing speed is 23,707 RPMs which is 93% of the rated speed. While it would be nice to have more than 7% headroom keep in mind that the car has a lot of power:

RPM............Torque (lb-ft)................HP
2,000................860.2 .........................327.6
4,000..............1,018.3..........................755.2
6,500 ................799.9...........................990.3 (500 RPM below redline)

My point being is that I can't be at the redline for long so the 7% headroom should suffice. The bearings are a $150 upgrade over the steel bearings and they also sell standalone pulleys here.
 
Back
Top