Scotland Tornado

Hi Brett,
The simple answer is that I don't know what Andy did to the car to get it through the IVA, and to be honest I didn't really care as long as he got it through. He made a number of changes to the car before the IVA, and then removed them after the IVA before the car was collected and returned to me. What I can tell you is that the car definitely did not have a Cat 1 alarm when I sent it down to Tornado for its IVA.
Thanks
Ian
 
I was looking for a tool wrap to keep some useful tools in the car, not that I'm planning on the car going wrong, but you never know! I found a supplier on ebay who was able to run off a few GT40 ones. There's a few left if anyone is interested....
 

Attachments

  • tool wrap.jpg
    tool wrap.jpg
    250.8 KB · Views: 558
  • tool wrap2.jpg
    tool wrap2.jpg
    248.4 KB · Views: 470
The car has just been delivered back from Ricky Gauld Performance Tuning. He has just tuned the car, set up the carbs, and he has set the ride height and the wheel alignment, plus he has done a double check to make sure the car is safe. Now that the car is tuned properly, it is sounding awesome, can't wait to get it on the road.

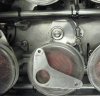
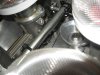
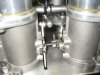
I'm still having problems with a sticky throttle and all attempts to solve the problem have only resulted in minor improvements. For anyone that's interested, the bellcrank bolt does indeed have a retaining nut below the manifold (previous advise suggested it did not, but I can assure you it does) and attempts to remove the bolt will release the nut below the bellcrank assembly requiring the entire manifold to be removed! All is not lost yet as there is engine fabricator not far from me and he is going to take a look and maybe fabricate an alternative bellcrank/throttle assembly.

Also, I did have a squealing noise from the gearbox/engine, and it was thought that this maybe a bad release bearing. However it turns out that it was a squealing belt, plus the noise from the bronze spigot bearing on the flywheel. The belt was tightened properly, and the noise gas disappeared. The spigot bearing squeals occasionally, but this will disappear over time.

I still have a leak on the drive shaft split pins, and I have tried to stop this using blobs of RTV after having dried each end with Acetone. It has improved, but not stopped the leak on two ends. Any suggestions from others out there?

This weekend, I took a few photos and next plan to take these into a few autosprayers to get quotes for preparing and painting the car. My plan is to have this done by mid/late April. I attach the photos of the car, parked beside my other toy which I had out today as we were basking in sunshine here!
 

Attachments

  • DSCF0734[1].jpg
    DSCF0734[1].jpg
    291.3 KB · Views: 575
  • DSCF0735[1].jpg
    DSCF0735[1].jpg
    299 KB · Views: 534
  • DSCF0737[1].jpg
    DSCF0737[1].jpg
    217.1 KB · Views: 496
  • DSCF0740[1].jpg
    DSCF0740[1].jpg
    311.5 KB · Views: 623
Ian, I would highly recommend having a chat with Philip Greig at Kirkton Motor Body Works in Banchory. Phil carried out a full bare shell restoration and respray on my son's 1991 Classic Mini and the paint finish is absolutely superb. He's been in the paint spraying business a long time and has very high standards. As well as doing insurance work and 'run of the mill' jobs he really enjoys tackling something out of the ordinary including bikes, motorhomes, you name it.

My lad's Mini is at his place at the moment having a little repair after a minor bump so you could see for yourself what Phil is capable of.
 

Attachments

  • 9136544993_2d26abb9cb_o.jpg
    9136544993_2d26abb9cb_o.jpg
    478.4 KB · Views: 386
  • 9136545949_b326fbb310_o.jpg
    9136545949_b326fbb310_o.jpg
    491.3 KB · Views: 460

Ian Anderson

Lifetime Supporter
I still have a leak on the drive shaft split pins, and I have tried to stop this using blobs of RTV after having dried each end with Acetone. It has improved, but not stopped the leak on two ends. Any suggestions from others out there?
!

I believe the way is to fill it with silicone sealer until it comes out the other end of the roll pin.

I also added a wrap of insulation tape around the cv adaptors covering the holes and not a drop now

Ian
 
Ian, would love to hear/see a video of the noise your baby is making now! If it is gearbox oil on the inner adapters, this you could try IanA's suggestion, I spotted my leaks (plural) early on and took a sledgehammer to them and welded inserts, see:-

http://www.gt40s.com/forum/gt40-bui...ld-belfast-northern-ireland-2.html#post406196

When an area gets contaminated with oil, it can be difficult to get a sealant to take. I drained the oil down a bit and cleaned the box output shafts and the roll pin holes with cotton bud and a degreasers to remove all the oil, squeezed in sealant, inserted the roll pin and sealed the outside like IanA suggested.
 

Dave Bilyk

Dave Bilyk
Supporter
Ian B, additionally, I had to fit a slightly smaller diameter roll pin, as they kept breaking, I don't think the holes line up that well. That means more RTV and a better seal so it's all good. Blobs at the end wont work, as Ian A says you need to fill the whole thing from one end to the other.

Dave
 
I have now fabricated a new throttle assembly that will hopefully improve the sticky throttle as the standard Tornado set up is for a Holley carburettor rather than Weber IDF's. I may have also have to slightly modify the pedal arrangement too but I'll see how I get on with the current change. I also fitted a battery kill switch with a pull lever inside the cabin. A few weeks ago I also fitted a reverse lock out mechanism to the gear lever.

I checked with Kirkton autobody but they needed 1 year to clear the current 3 cars he has on his books! So the car is booked in with Kintore autobody and car restoration. I have been taking everything off the car in readiness. They will start the car in 2 weeks time and they expect about 4-6 weeks to complete. This weekend we were in their shop sorting the colour scheme. They are going to paint up a large board with the choices plus the stripe so I can decide which way to go.
 

Attachments

  • DSCF0752[1].jpg
    DSCF0752[1].jpg
    239.3 KB · Views: 586
  • DSCF0753[1].jpg
    DSCF0753[1].jpg
    170.7 KB · Views: 568
  • DSCF0755[1].jpg
    DSCF0755[1].jpg
    170.7 KB · Views: 597
  • DSCF0760[1].jpg
    DSCF0760[1].jpg
    127.1 KB · Views: 609
  • DSCF0759[1].jpg
    DSCF0759[1].jpg
    225.6 KB · Views: 593
Hi Ian

I changed the bell-crank lever to a capstan type that gives a constant pull lever radius on a set up like this.
With the lever , as the pull goes toward max the efective radius of the lever reduces , with the pull round the capstan groove the leverage remains constant. Result was more progressive and proportional action
Not easy to get a good picture hope these help.

Regards

Stephen
 

Attachments

  • IMG_0930LR.jpg
    IMG_0930LR.jpg
    58.4 KB · Views: 508
  • IMG_0931L.jpg
    IMG_0931L.jpg
    36.4 KB · Views: 443
  • IMG_0932L.jpg
    IMG_0932L.jpg
    32.9 KB · Views: 469
  • IMG_0933L.jpg
    IMG_0933L.jpg
    35.9 KB · Views: 460
I am fitting an AFFF extinguisher hand held inside the car. I was also thinking about fitting a plumbed in system inside the engine bay locating the extinguisher on the diagonal brace to the side of the gearbox activated by a pull cable from inside the car. However I believe that these cylinders are only good for about 60degC or so and with a hot engine bay I would be worried that it may rupture. Is this a real concern, have others fitted AFFF systems inside the engine bay with no issues?
Thanks
 
How about fixing a slim unit in front of the passenger seat and then plumbing back into the engine bay? That is what I may try to do when the time comes.

Brett
 
Keith, the electrical connector is a 'belt and braces' to keep the throttle cable from slipping. I've not yet finalised the sticky throttle issue, when I have the electrical connector will be removed and replaced with something more aesthetic.

Brett, putting the cylinder in front of the passenger seat would be OK, but to be honest, I'd rather not put it there. Its going to be hard enough convincing my wife to get in the car as it is; a fire extinguisher bottle right under her legs wont help the cause!

I'd like to try and get the extinguisher in the engine bay but am concerned it may be too hot?

Ian
 
Ian, I only ask as the bodies of the electrical connectors are quite thin and have seen many a cracked one along the way.

Can I suggest (going by your pic of the throttle), that the initial angle of the cable wrt the point where it mates with the bracket would be better to be at or about 90 deg. It also appears that when the throttle is sitting in the initial position pictured, the pivot point has gone too far back and then the pedal depressed and cable pulled you will get initial resistance as the lever has gone back and decreased the angle well below 90.

You also have an angle where the cable enters the sleeve, better not to have this, it is always a compromise as the entry angle changes as the pivot lever moves round.

One poss solution is to move the main lever pivot down, shown in green, this will solve both angle issues. K
 

Attachments

  • Angle.jpg
    Angle.jpg
    140.9 KB · Views: 468
I am fitting an AFFF extinguisher hand held inside the car. I was also thinking about fitting a plumbed in system inside the engine bay locating the extinguisher on the diagonal brace to the side of the gearbox activated by a pull cable from inside the car. However I believe that these cylinders are only good for about 60degC or so and with a hot engine bay I would be worried that it may rupture. Is this a real concern, have others fitted AFFF systems inside the engine bay with no issues?
Thanks

Hello Ian,

Remember, there is an ideal spot on right sill aft of your fuel pumps.

I was going to put a tool compartment there on 875 but never got round to it.

I believe there is enough room under the top plate to perhaps cut a hole large enough to drop a bottle in.

Airflow from the rear clip side scoop also flows right at this area.

Take a look.

Cheers,
Scott
 
Thanks for the suggestions. I played around with the throttle cabling this weekend, moved the angle of the carb pulley, eliminated the kink in the cable etc, etc. It has improved the sticky throttle a little, but its still pretty stiff. I'll haver to play around with some other mods, perhaps around the foot pedal too to get a bit more leverage. Has anyone out there fitted a drive-by-wire throttle/pedal, I'm seriously thinking about going down that route?

Fitting the extinguisher where you suggest Scott, maybe possible, but it is a little tight due to the roll over bar rear brace. It could be done I guess with some panel mods.

Anyway, the car went off to the Autobody shop on Saturday; getting the body work and the paint job done. It will take around 4-6 weeks to complete. Meantime, this weekend, I did the borders around the windows and the front lenses.
 

Attachments

  • DSCF0762[1].jpg
    DSCF0762[1].jpg
    139.2 KB · Views: 463
  • DSCF0763[1].jpg
    DSCF0763[1].jpg
    203.2 KB · Views: 449
Ian,

Yes the brace is there but it can unbolted and reinstalled after a firex is installed. It is a good spot really, and if you have to use it you will not be concerned by its location, LOL!

Now that I think of it Ian, I removed all four individual IDF throttle shaft return springs, 1 on each carb. I substituted them for 1 common return spring that back drove the shafts closed through the linkage set up. This spring was one like you would use on a Holley or Eddie carb. I initially had reservations of doing this but it worked out great. Just a thought for you to consider.

Can't wait to see her painted. Can you tell us what she will look like or is it top secret?

Cheers,
Scott
 
Back
Top