
- Forums
- GT40 Replica Manufacturers' Corner
- RCR Forum - RCR40/SLC/917/Superlite Aero
- The SLC Clubhouse
You are using an out of date browser. It may not display this or other websites correctly.
You should upgrade or use an alternative browser.
You should upgrade or use an alternative browser.
SLC 001 Build
- Thread starter Mesa
- Start date
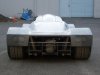
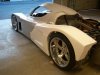
Next time your taking pictures, could you get a shot of the car directly from the rear with the bodywork on? I would like to see a pic that shows off the width of those tires and how they work with the rear bodywork.
Brian Hamilton
I'm on the verge of touching myself inappropriatel
But one of my favorites Rob!
+1
I'm an ass man myself. LOL
What color are you going to paint this beast again?
That looks effin great!
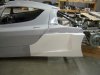
I love your rear duct treatment, particularly how the top and bottom follow existing lines on the car and the radiused leading and trailing edges follow the wheel arch, matching the front.
Few questions though....
It looks as if the difference in extra width of the rollers was pushed out instead of split in and out. Just wondering why you elected to do it this way if that is indeed the case. Cosmetics, handling, etc????
It looks like the rear duct opening has significantly less area than the original, possibly limiting/reducing airflow through it. Given the extra width and the room created, it seems you could have increased the opening size (not just in height as you did) providing more air for what you mentioned what you wanted to do.
Are you planning on pulling extra parts out of the molds")
I love your rear duct treatment, particularly how the top and bottom follow existing lines on the car and the radiused leading and trailing edges follow the wheel arch, matching the front.
Few questions though....
It looks as if the difference in extra width of the rollers was pushed out instead of split in and out. Just wondering why you elected to do it this way if that is indeed the case. Cosmetics, handling, etc????
It looks like the rear duct opening has significantly less area than the original, possibly limiting/reducing airflow through it. Given the extra width and the room created, it seems you could have increased the opening size (not just in height as you did) providing more air for what you mentioned what you wanted to do.
Are you planning on pulling extra parts out of the molds
Hi Dave,
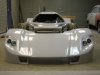
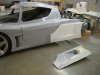
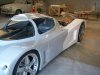
The wheels have about .5 inch more clearance (relative to the CCWs) between the control arms and the inner lip of the wheel, so in this respect they are pretty close to the CCW option that RCR spec'd for the car. I know it looks otherwise. The wheels are 3 inches wider than the 13 inch CCWs and the car as it sits in the pictures is 6 inches wider total vs the stock body.
The ducting for the areas you speak about are yet to be made, there will be separate custom sized molds made for ducting air to the radiators or coolers that end up behind those now closed off side panels. Since I do not know what size the opening will need to be in the end, I decided to leave then closed and flat for now. Make sense?
Additional parts are possibility....
Last edited:
To finish tending the mail.
BillD and John - I hope that picture fills the need
Lindemann - Thanks for the offer, if need be I'll take you up on it .... or breakdown and get a new computer.
To everyone - thanks for the complements, it does have a way of recharging a person when the last thing he might want to do is get dirty again <chuckle>.
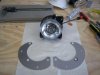
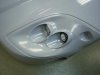
The headlight install.
To get some way to square up the headlight ports I leaned the hood up against the wall and squared it across the top back and bottom. This gave some possibility that the lights would be pointed somewhat straight down the road when done.
I fashioned the HL adjustment plates out of 090 aluminum sheet and the mounting "L" brackets from 1.5 inch / .188 flat stock aluminum.
Attachments

Last edited:
The high beams are 60mm units vs. the 90mm low beams as these smaller lights fit the smaller high beam opening better.
Attachments

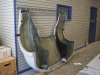
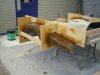
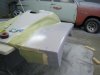
So what have I been doing the last couple of months you ask... Making molds. As you can see pulling the molds off is a little hard on the plugs!
 Hey there were supposed to be some pictures here!? Wut up wid dat?
Trying through IE browser....Oh poo I give up for tonight, maybe I'll give it another shot tomorrow.
Hey there were supposed to be some pictures here!? Wut up wid dat?Trying through IE browser....Oh poo I give up for tonight, maybe I'll give it another shot tomorrow.
Last edited:
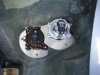
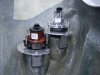
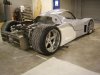
A lot of dirt and dust accumulates in a year's time - In celebration of my car's one year anniversary of delivery (last month) I gave my dirty car a bath. It's kind of tough washing a vehicle with no windows in it. Ah, but it gives one renewed energy to see all the bright machine work in its intoxicating glory.
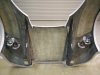
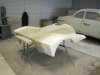
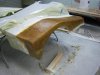
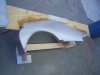
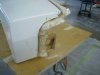
Last weekend I managed to get one of the upper "flares" laid up, once done I like to leave it in the mold to cure for a couple of days. In reality the anticipation of seeing the finished product was killing me. Did I do a good job? Was it straight? Would it look cool on the car? Months of work were sitting in these molds....I managed to hold off extracting the part too early but it sure was tough. I am currently making the second (right side) "flare" and look forward to being able to join them to the deck lid. The anticipation of seeing all the pieces together in final form will once again...be a killer.
Last weekend I managed to get one of the upper "flares" laid up, once done I like to leave it in the mold to cure for a couple of days. In reality the anticipation of seeing the finished product was killing me. Did I do a good job? Was it straight? Would it look cool on the car? Months of work were sitting in these molds....I managed to hold off extracting the part too early but it sure was tough. I am currently making the second (right side) "flare" and look forward to being able to join them to the deck lid. The anticipation of seeing all the pieces together in final form will once again...be a killer.
Attachments

Similar threads
- Replies
- 14
- Views
- 2K
- Replies
- 26
- Views
- 7K
- Replies
- 5
- Views
- 785