I received my SLC back in June. Just working on the basics so far. First of all I want to say thanks to all the people who post in this forum. I would be totally lost without your guidance. This is my first build of any kind. My plans include: LS7 (620 HP), Ricardo, black paint, black wheels, front hydraulics, A\C, race tail. It will be street legal but I plan on running it at the Bondurant road course in Phoenix where I live. Also, I plan on going to the Texas Mile in Beeville and see what kind of top speed I can achieve. I have been working on the wiring lately and ran into a roadblock following the ISIS manual. My problem is with the Gray 6-pin connector that comes off the H-bridge module. I cannot find what it connects to. The only remaining wires I see in the area come from the clock spring. One is the flex tape bundle that has a black 4-pin female connector and the second is a bundle of four wires with a yellow 6-pin female connector. Neither of these connect to the Gray 6-pin connector from ISIS. Any thoughts?

- Forums
- GT40 Replica Manufacturers' Corner
- RCR Forum - RCR40/SLC/917/Superlite Aero
- The SLC Clubhouse
You are using an out of date browser. It may not display this or other websites correctly.
You should upgrade or use an alternative browser.
You should upgrade or use an alternative browser.
SLC-Stealth Lambo Crusher
- Thread starter Crowley
- Start date
I received my SLC back in June. Just working on the basics so far. First of all I want to say thanks to all the people who post in this forum. I would be totally lost without your guidance. This is my first build of any kind. My plans include: LS7 (620 HP), Ricardo, black paint, black wheels, front hydraulics, A\C, race tail. It will be street legal but I plan on running it at the Bondurant road course in Phoenix where I live. Also, I plan on going to the Texas Mile in Beeville and see what kind of top speed I can achieve. I have been working on the wiring lately and ran into a roadblock following the ISIS manual. My problem is with the Gray 6-pin connector that comes off the H-bridge module. I cannot find what it connects to. The only remaining wires I see in the area come from the clock spring. One is the flex tape bundle that has a black 4-pin female connector and the second is a bundle of four wires with a yellow 6-pin female connector. Neither of these connect to the Gray 6-pin connector from ISIS. Any thoughts?
Micheal, I would try and help you but my car is covered and tucked away. I recommend contacting ISIS direct and have them walk you through your problem. I found them to be extremely cooperative and willing assist; even to the point that I received a follow telephone call to see if my problem was resolved. That's what I call first class customer service!
Good luck.
Jim
Jay Harris, ISIS owner is sometimes hard to catch as he is running a business and doing sales too but you may ask to speak to Mike instead ...
I received my SLC back in June. Just working on the basics so far. First of all I want to say thanks to all the people who post in this forum. I would be totally lost without your guidance. This is my first build of any kind. My plans include: LS7 (620 HP), Ricardo, black paint, black wheels, front hydraulics, A\C, race tail. It will be street legal but I plan on running it at the Bondurant road course in Phoenix where I live. Also, I plan on going to the Texas Mile in Beeville and see what kind of top speed I can achieve. I have been working on the wiring lately and ran into a roadblock following the ISIS manual. My problem is with the Gray 6-pin connector that comes off the H-bridge module. I cannot find what it connects to. The only remaining wires I see in the area come from the clock spring. One is the flex tape bundle that has a black 4-pin female connector and the second is a bundle of four wires with a yellow 6-pin female connector. Neither of these connect to the Gray 6-pin connector from ISIS. Any thoughts?
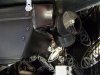
I believe you are looking at the connecter for the steering column tilt. There is a plug on the lower half of the steering column cover that should plug into that ISIS plug. It's the switch with the arrows on it.
Allan, thanks for the clue. I found the wire. I had it wrapped up tight so it wouldn't be in the way while I was working.
Cam, I bought the flat black CF10 wheels. Also, the race tail. My theme is stealth so everything exterior will be black.


.JPG")
Cam, I bought the flat black CF10 wheels. Also, the race tail. My theme is stealth so everything exterior will be black.
PeteB
GT40s Supporter
Michael,
Looking good! Looks like you are slightly farther along in your build than I am. I just started wiring and it took me a while to find that connector also. I had a slight moment of panic after I cut off all the wires from the clock spring except the horn wires and I thought I cut off that connector.
Looking good! Looks like you are slightly farther along in your build than I am. I just started wiring and it took me a while to find that connector also. I had a slight moment of panic after I cut off all the wires from the clock spring except the horn wires and I thought I cut off that connector.
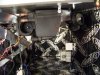
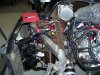
I decided to not use the A\C plenum. Instead i bought a splitter from Vintage Air and epoxied it the the manifold on the evaporator. This way the hoses exit the evaporator and go straight to the vents. Since one hose travels a much longer distance I fabricated an adjustable valve system from lexan to restrict air flow on the short side. Living in AZ, there is no need for a heater, especially since my seats will be heated using the Dorman kit 628-040.
Attachments
Next task is figuring out the best dry sump system for the LS7. I am looking for a system that will have an external pump so I can add a couple scavenge lines to the oil pan. I will be mounting the A\C compressor just below the thermostat housing so I am looking for a pump that will drive off the idler pulley that is located just above the thermostat housing. I have considered Aviad, ARE, and Daily Engineering, but none of the oil pans look like they will fit. Any advice out there would be greatly appreciated.
Attachments
Ken Roberts
Supporter
Check out Doc Kalers setup. He has an LS7 with an external scavenging pump that fits above the AC compressor and is driven off the tensioner pulley position. He mentioned that it does fit. He was using the stock LS7 oil pan but I think he has upgraded to a ARE pan.
Here is a link to his build log http://www.gt40s.com/forum/slc-clubhouse/29411-docs-sl-c-build-5.html#post300350
He has also converted to the low position CTS V alternator/mount as the high mounted Corvette alternator as shown in his pictures didn't fit.
Here is a link to his build log http://www.gt40s.com/forum/slc-clubhouse/29411-docs-sl-c-build-5.html#post300350
He has also converted to the low position CTS V alternator/mount as the high mounted Corvette alternator as shown in his pictures didn't fit.
Last edited:
Ken Roberts
Supporter
Here are all the mods I have done to my dry sump install (minus the external scavenge pump like Doc Kalers).
http://aviaid.com/pdfs/153-boltin_dry_sump_lubrication_systems_for_ls7_engine_and_zo6_corvette.pdf
http://aviaid.com/pdfs/153-boltin_dry_sump_lubrication_systems_for_ls7_engine_and_zo6_corvette.pdf
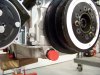
Got myself in a real jam, hoping to find some help. I have an LS7 wet sump engine. I bought a dry sump system from ARE. The pan is a 1005m. As you can see from the first picture, the AN fitting is too close to the AC pulley. I am considering using the setup as seen in the second picture. I downloaded this picture over a year ago so I don't know who's engine it is. It shows a smaller diameter AC pulley than I have and he installed a little idler pulley in between to elevate the belt. I believe this would work for me but I have some questions.
1. Where do I purchase a smaller diameter AC pulley?
2. If I change the diameter of the AC pulley will it affect the performance of the compressor. It will be now be spinning slower?
3. Where can you purchase such a small idler pulley?
1. Where do I purchase a smaller diameter AC pulley?
2. If I change the diameter of the AC pulley will it affect the performance of the compressor. It will be now be spinning slower?
3. Where can you purchase such a small idler pulley?
Attachments
I like your vent exit regulator valve. Very simple and effective.
It looks like you are using silicone sealant in the joints to hold it together. The AC box is made of ABS and I think the Y-connector is too. ABS adhesive will do a better job of holding them securely together. ABS adhesive is just a few bucks and can be purchased at your local Home Depot, Lowes, etc.
It looks like you are using silicone sealant in the joints to hold it together. The AC box is made of ABS and I think the Y-connector is too. ABS adhesive will do a better job of holding them securely together. ABS adhesive is just a few bucks and can be purchased at your local Home Depot, Lowes, etc.
I decided to not use the A\C plenum. Instead i bought a splitter from Vintage Air and epoxied it the the manifold on the evaporator. This way the hoses exit the evaporator and go straight to the vents. Since one hose travels a much longer distance I fabricated an adjustable valve system from lexan to restrict air flow on the short side. Living in AZ, there is no need for a heater, especially since my seats will be heated using the Dorman kit 628-040.
Ken Roberts
Supporter
The stock LS7 a/c compressor is variable displacement. Vintage Air warns against using this type of compressor with their system. Just a heads up.
I was warned about the stock compressor also by the vendor of my unit.
The smaller unit I used still fit in the same location, just mounting was a bit more difficult.
The smaller unit I used still fit in the same location, just mounting was a bit more difficult.
The question has kind of morphed into a A/C thread - The sanden SD7 compressor is small, non-variable and will work with Fran's mount. I spent weeks trying to use the stock cts-v mount with tensioner and trying at least 3-4 oem compressors and then sourcing the a/c manifold to fit the hoses. The bottom line - after about 4 weeks of trying parts - I bit the bullet did the sanden unit with the RCR mounts. The biggest hurdle to using the part that comes in the GM CTS-V front access. kit... re: the compressor AND sourcing a A/C manifold that will work with A/M hose set-ups. I believe the compressor that came with the frt. access. kit is a non-variable unit (Denso 10S17F - GM truck compressor) - but I could wrong.
Last edited:
Ken Roberts
Supporter
Yes the CTS V a/c compressor is a fixed displacement unit. The "truck" compressor is also fixed displacement but doesn't share the same part number with the CTS V.
Grant came up with a nice solution here using the CTS V mounting bracket. He didn't us the a/c tensioner due to the fact he fabricated a turnbuckle type of lower mount. You could make a solid lower mount and add the a/c tensioner (it bolts on the side of the bracket). This will give you the required belt wrap for clearance of the dry sump hose fitting. http://www.gt40s.com/forum/slc-clubhouse/38866-grants-sl-c-build-tread.html#post391866
Grant came up with a nice solution here using the CTS V mounting bracket. He didn't us the a/c tensioner due to the fact he fabricated a turnbuckle type of lower mount. You could make a solid lower mount and add the a/c tensioner (it bolts on the side of the bracket). This will give you the required belt wrap for clearance of the dry sump hose fitting. http://www.gt40s.com/forum/slc-clubhouse/38866-grants-sl-c-build-tread.html#post391866
Last edited:
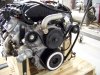
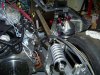
Had to take a little break from the SLC, but now I'm ready for round 2. First pic is of the mounted oil cooler (Setrab 920), and the expansion tank (Moroso 63651). I plan on fabricating a flexable shroud to mate with the side port in the future. Next pic is of the ARE dry sump tank and in front of that is the air breather for the oil tank. What I need help with is finding a source for a thermostat housing/water neck for the LS7 that will point down at the 6 O'clock position. On page 86 of the SLC manual there is a picture of one that would work nice for my application but I can't get a hold of the company which is Southern Performance Systems 678-482-0866. When you call it goes straight to voicemail??? Any suggestions would be great.
Attachments
Similar threads
- Replies
- 6
- Views
- 692
- Replies
- 2
- Views
- 255
- Replies
- 3
- Views
- 654