Tornado GT40 in Texas

Tim Kay

Lifetime Supporter
Dylan is right on both accounts, I've paneled my Tornado footwells and there's no room to mount a dead pedal. Clutch-foot rest on pedal, not ideal, and I stay aware not to apply pressure while resting. Freeway drives or ok, I find it comfortable to lay my foot on the floor.

As for the front frame, amazing how much pressure builds up under the front clip with the frame paneled so I added an air outlet on both sides to relieve the air pressure. In addition, I did what Dylan suggest, I reworked my single nostril to allow more air out and over the front clip. Ultimately, I'd like to shroud all around the nostril to help eliminate hot air, off the radiator, entering under the front clip (reduces the cabin temp as well).

Other than that I can't think of anything significant against paneling. Aesthetically, I like the paneled look inside the cabin.
 
If you panel the front frame, just louvre it as much as possible before shooting rivets or use screws so the panels can be removed.

If you panel the front frame and use a full depth single vent, you will not be able to tilt the front clip without removal of the vent hatch. The hatch will foul on the rad. Not good if you want to service or inspect something on the road.

I was going to make a two piece single vent with the upper and lower halves for 875 but never I got around to it, maybe on the one going together now.
 
Re. panelling the footwell, (as you know) on a RHD car it's the accelerator that is beside the panel and as I have no plans for cruise control, will be keeping my foot thereabouts. I appreciate that the issue is different for a LHD car.

Re. the front bay, I panelled mine and am in the process of deepening both nostrils to increase the flow.
 
All good points guys and I will incorporate most of them. I have found some nice louvers that will fit in the front from Flyin' Miata. I can do some paneling in the footwell area and avoid the panel by the clutch. I am going to enclose some of the engine bay area. Photos soon.

-Bob Woods
 
Those little things won't do much.

There must be a hot rod shop that can punch louvers in the greater Dallas metro area.

I'd lay out and fit the panels then have a shop louver them completely.

But that's just me :coolgleam:
 

Randy V

Moderator-Admin
Staff member
Admin
Lifetime Supporter
Bob, if you're looking for some nice louver work - check with my cousin Mike Kuhn in Rochester MN
Http://www.kuhnsautospecialties.com

He's done a lot of work for me and a lot of other shops.. Great reputation as well and not just saying that because he's family..
 
Scott,

You were right. Those Miata louvers were too small and shallow. I'm looking for someone local to punch larger louvers.


Randy,


Thanks for the contact.


Bob Woods
 
Tim,

You talked about pressure building up under the front clip. It seems to me that the area of the nostrils is usually in a low pressure region with the air accelerating over the top of the nose of the car. The lip on the leading edge of the nostrils act as a Gurney flap on a wing and will further lower the pressure in the nostrils. So it seems to me that there will be a low pressure in the nostrils drawing air through the radiator and out the top of the front clip. Therefore if I install side panels in the front nostril pit area and louver them, which way will the air flow? If the pressure in the wheel well is lower than the pressure in the nostril pit, then air will flow into the wheel well if it is louvered. This will improve the airflow through the radiator. If the pressure in the wheel well is higher (or not as low as) than the pressure in the nostril pit, then the nostril will suck air from the wheel well instead of the radiator and hence reduce the cooling effectiveness.

I'm hoping that someone has measured the pressure in the nostrils, done a CFD analysis to be sure there is a low pressure region there, or can confirm my thinking. I am going to panel the sides of the nostril pit. I am contemplating if I should louver them or not, and if so, which direction I should direct the louvers?

Scott,

I did find someone locally that can custom punch the louvers.

All comments welcome.

-Bob Woods
 
Guys, I'd be interested to know if anyone has or can do a temp and pressure test and/or simulation.... I don't want to 'waste' a whole load of time deepening the nostrils if the difference is marginal, to the running temp. In other words, does deepening the nostrils and adding louvres simply minimise the heating in the front bay area and have little effect on the engine running temp?

Perhaps some of those guys with finished cars could do a lap with half cut nostrils note the temps, then do another lap with the nostrils removed?
 

Ian Anderson

Lifetime Supporter
Guys

My2c here (And I don't have a Tornado)
My Dax is not side pannelled under the fromt clip

I have a shallow twin nostril (Very similar to a tornado one) In fact the Tornado one fits (see post 14) http://www.gt40s.com/forum/gt40-build-logs/17398-dax-build-up.html

I am definately going to get a deepened nostril pannel for 2 reasons

1) above about 90 mph the nostril pannel bows upwards so there must be either a) a really low pressure above it or B a high pressure build up inder it (I woudl go with the latter)
2) help keep cabin tems down - at present in stop start traffic and fans come on - my feet start cooking! Hot air from the rad hits the front of footwell and soaks into the cabin. Not to bad when moving above 30mph but an hour and a half at idle in Rouen going to LMC in 2010 with 40C outside tems it was damned hot in there!

Now there is a photo on here somewhere that shows on the originals with the half nostrils they had a "kick up" metal pannel running from under the radiator and meeting up with the bottom of the nostril pannel!
See here http://www.gt40s.com/forum/gt40-tec...s-wheels/29007-behind-radiator-originals.html


Ian
 
I tried a kick up plate on my car and it does restrict air flow in the radiator a fair bit. The problem is on the Tornado twin nostril that the bottom edge is fairly close to the radiator and means the kick up plate has to be quite steep to meet it.
A few of us decided to go for Lee Dawsons nostril - its a pretty close match for the Tornado bodywork and just needs a little fettling.
The upside of this is you can trim it to seal around the radiator edges and all of the hot air from the radiator gets pushed out the nostrils - keeps the front bulkhead cool and in turn cockpit cooler. Air pressure used to build up under the old nostril but cured by the deep ones. Bear in mind that there is a fair bit of air through the "brake" vents at the sides of the radiator which ideally should be directed onto the front discs/calipers to avoid the air pressure problem completely.
 
I'm pleased to see all of this discussion. There are two points to consider here. One is whether the sides of the nostril pit under the nose should have panels on the sides to separate the wheel well from the nostril pit. The second is sealing the bottom of the nostrils so that hot air cannot go under the nostrils and heat up the front bulkhead and hence the cockpit.

One of my motivations is to seal the road dirt (and possibly water if I ever drove it in the rain) from getting dirt or water under the front clip (hood as we call it in the USA). If I am correct and the low pressure on the top front of the car and the gurney flap lip on the leading edge of the nostril do indeed create a very low pressure region, then we should let that low pressure draw air from the high pressure at the front of the radiator through the radiator and out the nostrils. Therefore the side panels should be sealed and there should be no flow under the nostril.

I further agree that the flow beneath the nostrils should be sealed somehow so hot air cannot go to the front bulkhead. Since I don't have the front section and nostrils installed yet, I'm not sure what the best way is to do this, but I will think about it.

Randy's original GT40 does not have any sidewalls or panels separating his wheel area from under the nose. See the photo below. This car has a single nostril. I haven't asked him how hot the cockpit got on track.

More discussion please.

-Bob Woods
 

Attachments

  • Original GT40 front area.jpg
    Original GT40 front area.jpg
    322.2 KB · Views: 2,157
I don't want to interrupt the discussion on panels under the hood, but I think it is time for an update on my progress.

Panels

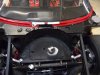
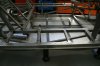
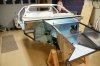
I have fabricated almost all of the panels and drilled and deburred their holes. Here is what I am doing for the panel under the hood between the nostril pit and the wheel well. I will probably do something to seal the nostrils so all of the air goes out the nostrils once I get the front clip installed.

I have placed vertical panels on either side of the engine compartment. I also have horizontal panels on the bottom of the frame between the engine area and the sills (not shown). I will use some of this area for the fuel pump and fuel line routing so I don't want water and road dirt to get in that area.

Rear Bulkhead Braces

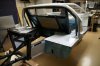
I purchased the bulkhead braces from Tornado. Notice that the foot on the back side of the brace interferes with the battery box. The braces have a large square foot that extends over places that have nothing underneath them; therefore, I trimmed them to only have footing to go over the 1.5" frame tubes. I trimmed the left (battery) side more and it still required that I remove the corner of the battery box. It seems to me that if it is ok to not have a brace, then a 1" diameter brace with a trimmed footing would be better than a 1.5" tube in the brace; however, I didn't fabricate my own.
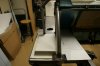
Sill Stiffeners

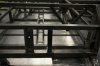
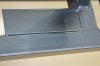
The aluminum panel over the side sill has too much compliance if you were to put some weight on it getting in and out of the car. I have welded in two cross members to support the sill panel. This further increases the protection from a side impact. Since the fuel tanks are under the sill, there is very little protection for a side impact. This will help that protection.
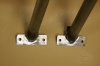
Front ARB Mounts

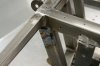
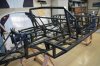
In the normal location for the mounts for the front anti-roll bar, there is a large part of the ARB that is cantilevered from the mount to the connection to the wheel and can bend up without twisting. Not only does this cantilever not contribute to torsional stiffness and reduce the effect of adjusting the ARB, it also could put more friction in the plastic mounts. I have moved the mounting point from the normal vertical plates (notice the two holes in the picture) to the outer vertical frame member. This frame member is welded in at an angle, so I had to make tapered inserts to get the surfaces square with the frame. These have a 9.5 degree taper.

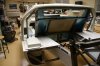
Throttle Housing Mount

The cable housing would normally mount to the aluminum front bulkhead panel. I wanted more stiffness than the aluminum sheet would provide, so I welded a vertical steel plate in the frame in front of the throttle.

Frame off to Powder Coat

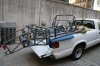
I have drilled most of my holes for rivets, rivet nuts, and items that bolt to the frame. I have taken the frame to powder coat and it should be back by this weekend or early next week. It fit in the back of my little pickup.

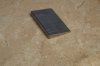
I have chosen a gun metal grey for the frame. It is Tiger Drylac Iron Glimmer P7.

One problem that I realized just before taking it to sand blast was that all of these rivet holes would catch sand. So how clever was I to do the powder coat last after I drilled all the holes? However, chips from drilling are inside the frame as well and I would like to get all of the debris out of the inside of the frame anyway. What I will do is turn the frame upside down so all the holes are pointing down and insert a flexible plastic 1/8" pneumatic hose through a hole on one end and try to blow out all of the debris. I could also use a vacuum to help encourage debris to flow to the other end. I'll let you know how well this works.

Engine

The engine is complete and I will bring it home soon. I will give all of the specs for the parts as soon as I bring it home. I will also run a engine dyno simulator to estimate the power I expect to get.

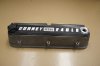
For now, here is the valve cover. I machined inserts for both ends of the cover. One end has M33 x 3.5 threads for a screw-on oil filler cap and the other has 3/4 NPT for a breather. My machinist milled GT40 in the middle.

-Bob Woods
 

Attachments

  • front panels under hood.jpg
    front panels under hood.jpg
    142.9 KB · Views: 1,976
  • rear engine panels.jpg
    rear engine panels.jpg
    149.8 KB · Views: 1,814
  • Bulkhead braces 001.jpg
    Bulkhead braces 001.jpg
    93.9 KB · Views: 1,599
  • rear braces trimmed.jpg
    rear braces trimmed.jpg
    81.9 KB · Views: 1,405
  • Sill stiffners.jpg
    Sill stiffners.jpg
    135 KB · Views: 2,148
  • ARB 9.5 degree shim.jpg
    ARB 9.5 degree shim.jpg
    119.7 KB · Views: 1,406
  • ARB shim welded.jpg
    ARB shim welded.jpg
    92 KB · Views: 1,594
  • throttle housing mount.jpg
    throttle housing mount.jpg
    110 KB · Views: 1,449
  • frame in pickup.jpg
    frame in pickup.jpg
    194.7 KB · Views: 2,368
  • valve covers.jpg
    valve covers.jpg
    97.1 KB · Views: 2,195
Bob, regarding blowing bits out of the frame.....you are going to have a VERY tough time at this the way you want to approach it.

On my Tornado, I drilled out some ~1500 rivets and removed all of the shoddy paneling on the car. I then had to get the rivet heads and debris out before the rivet holes were TIG welded back up. I set my 75 gallon compressor at 150PSI and fed it in through the holes...and was able to push rivet heads and debris only about 18" down the longer framerails. I had to cut 0.500" holes in the ends of almost every tube in the frame, duct tape the exposed rivet holes to create a sealed cavity, and work my way along the length of tube with air pressure at one end and a vacuum at the other. (Through those 0.500" holes...)

What I'm trying to say is..PLUG THOSE HOLES IF YOU CAN! Run down to Home depot and buy a bunch of sheet metal screws or something that you can thread partway into the rivet holes and have them bite enough to hold while they sandblast it. Plastic plugs, if you can find something suitable, would obviously be better. You do NOT want to try and clean out those tubes afterward!
 
Hi Dylan,

Thanks for the input. I have two things different than your situation. First I only have small sand and small shavings that came off the bottom of the drilled hole. I do not have rivet heads trapped inside. Second, I should be able to progressively push the plastic hose down the frame rail to blow the sand down the tube.

You might have a good point about blocking some holes to increase the velocity at another hole. I'll report back to you on how well it works.

-Bob Woods
 
Bob, my sills have suffered from the problem you describe, where sitting on them, which is often during the build, has caused them to bend. I would suggest that even with your braces the problem will occur and you will see them bent in the voids between the braces. You could consider using a harder aluminium sheet for the sill tops.

Re. the bulkhead braces, it is a pity that the Tornado parts simply don't fit without having to modify them, I wonder do they have different brace designs for different chassis, and you ended up with the wrong one?

I think the issue with blowing out debris may also be due to the flow rate and not just the pressure, you could consider using a liquid to help capture and propel the debris out the bottom hole, but still use air in (at the top) as the force to move the liquid and the 'captured 'debris.

[FWIW It is hard to beat prolonged vibration to get stuff removed through suitably sized holes. One way we test if a product will hold together, is to FedEx it around the world to ourselves, or drive 100 miles with it in the back of a delivery van, if it is still in one piece when it gets back, then it passes.]
 
Regarding Keith's mention of vibration....I have a picture somewhere of me hanging my frame from two ratchet straps off of a beam in the ceiling of my garage and beating the tubes with a rubber mallet. It allowed the frame to 'ring' like a bell and was another trick to shaking loose the debris.
 
The frame is back from powder coat and I am very pleased with the result and color. Even though not much of the frame will be seen, this dark grey will go well with the Guardsman Blue body color and grey carpet.

The air purging seemed to work ok. I turned the frame upside down to blow out the frame rails that were drilled from the top. I think that Dylan's suggestion to tape up some of the holes was a good idea.

The day after it came back from powder coat I temporarily put all the finished panels back on to see what else needs to be done. Next is to pre-fit the A/C, windshield wiper, and other similar items. After that, I am ready to mount the roof section and side sill covers.

A word of caution! I had the front and rear section support rods powder coated. They hung them from one end so both bushings fell to the bottom. One end is fine, but I can't move the other end over the powder coat. I will have to remove the powder coat on the rod and repaint the rod. I should have taped or zip tied both bushings to their respective ends before powder coating.

-Bob Woods
 

Attachments

  • after powder coat 001.jpg
    after powder coat 001.jpg
    177 KB · Views: 1,722
  • after powder coat 003.jpg
    after powder coat 003.jpg
    152.9 KB · Views: 1,599
  • after powder coat 004.jpg
    after powder coat 004.jpg
    137.2 KB · Views: 1,658
  • after powder coat 005.jpg
    after powder coat 005.jpg
    130.9 KB · Views: 1,643

NickD

Supporter
Congrats Bob, that seems to be coming along great. Nice powder coat finish. I almost regret choosing to paint mine by hand now ;-( Its a real shame that it such a nice finish and people will see hardly any of it.
 
Back
Top