
You are using an out of date browser. It may not display this or other websites correctly.
You should upgrade or use an alternative browser.
You should upgrade or use an alternative browser.
Tornado TS40 Build Belfast Northern Ireland
- Thread starter Stavros
- Start date
Keith Stafford
Supporter
Been busy sorting out loads of small issues, progress:-
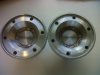
1) oil leak, both prop shafts are back on with the modified CV adapters.
2) third brake light installed.
3) side indicator repeaters installed.
4) wheel fouling wheel arch, track rods adjusted and tracking set.
5) front indicator hole in wrong place, fibreglassed and re-drilled.
6) brake and clutch lines exposed in the footwell, moved to central tunnel.
7) decided to panel the interior and front bay,... ongoing.
8) steering cut out, Corsa C sourced and ready to install.
Some things still to do in the next couple of weeks:-
1) finish the panelling
2) sound proofing.
3) get the tanks back in.
4) make an ally batt box.
5) position the central roof scetion.
6) get the steering in.
............... I'll let you know how it's going.
K
Attachments
Keith, can I respectfully suggest that it is highly unlikely that your gearchange will work satisfactorily, particularly the cross gate movement, it might be better to review that now rather than later when you have finished all of the panelling etc, Frank
Keith Stafford
Supporter
Cheers Frank, what would you suggest? Would you need to see or know more about the linkage?
Keith
Keith
Keith
If the gear linkage was supplied by Tornado and is adjusted correctly it will be fine.
Thanks
Andy
If the gear linkage was supplied by Tornado and is adjusted correctly it will be fine.
Thanks
Andy
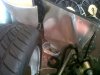
Hi Keith,
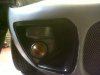
Looking at the photo of the front indicator, you will have problems meeting the IVA visibility requirements with them mounted in their current position. They have to be visible when viewed at an angle of 45 degrees from the other side of the vehicle (see post #215 on page 11 of my build log)
Sorry to be the bearer of bad news, but better to resolve it now, than a fail on the day of the test
Regards,
Andy
Keith Stafford
Supporter
Hi Andy
I am also going to add 'repeaters' to the top aperture, a la your AG40! I have just not been able to source them yet. I was conscious of the 45 angle, so moved the lenses out a bit to try to get it, have not checked them.
Hey never worry about pointing out mistakes to me.
K
I am also going to add 'repeaters' to the top aperture, a la your AG40! I have just not been able to source them yet. I was conscious of the 45 angle, so moved the lenses out a bit to try to get it, have not checked them.
Hey never worry about pointing out mistakes to me.
K
Keith Stafford
Supporter
Hi Guys
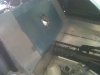
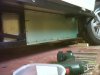
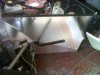
Have been doing some panelling, never done this before, so started on some rectangular 2D shapes. I panelled behind the tanks, I do realise that it is somewhat unnecessary to panel here, but I need the practice, easy shapes, most importantly, hidden by the tanks. Oh yes, stuck some sound proofing in too.
Have been doing some panelling, never done this before, so started on some rectangular 2D shapes. I panelled behind the tanks, I do realise that it is somewhat unnecessary to panel here, but I need the practice, easy shapes, most importantly, hidden by the tanks. Oh yes, stuck some sound proofing in too.
Attachments
Keith Stafford
Supporter
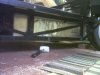
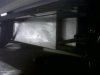
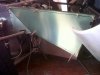
Moved on to some 3D-awkward-shape panelling, the reflections make it look bent in places, it's an elusion, kind of. I have now closed off the front bay, which makes a big difference to the look of the car, was then able to fit the horns, screen wash bottle etc. and finish off some wiring there. I will ultimately put some form of venting, however I want to deepen the nostrils and take as much air up and out away from the bay altogether.
Attachments
Last edited:
Keith Stafford
Supporter
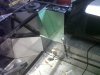
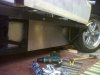
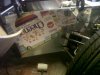
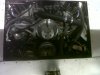
At present the heater feed is taken off the thermostat near the water pump and both the feed and return hoses are taken down the central tunnel, I want to remove these two hoses and tee-off to the heater from the rad hoses in the front bay, for both feed and return. I am getting some ally Y joints made (rather than tee joints) to keep the pressure up for the heater. Question, does anyone know what I should do with the heater hoses on the engine, see image. You can see:-
Thermostat top-middle.
Heater feed 16mm hose on the left.
Heater return on the right, which has a tee to the water reservoir.
Do I just loop the heater feed from the t/stat to the heater return and close off the connection (heater) on the water tank?
Thanks in advance. K
Thermostat top-middle.
Heater feed 16mm hose on the left.
Heater return on the right, which has a tee to the water reservoir.
Do I just loop the heater feed from the t/stat to the heater return and close off the connection (heater) on the water tank?
Thanks in advance. K
Attachments
Hi Keith,
The simple answer is that you just blank off the heater feed pipes
However what you are planning will result in poor heater performance. On your layout as it stands, the heater feed is before the thermostat housing and is fed all the time, even when the thermostat is closed.
If you take the heater feed & return in the main coolant pipes at front of the car, the heater feed is now after the thermostat, which means it won’t operate until the thermostat is open.
Therefore take the heater feed from before the thermostat and the heater return can then be fed into the return coolant pipe
If you’re wondering why on my system the heater feed & return are both at the front of the vehicle, I’ve also a remote thermostat (and electric waterpump) at the front of the car. The heater feed is still before thermostat to give a satisfactory heater operation
Regards,
Andy
Keith Stafford
Supporter
Thanks Andy
I am aware that I will have to wait a while longer for the heater to receive its heat, given my planned MO for using the car, garaged, not out much in cold and wet,... I was happy enough with the wait (of course I will regret it when in a rush some cold wet morning when I have to wait 10 mins for the demister).
My main issue is really getting the central tunnel finished and closed, I found that the vacuum hose to the brake servo is un-grommeted through the panelling, so given that it has to come out, just to fit a 30p grommet, I was trying to sort the other tunnel issues out at the same time. in the long run I will put a remote thermostat in the front, so really I just doing some of the ground work for that.
Am I right in thinking that (generally) once the t/stat is open it will tend to stay open, unless it is super-cold outside?
Do/did you simply just remove the t/stat mechanism from the housing on the engine to 'disable' it?
Regards
Keith
Hi Keith,
I wouldn’t recommend removing the thermostat for a road car application, as it would lead to very long warm up times. Taking into account you’ve still got to get the car through the IVA test, which requires a suitable demist system to be functional, I’d leave it in.
Generally the thermostat will cycle; opening & closing, depending on how much heat the engine is generating and how much heat the radiator is dissipating. And it’s a simple job to just remove the engine mounted thermostat to disable it.
Andy
Keith Stafford
Supporter
Hi Andy
I don't plan to remove the t/stat until I had a remote one to replace it, it was really just out of interest, which given the demist req. may be sooner than I would want!
I already have an electronic temp sender in a rad hose in the front bay, I guess to switch the fans,..... have not looked at it much yet; perhaps an electronic t/stat is not too far away?
Regards
Keith
Brett James-McCall
Moderator
I wouldn’t recommend removing the thermostat for a road car application, as it would lead to very long warm up times. Taking into account you’ve still got to get the car through the IVA test, which requires a suitable demist system to be functional, I’d leave it in.
The old SVA/early IVA used to have tester notes in it. It used to say that rear mounted engines may lead to long warm up times and testers should take that into consideration.
Brett
Ian Anderson
Lifetime Supporter
Fit a heated windscreen
It stops the IVA jobsworths in their tracks!
Ian
It stops the IVA jobsworths in their tracks!
Ian
Keith:
I have fitted remote thermostats just for the ease of access or space considerations and they generally work well, only thing is its necessary to drill a small hole like 1/8" in the t-stat face to get continuous flow ...not enough to prevent the motor from warming up, but necessary to get hot coolant to the t-stat so it opens before the motor gets too hot.
Also you can run a smaller line from the pressure side of the cooling system to your heater and just tee off to the suction side from the other side of the heater core, that works well and if you like put a valve inline for the summer months to shut flow to the core, probably necessary if you are planning AC.
You may need some type of restrictor in the heater line to prevent it from bypassing your main loop, this can be on the outlet of the heater.
I have seen systems overheat because the coolant follows the path of least resistance and the restrictor will prevent that.
Good luck
Phil
Keith Stafford
Supporter
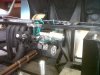
Did a wee bit more panelling over the past few weeks. The weather has been fantastic here so spent more time sorting out water slides and paddling pools for the three girls. Anyway for those interested in panelling I attach some pix.


I also quickly made some bracked for the head lamp units to allow me to adjust and align them.


K
I also quickly made some bracked for the head lamp units to allow me to adjust and align them.
K
Keith Stafford
Supporter
Did a wee bit more panelling over the past few weeks. The weather has been fantastic here so spent more time sorting out water slides and paddling pools for the three girls. Anyway for those interested in panelling I attach some pix.


I also quickly made some brackets for the head lamp units to allow me to adjust and align them.


K
I also quickly made some brackets for the head lamp units to allow me to adjust and align them.
K