You have such great patience and well planned procedures.. Chuck, I have to say that yours would be the only hand-built aircraft I would want to fly in.. As a pilot myself, I've seen some pretty nice kit planes, but I was always suspect of short-cuts taken that might compromise the quality and safety of the finished product. Yours show none of that.. Kudos to you guys for the great work!!! Thank you for sharing the experience with us!

You are using an out of date browser. It may not display this or other websites correctly.
You should upgrade or use an alternative browser.
You should upgrade or use an alternative browser.
Chuck and Ryan's Carbon Cub Build Blog
- Thread starter CESLAW
- Start date
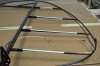
Elevators
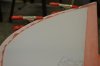
1. One goal is to keep the sewn seam centered. After putting the cover on and aligning the seam, clamps were applied at each rib. Note the seam center line is actually one side of the quarter inch sewn seam. The fabric had a darker line making the center point making it easy to line up.
2. The fuselage end of the envelope is stitched about two inches too far. Pull it back on itself to determine how long a cut will be needed, then a single cut along the seam line only.
3. The glued edges are straight, so rather than using a compass a straight line was marked and cut before the fabric was glued in place.
4. Be sure and keep the final visible pinked seam on the bottom. Cub Crafters marked the fabric covers “right” and “Left” so that the envelope seam would also be on the bottom.
5. I shrunk the fabric in increments: 250, than 300, than 350 degrees, going back and forth from side to side in an effort to keep the seam on the leading edge centered.
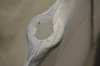
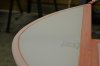
Rudder
1. Don’t forget to place the strobe light wire. It is held in place with tree wraps of friction tape in three locations per the lighting manual.
2. Glue was applied around the strobe light opening and permitted to dry before the fabric was applied. After the fabric was applied and shrunk, the glue was activated with MEK to help secure it in place. The opening was then cut, pie style, and the pieces glued in place. There is a lot of tension around the opening and I wanted to add a bit more glue to make sure the fabric stayed put.
With the tail surfaces covered it is time to learn how to rib stitch.
1. One goal is to keep the sewn seam centered. After putting the cover on and aligning the seam, clamps were applied at each rib. Note the seam center line is actually one side of the quarter inch sewn seam. The fabric had a darker line making the center point making it easy to line up.
2. The fuselage end of the envelope is stitched about two inches too far. Pull it back on itself to determine how long a cut will be needed, then a single cut along the seam line only.
3. The glued edges are straight, so rather than using a compass a straight line was marked and cut before the fabric was glued in place.
4. Be sure and keep the final visible pinked seam on the bottom. Cub Crafters marked the fabric covers “right” and “Left” so that the envelope seam would also be on the bottom.
5. I shrunk the fabric in increments: 250, than 300, than 350 degrees, going back and forth from side to side in an effort to keep the seam on the leading edge centered.
Rudder
1. Don’t forget to place the strobe light wire. It is held in place with tree wraps of friction tape in three locations per the lighting manual.
2. Glue was applied around the strobe light opening and permitted to dry before the fabric was applied. After the fabric was applied and shrunk, the glue was activated with MEK to help secure it in place. The opening was then cut, pie style, and the pieces glued in place. There is a lot of tension around the opening and I wanted to add a bit more glue to make sure the fabric stayed put.
With the tail surfaces covered it is time to learn how to rib stitch.
Attachments

Looking good!
You can make a rib stitch needle from a 1/16" welding rod with the end flattened and a hole drilled for the cord. Check out Section 2 FAA 43.13 and chart on 2-21. You'll really need a long needle. It's been many years since I have done any fabric covering , but you'll find rib stitching (as I remember) not too difficult.
Have at it, and have some fun!
Rib Stitching
There is a scene in the original Matrix movie in which Trinity needs to escape from the evil agents in a Huey helicopter, which she had never flown before. She calls the control center and asks them to upload a program for this aircraft into her brain, which they promptly do. Moments later she is flying it like a pro.
That describes the way I felt learning to rib stitch; something I had never done before. Only difference is it took me a couple of hours practicing on a test section watching a video in front of the television to ‘upload the program’ and finally master the technique. I need a faster brain.
Although I plan to fabric rivet the wings as per Cub Crafters current practice, the tail feathers have to be rib stitched. It took me about two hours per tail section or a total of ten hours. That seemed like a really long time.
Rib stitching is thoroughly covered in many places. I have only tips:
1. Rib stitch from the bottom of the tail surfaces. That way the top will have no knots visible and look perfect.
2. The ribs on the elevators are a quarter inch wide, so the 3/8” rib tape had to be cut to size. (Don’t tell me that there was a roll of quarter inch tape in one of those boxes that I overlooked. I don’t want to know).
I really dislike rib stitching and am sure glad this job is done. But they really look good, perfectly aligned, nice and flat.
Attachments
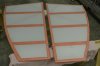
Tail feather tapes
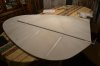
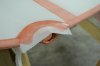
Following the Cub Crafters rather than Poly Fiber’s guidelines, two coats of poly brush were brushed on where the tapes are to be applied. The tapes over the ribs were applied first, trimming the ends where they meet with a straight scissors so the seam would not show. Next the tapes around the perimeter were applied. And finally the grommets were Polybrushed in place.
The tapes are applied by brushing the Poly Brush on top of the tapes. After they are in place a fourth coat of Poly Brush is applied, per Cubcrafter’s practice.
The tapes around the perimeter of the elevators and rudder were stretched to make them lay flat per the award winning Mitch Travis video with one slight change. When ironing the tapes to make them lay flat, a piece of paper was placed between the tape and the Poly Brushed surface so the tapes would not stick. Both sides were ironed before Poly Brush was applied. This worked well.
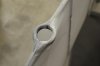
There is a trick to installing the grommet around the strobe taillight. Per Mitch, it is split in half and then Poly Brushed in place with the cut edge along the center seam of the rudder
Following the Cub Crafters rather than Poly Fiber’s guidelines, two coats of poly brush were brushed on where the tapes are to be applied. The tapes over the ribs were applied first, trimming the ends where they meet with a straight scissors so the seam would not show. Next the tapes around the perimeter were applied. And finally the grommets were Polybrushed in place.
The tapes are applied by brushing the Poly Brush on top of the tapes. After they are in place a fourth coat of Poly Brush is applied, per Cubcrafter’s practice.
The tapes around the perimeter of the elevators and rudder were stretched to make them lay flat per the award winning Mitch Travis video with one slight change. When ironing the tapes to make them lay flat, a piece of paper was placed between the tape and the Poly Brushed surface so the tapes would not stick. Both sides were ironed before Poly Brush was applied. This worked well.
There is a trick to installing the grommet around the strobe taillight. Per Mitch, it is split in half and then Poly Brushed in place with the cut edge along the center seam of the rudder
Attachments
Status Report
It has been a long time since I posted a progress report, so I thought it was about time. There are several posts over at Supercub.org and Cubcrafters.com, if anyone wants more details.
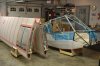
As of May 15, everything is covered.
We started this project fourteen months ago in March, 2014. Approximately 575 hours have been invested, which does not include setup, research and collateral matters. (Those collateral matters would probably add at least another 100 hours.)
Time spent building the wings up to cover was around 150; the fuselage up to cover was around 150; and the balance was covering. Frankly covering took much longer than I was expecting.
The left wing which was first took 55 hours to cover. We thought the right would go much faster. Not so. It took 53 hours.
It has been a long time since I posted a progress report, so I thought it was about time. There are several posts over at Supercub.org and Cubcrafters.com, if anyone wants more details.
As of May 15, everything is covered.
We started this project fourteen months ago in March, 2014. Approximately 575 hours have been invested, which does not include setup, research and collateral matters. (Those collateral matters would probably add at least another 100 hours.)
Time spent building the wings up to cover was around 150; the fuselage up to cover was around 150; and the balance was covering. Frankly covering took much longer than I was expecting.
The left wing which was first took 55 hours to cover. We thought the right would go much faster. Not so. It took 53 hours.
Attachments
Some amazing progress Chuck!
What would you estimate that the wings and fuselage weigh at this point?
This is very rough, but wings around 75 pounds each. Fuselage probably around 200. When complete the dry weight will be a bit over 900 pounds with 180 HP.
This is very rough, but wings around 75 pounds each. Fuselage probably around 200. When complete the dry weight will be a bit over 900 pounds with 180 HP.
That is amazing! The climb performance of that plane will be phenominal! :thumbsup:
That is amazing! The climb performance of that plane will be phenominal! :thumbsup:
It will be. Well over 2000 FPM. I'm lucky to get 500 out of the Cessna 172.
What are typical cruise speeds @75% power?
What are typical cruise speeds @75% power?
Ah, yes. That is the weak spot. Around 95mph. In level cruise the 172 with its modest 145 HP Continental is faster. The downside of those STOL wings!
Similar threads
- Replies
- 17
- Views
- 14K
- Replies
- 16
- Views
- 6K