Converting RHD SLC to LHD

I've done quite a bit of forged carbon skinning past several months, although on smaller objects and with 1/4" carbon. After trial and error on handful of things, will relay my procedure in hopes maybe something will be of help. This also works great on regular carbon fiber too, although you can't be quite as carefree as chopped.

I use a typical cheap food vacuum bag sealer. Normally wouldn't be useful for you, but actually would work for skirts since you can buy bag by the roll. Brother has a pneumatic vacuum sealer with a 4x4 bag he used to veneer drums years ago, now it's mine. I have yet to try it, but need to see how well it works.

- Clean part, make sure it's either black or has been painted black in case you miss a spot here or there.
- Lay down 3 layers of clean masking paper (like you'd use to protect floors of house). Put part on it.
- Using Gorilla spray adhesive, lay down a layer on part. Remove top layer of masking paper, under part, so it's on clean paper
- Start generously sprinkling chopped carbon on top and cover as much as possible.
- Cut vacuum bag to length and seal one end with vacuum sealer.
- Mix up epoxy and start dabbing it on the carbon to wet it all out. Examine and lay more carbon as needed to spots that need it.
- Peel ply, then absorbing mat.
- Slide part in vacuum bag, start vacuum sealer and let do it's thing. Let cure.

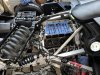
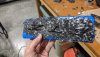
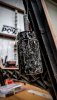
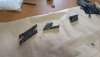
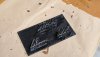
Parts seem to come out great using the food vacuum sealer, better than I expected. Attached a few pictures of random things I still have pictures of on my phone to see outcome. The forged ZL1 emblem is the latest thing, also is full carbon I made a from a silicone mold of emblem. I need to trim and do a full wet coat, they have potential.
 

Attachments

  • PXL_20211019_002609861.jpg
    PXL_20211019_002609861.jpg
    398.9 KB · Views: 217
  • PXL_20210803_013755011~2.jpg
    PXL_20210803_013755011~2.jpg
    183.7 KB · Views: 219
  • PXL_20210801_160324788.jpg
    PXL_20210801_160324788.jpg
    408.7 KB · Views: 228
  • PXL_20210803_012808082.jpg
    PXL_20210803_012808082.jpg
    405.4 KB · Views: 216

Kyle

Supporter
Those look fantastic! This side skirt is coming out well, just lots of sanding. Vacuuming and peelply is the way. I don’t think I’ll do another part without it.

1F5B73D5-FD70-4CF4-87FC-737972A2CF11.jpeg


Allan has been making good progress. Doors and actuators are all adjusted and working well. He did have to add a bunch of fiberglass layers to the door where the hinges meets. I did not modify that area at all, so anyone building in the future check this area.
806FA0F9-78D7-490E-8600-C9D7D2E724F6.jpeg


Anyone using an LS, make sure you get the corvette style throttle body. My truck style 3 bolt is too tall. So I’ll have to convert my Holley connector to a 6pin plug. Should be good to go then.

75F7B4E7-6166-404B-8D60-A79F7BEB8694.jpeg
 
Those look fantastic! This side skirt is coming out well, just lots of sanding. Vacuuming and peelply is the way. I don’t think I’ll do another part without it.

The forged looks awesome on the side skirts. You're definitely right, plenty of sanding for sure. At least it's flat and no little nooks and crannies to get into with it. After using vacuum and peel ply, it's hard to imagine doing it any differently.
 

Kyle

Supporter
I wanted to share a few more photos from Allan. It looks like a lot of body work is done, primer soon. I will be doing plastidip at home when it gets back.

Unbelievable how much work there is. Just when you get all the mechanical stuff done there is still hours and hours into the body and interior.

B097B6D9-36C1-44F7-B67E-46CE46D6EB4E.jpeg
3E184EF8-D23A-4CA1-AD54-6C6D42C94091.jpeg
82FFCFAF-610E-4BA9-BB3C-E4D3224C03A1.jpeg
1E47C5A0-B771-466E-99DA-BB4259D6D130.jpeg
0DFCD039-3690-48BD-BB9E-95A0FE673131.jpeg
664EC7C9-EF5E-48C0-BF79-BFDB8404FDEB.jpeg
1DF7E204-CF3E-44F9-99E5-D9F225351062.jpeg
EC166718-0187-42E3-8823-F32EFD45371A.jpeg
D93A13E1-46E7-478F-AC14-99EC2B3A131C.jpeg
CB60E63D-9C83-424D-8420-658121DBBADA.jpeg
 

Kyle

Supporter
Little update. Allan says the car should be finished this week.

I also am closing on a new rental property here soon that includes a detached two car garage. I’m going to convert it into my workshop, should help tremendously with getting things done.

I still have a list of things to complete on my own, but nothing is terribly urgent. A head swap is first in the list

New throttle body
Plug for throttle body
Adapter for throttle body
Update terminator
Split rear wing
Front hinge
Wheel vents
New heads and springs
Crossover hose vent steam
Weld in bung for radiator and vent line
Clear coat splitter and side skirts
Sand center console and clear
Paint crossmember and supports
Build fiberglass heat duct for radiator


CE701F37-9A04-44EA-87D6-99149C1A279B.jpeg
0429AB96-A516-4321-8650-5FBE668AFAE9.jpeg
5F9E3715-C1C4-4A93-85A6-C39262FE7A5E.jpeg
7C7226EC-3574-4CDE-B69E-FA128E4833E8.jpeg
0561144B-F5F5-4127-9139-28ECA4B50F3E.jpeg
 
Is Allan also building your an upper console to hold a couple more speakers? If not, may be worth considering. Not really for extra audio, just visually looks nice and filler between the seats.

In hindsight if I was to do mine over again is I'd put 2/3-way 5.25/6.5 behind the seats like you, enclose the upper console Allan built to hold little 6/8" sub.
 

Kyle

Supporter
In the passenger well there is a 8in powered sub. I think my biggest worry is going to be rattling. I think what im going to do is add some more sound deadening in the doors and possibly add some expanding foam in the distal corner of the door as well. I need to remove the door inserts to carbon them anyways. I also want to remove the dash and add some more foam/deadening etc.
 
In the passenger well there is a 8in powered sub. I think my biggest worry is going to be rattling. I think what im going to do is add some more sound deadening in the doors and possibly add some expanding foam in the distal corner of the door as well. I need to remove the door inserts to carbon them anyways. I also want to remove the dash and add some more foam/deadening etc.

Have pictures of the 8 enclosure? I built one for mine, but had a brain fart apparently and didn't take into consideration the HVAC was lower, lol. Box was just a cube so easy to rebuilt, but it's on the back burner for now. I agree, I'm curious about rattles from it or just sounding bad in this car from so much metal and fiberglass, but some umph is desperately needed in mine. :)

For what it's worth, if it's in the cards, I'd let Allan paint it....even just plain black. I don't think it would costs that much more at the stage it's currently in. Then you'll have a good paint job and just dip over it. That was my thinking when he built mine, although I never bothered to dip. I lost trust in DYC and plasti-dip when it ate the OEM paint off my old Hayabusa on it's 4th dip.

Make sure to ask Allan how to readjust the doors for when you remove and skin them in carbon. I understand the linear actuators are finky when you add weight after they're set.
 

Kyle

Supporter
Here’s where I put mine, no idea how it sounds
. I know in regular vehicles these pack a punch. Obviously not a 10/12 but it will help. Plenty of room in the footwell too.
D6071DC7-19AE-4372-92AD-E8F0DD630359.jpeg


I’m hoping if I can close on this property I’ll have a two car detached garage as a car work shop! So if I can ever decide on a color then I’ll attempt to paint it myself. Allan basically did all the hard work for me with prep and primer.

I’m eventually thinking I want to build an active power Gt40, having a dedicated space should help immensely.
 
Here’s where I put mine, no idea how it sounds
. I know in regular vehicles these pack a punch. Obviously not a 10/12 but it will help. Plenty of room in the footwell too.
View attachment 119339

I’m hoping if I can close on this property I’ll have a two car detached garage as a car work shop! So if I can ever decide on a color then I’ll attempt to paint it myself. Allan basically did all the hard work for me with prep and primer.

I’m eventually thinking I want to build an active power Gt40, having a dedicated space should help immensely.
Kyle - Looking really good. what brand and model is that speaker?
 

Kyle

Supporter
Kyle - Looking really good. what brand and model is that speaker?


Fran @ RCR sells a LHD rack ,this will be the easiest of your conversion.

To do a “Full” conversion I probably would have needed to move the center spine over a couple of inches. However, the amount of time required just wasn’t worth it. My seat is tight to the center console, but that was going to be custom anyways. As you said, steering rack, dash, and center tub were the main things needing modifying.
 

Kyle

Supporter
Been slowly knocking off tasks. Heads are back on, new coil brackets, rerouted the coolant lines to go into my expansion tank and basically act as an aerator, painted part of the supports black with Por15, need to do the side angle supports.
Added in a catch can, lots of oil in my intake even without having ran it much

28EF2054-DB80-4A8C-93BF-5FA8B4D2ACE6.jpeg
335C4EDA-B8CE-4286-87F3-4963B786C882.jpeg


Added black hole covers for the screws where the windows go.
5AF18520-AEE9-483F-B874-7AE35CC30980.jpeg

I’m about to clear coat some carbon fiber parts and then hopefully get it on the road temporarily until I can muster the will to accomplish more tasks.
 

Attachments

  • DD39B56C-9762-4540-983C-1DF8F47EE373.jpeg
    DD39B56C-9762-4540-983C-1DF8F47EE373.jpeg
    556.6 KB · Views: 134

Kyle

Supporter
Wow so today I had the first real drive around the neighborhood. Here are my impressions….

1. Super raw, everything gets transferred from the road. And it is really really low. I’m going to have to pay attention closely to potholes, sewer lids etc.

2. All the cameras and mirrors are much needed. I strongly suggest having a back up and rear view camera mounted up high.

3. I got half way through tuning the other day before it over heated, today I finally purged the bubble and didn’t have any overheat problems. I believe it has like a 190 thermostat. When summer comes around I may have to get upgraded fans. I already have it shrouded we

4. I do not have any ducting to my intake, I really need to have some dedicated ducting and close out for the intake tube as MAT temp was well over 109.

5. I’m having some intermittent misfires which I’ve narrowed to bad injectors, have a new set on order.

6. I have the splitter ready to clear coat, after this first drive I have low expectations of how long it is going to last.

7. First gear was a little difficult to find on the G96, definitely not smooth as butter like the Graziano seems to be, I’m going to have to adjust the cables if anyone has instructions on hand.
 
Back
Top