CANAMSA - SA stratch build

Thanks Mike

What transaxle are you useing?

Audi 016 AAZ

Just bought a pair of Ofenhauser valve covers
I'd like to see those, if you have a picture?

Cheers

Fred W B

2drivetrain.jpg
 
Last edited:
When I get them Fred I'll post some pix. of the Ofenhauser Valve covers. Should have them in a couple of days. i'm not sure if I'll get their 4 barrel intake or an Edelbrock. Or try to do a 4X2 intake?
 
i Fred I said I'd post some pix of the Offenhauser valve covers when I got them. Then forgot (it's hell getting old LOL) but in the mean time I also got an Offy intake. So here's the pictures of them.


I thought they were prety nice. I use a lot of Edelbrock parts on other engines. But I like the idea of the Offenhauser name on this one. They've been building parts for racing engines for a long time. Offy is closely associated with Indy & Can-Am here. How things look is important to me as well as how they work.
 
The chassis you showed in the early pictures you said was a rough mock up. Any progress on the "real thing"? Are you going to stick with a space frame (tube) or try your hands at a mono? It's been a long road just to get the body done I know. But ended in a magnificent product.
 
Thanks Mike

The chassis I've built so far is a rough mock up protoype that I put together to sort the ergonomics and the layout of the running gear. Its a tube frame with ally skinning to the centre section. I welded it almost fully and tested the torsional stiffness. I stopped working on it as I needed to sort out the overall width over the wheels and for that I needed the body confirmed.

I've now hung the body over the mock up chassis to finalize things like where the radiator mounts, suspension etc. Once that is done I will then build a real "final" chassis. Some of the frame parts or subsections used in the mock up exercise could become part of the final chassis.

At this stage I am not intending to attempt a replica pressed style tub chassis, maybe that will be a longer term project.

Cheers

Fred W B
 
A space frame with panels is probably the most practical rout. The T70 had a lot of pressed steel components to the tub. I think it's more practical for a road car anyway. Most race cars were not designed to last more than about 500 miles & then be torn down & rebuilt between races. Le Mans being the exception but that's why there are so many drop outs & DNFs. Looking forward to pix of the build.
 
Only thing that has has happened on the body recently is that I have made a stand to support the tail when off the car. The lower piece to shaped to fit the tail and is padded with a strip of closed cell foam. I fitted castors so I can move it around easily

tail%20dolly.jpg
 
For various reasons I have not reported any significant progress on my project this year yet, but I'm hoping that will change now that I am over the hurdle of the rear uprights. This turned out to be a very long story which needed facilities that I do not have in my garage and took a lot of running around to sort.

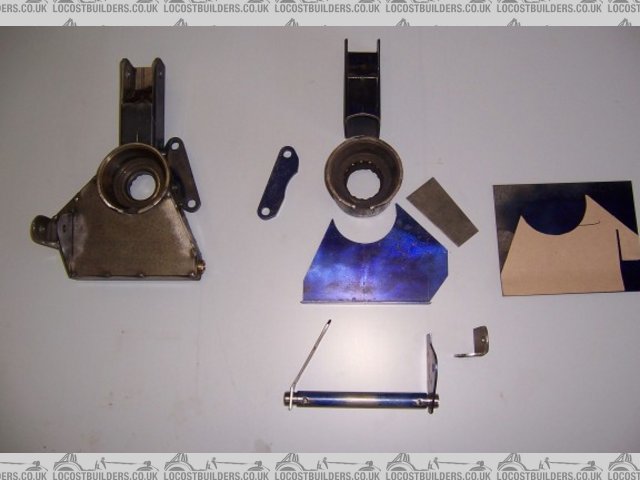
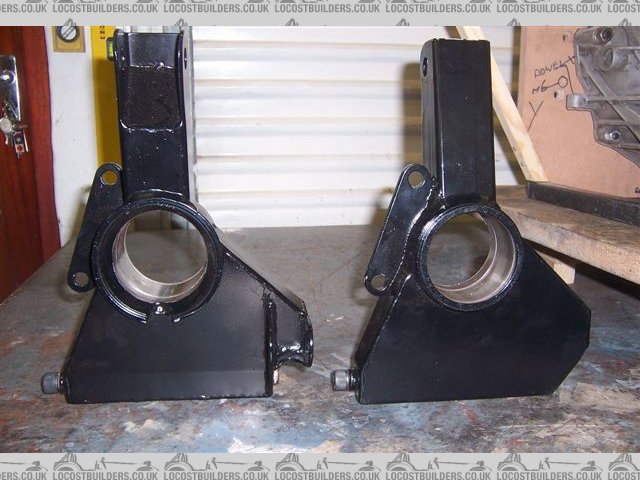
I started to fabricate these around the bearing housings cut out of the front struts from the Audi that donated the transaxle. In these picture you can see the parts and a tube that self jigs the lower bushes in line with each other and the side walls vertical.


upright%20parts.jpg


2upright%20parts%202.jpg


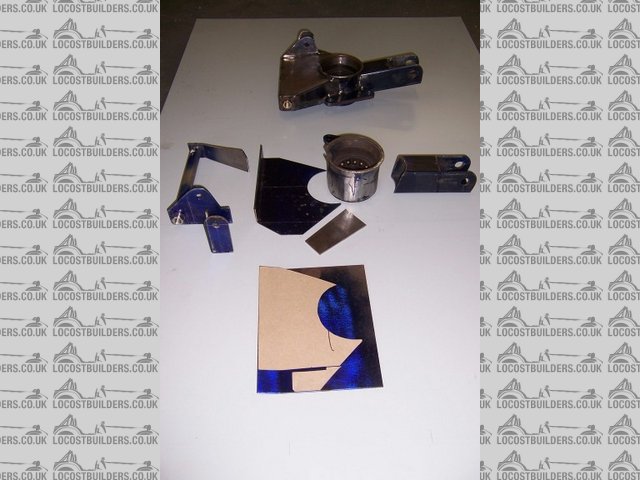
I intend to make the real wishbones from 21.3 od x 2.11wt Schedule 10 stainless tube, with machined inserts plug and fillet welded into the ends. You can see the detail in the pic below. I have also used this detail inside the bottom of the uprights. Joints are M12.

100_2421.jpg


I tacked the parts together and took them to a friend (man 1) to be TIG welded up. I left the old bearings in in what turned out to be a vain hope that they would help prevent the housings distorting too much. Getting the old bearings out was difficult, this was eventually only accomplished with the aid of a big press and welding on the race by a car repair shop (man 2 and 3). The housings were up to 0.5mm out of round in places.

So this needed to be sorted. I bought new bearings to measure from a friend at a bearing suppliers (woman 4) who recommended a workshop that might be able to help (man 5). Talked to man 5 who took an interest in my project, but could not help and suggested I go to a machine shop nearby (man 6). Man 5 even phoned man 6 to tell him to expect me. Man 6 turned out to be the proprietor of a fair size industrial machine shop and who also builds and races V8 dirt track cars as a hobby. He told me to leave the housings with him.

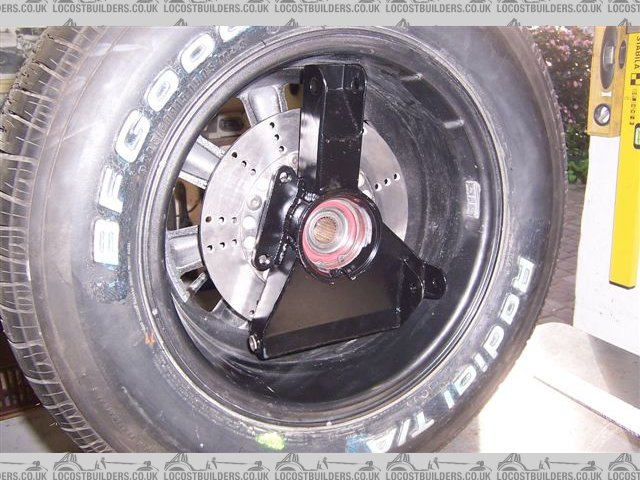
In the meantime I had drilled the hubs to convert to Ford PCD and studs, which necessitated visits to another friend (man 7) to use his small lathe to cut the "as cast" rear face of the hubs and then back to man 1 to press in the new studs.

Man 6 called to say the uprights were finished. He had cut a true reference step in one end of the housings, made a fixture to hold the uprights in a lathe, turned them to a true size and matched them to the bearings. He refused to accept any payment for all of this.

So now I could take the uprights home to fettle some of the welding a little and then to a paintshop (man 8) to have them sand blasted and painted black.

upright%2001.jpg


Then back to man 6 who light press fitted the bearings and hubs and finally I could test fit the brakes and see how they looked in the wheels.

bupright.jpg


rupwheel.jpg


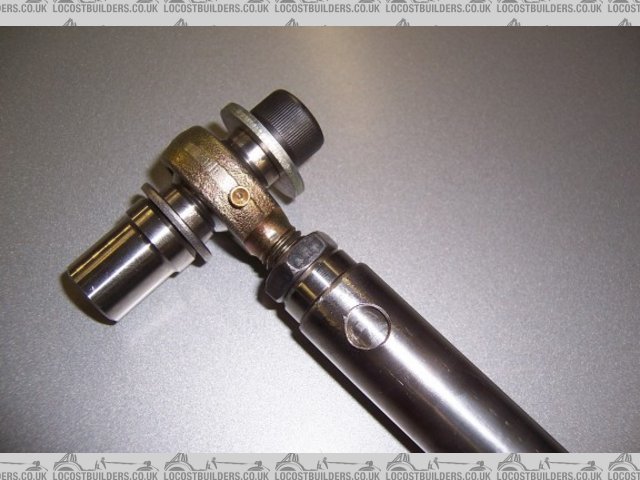
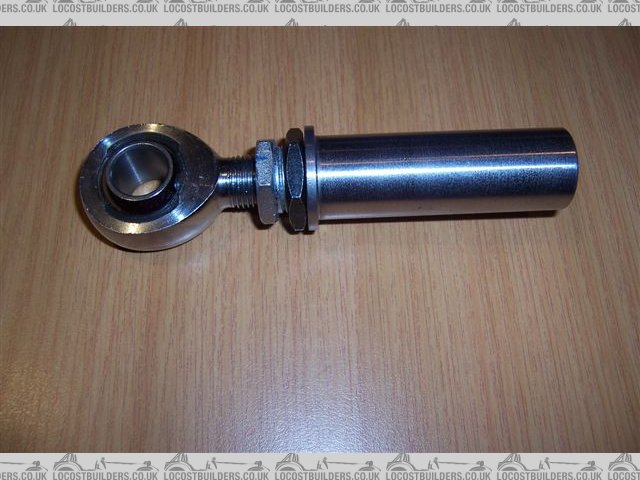
The top M16 attachment incorporates a internal and external threaded bush between the left hand 1.5 mm threaded rose joint (sourced from McGill motorsport U.K.) and the bush that will be welded into the top wishbone to give camber adjustment. A 360 deg rotation gives 3 mm of movement. The black half nut is the locknut on this adjustment bush, the lock nut on the rosejoint is not fitted yet. These parts were sourced with help from yet another friend (man 9).

2uprighttop.jpg


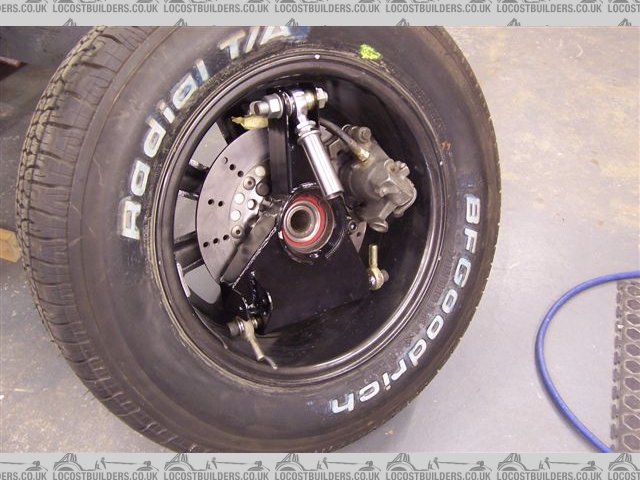
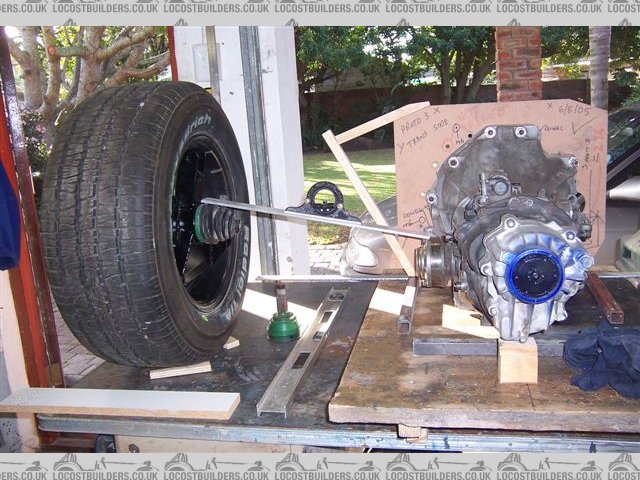
And finally I could mock up the wheel to trans axle geometry assembly. With a rear ride height of 125 mm It looks like I will get just on 10 deg drive shaft angle.

drive%20angle.jpg


Cheers
 
Last edited:
Hello Fred
Glad to see you are working again at your very nice project
As writed in some mail it's really a pity we are not close one to another so I could help you friendly such a lot in doing all your stuff suspension !!
I have left there so many items to offer you in order to built an more "look like" suspension !!
Otherwise I offer you again if you want to check by drawing all lenghts of your wirshbones to get an good and acceptable cinematic suspension preventing bump steer etc etc
may I give you an other friend advise ; you are talking to use stainlees tube for wishbones ; it's really better to use a mild steel tube than stainless ( stainless will bend few by few other the years or some hard bumps and you will not notice that at once )
Better use an rather standard mild steel you can find quite everywhere ; there I could find for you at very very low prices ( supplier is one of my best friend!!)chrome moly tube and then could weld your stuff in tig welding process
Only issue being shipment !!!!
Am ready really to help in any area you need ; your did a masterpiece all along this process so to help you will be an honor
 
Blue - With a rear ride height of 125 mm It looks like I will get just on 10 deg drive shaft angle.


Mic - Thanks again for your offer of help, certainly I will send you the some detail of my suspension layout.

As you can see I am not attempting to make a correct looking rear suspension, I will use upper and lower wishbones.

I'm pretty much committed to the stainless for wishbones, all my end fittings are made. That decision was made a long time ago and was down to me being able to source the schedule tubing easily. Chrome Moly is not easy to find in these parts.

The tensile strength of ordinary carbon steel and stainless is very similar, and stainless steel is more ductile. I see this as an advantage as in the case of an incident the stainless might be more likely to bend, rather than rupture and let the wheel come off altogether. Also the stainless schedule tube is pressure rated and so must be better made than ordinary carbon steel tube.

I accept that Chrome Moly would give a better strength to mass ratio.

Thanks for your interest
 
Last edited:
Hello
the choices are yours ; Ok no problem at all
Feel free to send any drawing or sketches and I wil try to help as much as I can !!
 
Hi Fred, Rear uprights are fun aren't they in fact uprights period take a lot of time and design work. I looked at fabricating at first but as you are now well aware there is a lot of heat required for the welding and that means distortion. Hence I chose to make a pattern and cast mine in alloy. Yours look good, what are you planning for the front?
Looking forward to more progress.

Cheers Leon
 
Fred hi mate looking good words don't do this project justice believe me, as for 10 deg rear drive axle angles I have 9 deg on the 5000 with the same trans and haven't had any problems to date, I am lead to believe they will operate ok up into the 20's but I don't think i'd like to try that much.
good to see you back in the shed
cheers from Sunny Queensland
John
 
Back
Top