
You are using an out of date browser. It may not display this or other websites correctly.
You should upgrade or use an alternative browser.
You should upgrade or use an alternative browser.
Custom transaxle
- Thread starter leonmac
- Start date
From what I have been told by the guy who will do the casting they will make the core from the pattern itself, from what I gather is they will pound the core compound into the Pattern then slit the Pattern and you have your core which will have steel rods through it to support it suspended in the box once the outside moulds are done. It will be done in 3 boxes, 2 sides and 1 for the top plus the core. To be totally honest I don't know the complete details but they assure me it will be one piece when it comes out.
cheers Leon
cheers Leon
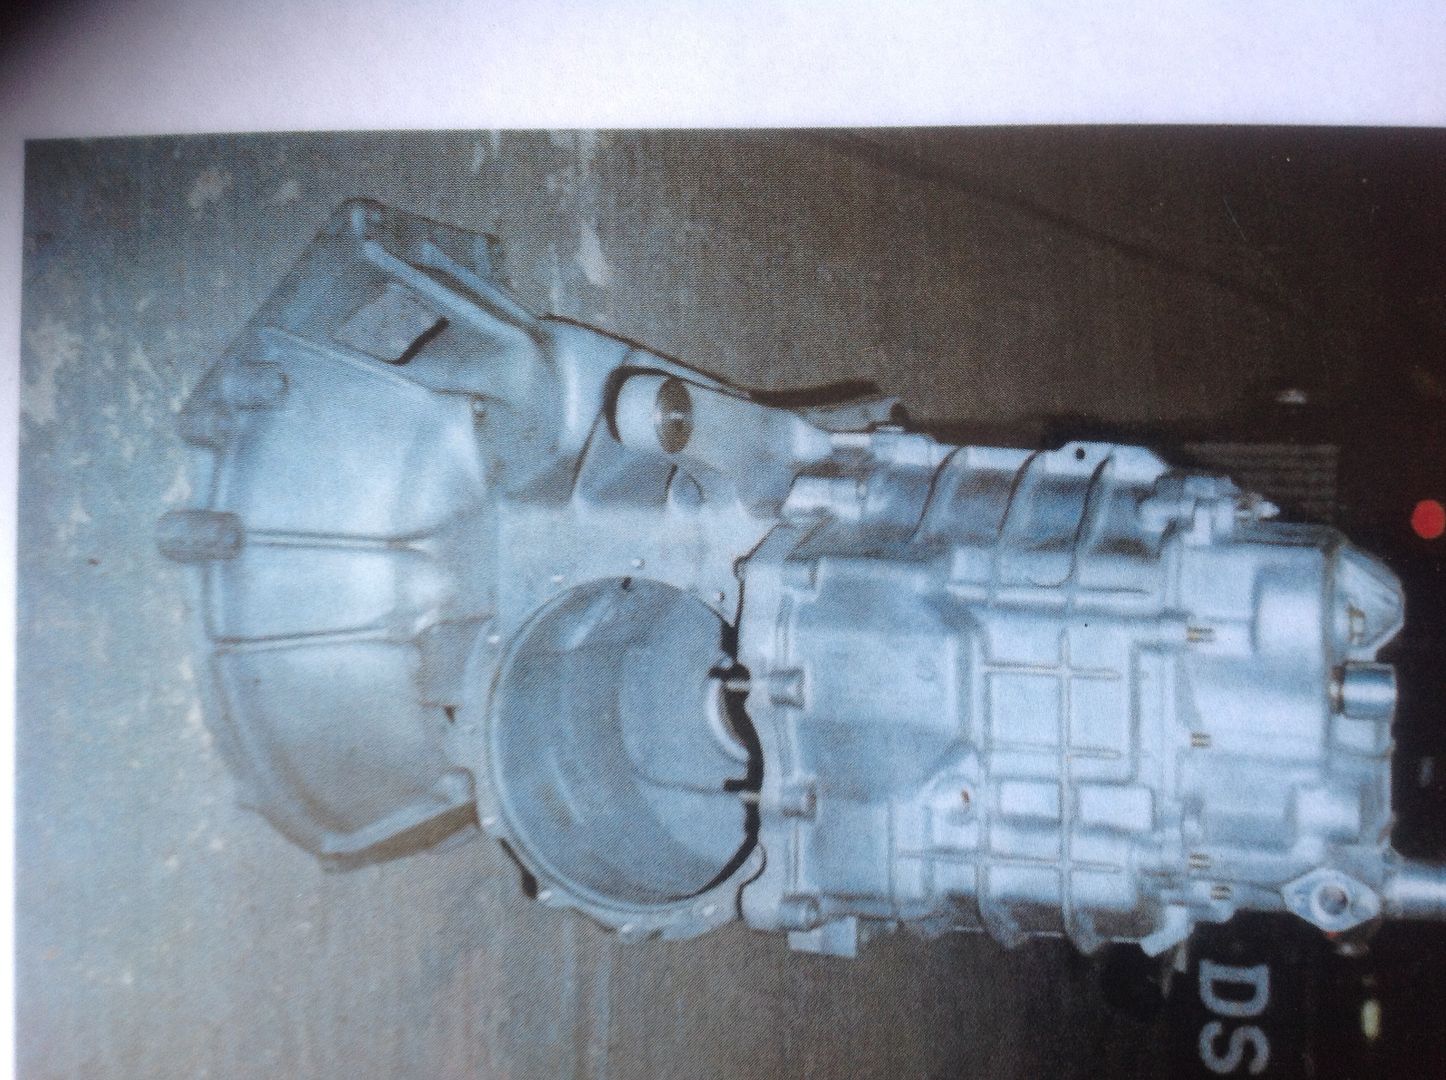
More time spent on the T/A pattern, I had it split down the middle by a local mill that has a huge band saw I put it in a frame so it could be held properly and run through true and square. I then hollowed out the diff section leaving ribs top and bottom, these line up with the studs that will hold the side plates and give strength and stop flex in the sides, I then put bosses in where oil will be pumped in and extracted from with the pump that will be driven off the lay shaft at the back, one will spray onto the crown wheel as it rotates away from the pinion so as not to create hydraulic pitting and one will spray onto the main gear stack it will sucked from the diff section though a boss at the bottom R/H side at the rear. There is still some matching up inside the housing to finish but it is almost there. Some photo's to look at, Cheers Leon :thumbsup:
Fantastic job!!!! cant wait till its done!! all the best, Neville.
Leon one thing you have to be mindful of is that the thicker parts of the casting pull on cooling and can distort the final as cast shape. We have had to add material in places on some of our molds and remove in others despite allowing the 3mm in every 300mm for contraction. On the G50 case we had to throw the first casting and attack the molds again, only small amounts but the hole in the side casing for the diff on cooling became slightly oval and the bellhousing shrank enough to put the bolt holes too close to the edge of the casting.

Thanks Bob, I have been quite mindful of that and tried to keep most of the mould to a 10-15mm thickness, obviously area's that have to carry bearings are thicker as are the sides where the side plates goes, it is 20mm around the lip I will add some meat into the hole to allow myself plenty to machine to match the side plates. The gear case section has also been made to the mould of the rear case section not the finished Alloy part shown in the earlier photo's. The shrinkage on the rear case was about 1mm all round the lip and if you look carefully you can see that difference between the finished Alloy part and the wooden pattern in Post # 88. I guess the first finished casting will answer a lot of questions for me, I have tried to leave enough meat that I can machine to the final dimension.
I was in at the foundry today for them to check my pattern again (3rd Time) and they are really pleased with it and say I'm on the right track, I just have some matching up to do in a few places and John said the better the external finish the nicer it will look so some minor sanding and finishing to do. So hopefully I will have an "Alloy" case soon.
, OH, BTW it will be cast in 6061 and treated to T5. we discussed using the 5008 that I used on the uprights and side plates (it age hardens) but they say the 6061 will give me a better result on the more complex casting due to the way they melt the raw alloy and the process they use to evacuate gases so there is no porosity. He did give me a big spiel on how its done but if I tried to explain it on here I'd just get it mucked up. Cheers Leon
Last edited:
Love this thread Leon.
You are doing a great job of keeping me interested.
Jim
You are doing a great job of keeping me interested.
Jim
Hi all, question for Robert, regarding the 'core shift on cooling issue' would it not be better to mould in larger bolt bosses in the bell without a bolt hole so that you would have wriggle room and could drill your own holes to match the motor?
I should imagine that centering bolt holes exactly in a limited run would call for a high order of accuracy in the moulding.
Not in anyway knowledgeable about these processes but I'm never too old to be fascinated by them...")
I should imagine that centering bolt holes exactly in a limited run would call for a high order of accuracy in the moulding.
Not in anyway knowledgeable about these processes but I'm never too old to be fascinated by them...
Hi all, question for Robert, regarding the 'core shift on cooling issue' would it not be better to mould in larger bolt bosses in the bell without a bolt hole so that you would have wriggle room and could drill your own holes to match the motor?
I should imagine that centering bolt holes exactly in a limited run would call for a high order of accuracy in the moulding.
On a simple casting like the ones I used to make for putting chevy/pontiac engines in range rovers the shrinkage issues were more a problem along the top of the bellhousing because there was more material to shrink, the buck had to be made slightly banana shaped to compensate. If you look at the third bolt hole up on the right ( engine side ) you will notice the drilling is very close to the edge. That hole on the buck would be nearly 15mm inboard of that which gives you some idea of how much everything pulls about. This casting is a reject and the mold was modified. Machining is the easy bit once the castings come out correctly , after facing off parallel we always work from crank centerlines to engine / gearbox dowels then to the bolt holes. I know it sounds cruel but we machined the gm and ford dowel positions along with crank centerline hole into the mill bed so once the dowel holes on the engine side were done the casting could be dropped onto them to drill the gearbox side without having to set up crank centerlines twice.
Bob

The unmachined one below for a gm/pontiac to 265 getrag being a lot smaller never had a problem and machined within limits as was.

Last edited:
Hello Guys, I have been away on holiday and now at work off shore in NZ hence no progress for a while. I was just reading the Boxter/Cayman thread and again the word "afordable" came up and I'm always curious as to what is considered "afordable" by the Replica Car comunity. Are we talking about used or new box's, are we talking capible of up to 500hp or box's capible of up to 900+hp. There is no doubt that the used market has its limitations on ratio's and HP ratings but nobody has really said what they would be prepared to pay for a box that meets the middle ground across the board, I'm talking 700hp and useable ratio's and lets be honest we all know wider ratio's work best for high torque V8s either 4 or 5 speed, IMHO 6 speeds aren't really needed for V8s. The other thing I hear a lot is 1st gears too low, I can see this as not good for track cars but street driven cars?? who wants to idle around looking for a parking space at 30mph? and what is good criusing RPM. I had a 6 speed Comodore SS that was 100kph at 1600 RPM, I hardly used 6th gear. Lets have some feed back. Cheers Leon.
Last edited:
No dog in this race Leon, but from my observations, $8-10k USD seems to be the range for ZF type - more for Rics, Graziano etc., perhaps up to $16k USD. There seems to be a marked reluctance to put money into transaxles, whilst many are prepared to throw $20k + USD at the motor.
One thing is for sure. They'll mostly balk at what you would consider a fair price and want it as cheap as possible.
Quaife sold 75 ZFQ units in fairly short order at around the $10-12k mark, but they came on stream at a time when there was a log jam of SPF cars waiting for T/A's. I can't imagine that anyone made any money out of such a short run.
One thread by Alberto Wannatini really laid out the bare bones of an economic exercise in specialist transaxle production and is the kind of detail you really need. I believe his forum name was (is) Gearfox, so a search would pay dividends for you.
Frank Clark
Supporter
Affordable: $15k max with LSD
Gearing: Wide spacing, tall 1st gear. Similar to Viper (long time viper owner here). 1st should handle 60mph (parking lots will suck if you have a wild cam, but that is OK). Highway gear should be 1400-1700 rpm @ 70mph.
Able to handle 650hp/600tq
Gearing: Wide spacing, tall 1st gear. Similar to Viper (long time viper owner here). 1st should handle 60mph (parking lots will suck if you have a wild cam, but that is OK). Highway gear should be 1400-1700 rpm @ 70mph.
Able to handle 650hp/600tq
As an addendum to my post re: Gearfox, in case you don't find it Leon, I believe that given the likely production run for replica, kit, scratch build market, the numbers didn't stack up, and therefore, unless you could guarantee a run of around 1,000 pieces (or whatever) it was nigh impossible to keep the unit cost down whilst maintaining the quality and performance.
Another forum guy from USA (Richard T?) started down this road some years ago, but he too ran into difficulties and poor health also intervened so that was a non starter.
It's a hard road to travel mate....
Another forum guy from USA (Richard T?) started down this road some years ago, but he too ran into difficulties and poor health also intervened so that was a non starter.
It's a hard road to travel mate....
That would put DeLynns T/As right on the money, I hope he gets his to the market as we have been waiting a long time to see them in the flesh. As for me, I hope to have the case pattern finished this time home and get it to the foundry and hope to have an alloy case with in the next month or so. My ratios are 3.15, 2.00, 1.35 and 0.90 with a 3.59 R&P. they are quite wide but I'm 510 inch Big Block. If I build more I will use the Wide Ratio Top Loader for street and I want to build a Track only with Jerico gears and dog rings but that is still a pipe dream at this point. Cheers Leon
I hear what you say Keith. If one was hoping to make a profitable business from these things the market we are in is not big enough. My hope is to just make one that works for ME. I would consider making others for mates if it is successful as long as it covered cost's I don't ever expect to make money from them but it would be cool if I made a couple with the Toploader and Jerico bits to see what they go like. I'm hoping John will want one soon (no pressure mate):thumbsup:
Cheers Leon.
Cheers Leon.
Hasn't Jac perfected his Wooden Wonder yet?
Yes, but with reference to your post #115 above that's where the issue stands, while I have no problems with building a few(less than~ 10) the thought and expense of gearing up to make them in greater numbers does not stack up, in addition to that transaxles for some reason seem to attract the largest amount of idiots who expect them to be completely bulletproof and withstand abusive treatment thru several engine replacements which takes the gloss off any thought of doing the thing on a commercial basis especially since most vendors of the parts wont transfer liability when installed in an unknown application.
For those who are interested the component parts on mine cost between $6k-$9k, add the cost of the housings and machining a few special parts and it starts to get up in the twenties on an individual basis---- still less than a USA genuine T44 replica. The saving grace for me as an individual is I can write off the machining just as most kit assemblers write off the labour of love in building their cars.
Your dead right Jac, If I built for other people it would only be to guys like John who understand the "No Warrenty" given side of things. You get what you pay for. If you want a 700hp T/A with a warrenty and factory back up you pay $20K plus. I'm not sure what DeLynns Back up/warrenty will be and for the suggested 8 - 10k price tag I,ve seen then thats the best buying you'll ever get. For your interest Jack I'm at the similar $$ to you, I'm looking $8-10k finished. It might come in cheaper depends on some machine work I can't do. Lets be honest, it isn't done yet so its all speculation at this point. Cheers Leon
Similar threads
- Replies
- 0
- Views
- 257
- Replies
- 5
- Views
- 721
- Replies
- 3
- Views
- 1K
- Replies
- 4
- Views
- 2K
- Replies
- 1
- Views
- 268