Darrin's MMR BOSS based GT40

Thanks for the pictures and info Bill! I'll keep it in mind as I build this area.

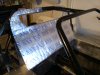
I picked this stuff because it has a higher review on Amazon than anything else (five stars with 33 people reviewing). The biggest complaint is smell for a few days but as I'm building the thing over a long period of time, that's not an issue. It is thinner though as you say. May double it up (which would make it about the same as Dynamat I think) in some areas.
 
Small update. Front exterior paneling done, tanks hung, sills in place and covers for fuel level sender fitted, rear bulkhead paneling added and cover about to be mounted. Next up some sound deadening material in the foot well area then the interior paneling at that spot gets done.
 

Attachments

  • CAM00723SMALL.jpg
    CAM00723SMALL.jpg
    139.7 KB · Views: 779
A little bit of progress.

Foot well area just about done. I have some more sound deadening material to add. I have it on the inside of the panels and plan to add a layer to the outside as well. Dynapad to go over that then carpet.

The rear bulkhead will get the same treatment...Dynapad then carpet.

Do you all put sound deadening material on the seating area or just leave it to the carpeting to do most of it? I was thinking about the same treatment (one latery of Rattletrap then Dynapad over that) after I got the rails for the seats in place.
 

Attachments

  • CAM00766Small.jpg
    CAM00766Small.jpg
    348.1 KB · Views: 606
  • CAM00769Small.jpg
    CAM00769Small.jpg
    510.5 KB · Views: 672
Hi darrin.

Looking great mate, i spoke to fatmat uk and im going to use there sound deadening too, just got to decide between xtreme and rattletrap. What quantities have you bought so far?
Also ive see youve got a footwell bulkhead panel installed are you going use a different pedal box like renato?
 
I think the Rattletrap is the better of the two from what I have read but both will do the job. I bought 25 square feet and that was enough to do everything you see and some areas that are hidden in the foot well area that are underneath panels. I still have another 6 square feet of it and will use it to do the rest of the front that I didn't get to yet. I image I'll get another 25 square feet to do the rest of the interior.

Then I have some Dynapad to go over it. Need more of it too probably. Just have enough to do the rear bulkhead and seating area now.

Yes, the plan is to go with the same top mounted pedal box that Renato is using (a Wilwood). Kind of waiting for him to sort that out and will replicate it. Same for the steering too. He is using an electric unit from a Toyota Yaris. They use six bolt mounting for the steering wheel and I'm looking at getting either a Momo or a NRG wheel to rest on top of a NRG quick release. Thinking that a used column with new hub, quick release, and either a used Momo or new NRG wheel will only run about $350-$400. Not too bad at all.
 
Bought this to set steering wheel positioning and such but it's not a bad fit. Might just keep it if I can get some lower profile seat runners.
 

Attachments

  • CAM00835.jpg
    CAM00835.jpg
    126.3 KB · Views: 575
I presume that's out of something rather than aftermarket? What's it out of? While we probably don't have the car it came out of here I'm after a temp seat atm for the same reasons.
 
No it's aftermarket.

I was about to buy a set of Sparco seats but kept thinking it would be a real hassle if they didn't fit when I just happened upon this one made by NRG (same company that I and so many folks here get their quick release steering hubs from). The measurements were about the same and the price was such that it made it worth it to me to use it as a "test mule" that I didn't have to worry about tearing or getting sealant on, etc. Looking at the thing and sitting in it though I am strongly considering keeping the thing and getting another for the passenger side. The fit is almost perfect except that it does sit a little higher than I want (comes with sliders which aren't low profile). The reviews I saw on the NRG seats are very good as well and I see why now.

I presume that's out of something rather than aftermarket? What's it out of? While we probably don't have the car it came out of here I'm after a temp seat atm for the same reasons.
 
Ah, yes looks pretty decently priced in the US.
Unfortunately what it appears you can get for $170 (£110) in the US turns into £220 ($340) in the UK...
 
Indeed, might be worth checking shipping but probably be a fortune.

At £100ea I'd do the same even if just for a build seat and flog it afterwards. At £220-£320 forget it!
 
That was my thinking as well.

I can measure the box it came in if you like as I haven't discarded it yet.

It's about 54"x28"x12" as a rough estimate and weighs around 30lbs (the seat is 24 or 25 I think).
 
Following the path Renato did using Toyota electric powered steering. We need to work out some space issues with the pedals though. Note that the wheel is just a test mule. Have the one I will use in the car on order. Steering feels very solid and am happy with it. Seat too. Going to get some cushion taken out (it is very dense and thick) to lower the seating area 1 or 2 inches though.
 

Attachments

  • CAM00839.jpg
    CAM00839.jpg
    76.3 KB · Views: 597
  • CAM00841.jpg
    CAM00841.jpg
    75.6 KB · Views: 592
Loose fit one door this evening. Having heard all of the horror stories I guess I am fairly happy with the fit but figure it is still going to be a pain to get it just right. It's off by maybe 3/8" at the worst spot.
 

Attachments

  • CAM00847Small.jpg
    CAM00847Small.jpg
    86.6 KB · Views: 634
Made four brackets for my top mounted pedals (other pedal comes from Ford with the PCM kit for the engine). Two that mount to the chassis and two that mount to the other two that the pedal assembly mounts to. Took about four hours to drill all of the holes (over 50) and get it placed just right. The bracket that fits furthest outboard had to be narrowed at the bottom to allow me to retain the cross member that goes from the top of the driver's side shock. The chassis brackets are 3"x8" angled in at the top and are made of regular carbon steel but the other two are 3/16" thick 1.5" angle stainless (tough to drill through) with one end opened up and flipped up to form the mounting surface (giving about a 3" linear area to resist downward movement...it's pretty solid to say the least and not all of the bolts are even in place yet).

The setup is made to allow you to adjust the pedal assembly with about 1,5" in the X axis, 2" in the Y and 2" in the Z although I doubt if I adjust them from the current spot, it would be nice for anyone else who might drive the car in the future.
 

Attachments

  • CAM00951Small.jpg
    CAM00951Small.jpg
    275.8 KB · Views: 655
  • CAM00948Small.jpg
    CAM00948Small.jpg
    313.8 KB · Views: 676

Randy V

Moderator-Admin
Staff member
Admin
Lifetime Supporter
Darrin,

Some really good progress!

Make sure you have your door gaskets in place when fitting them, you would be amazed at the difference it makes.
 

Ian Anderson

Lifetime Supporter
Darin

Could I suggest you fit a dead pedal to rest your clutch foot on when not using the clutch?

Easier to fit at this time than once it starts closing up down there!

Ian
 
I agree...but I don't think there is room for one unfortunately. :(

If I shift the pedals to the right (LHD remember) to make room for one then the angle is such that it will be odd driving. I may play with it a bit as not having one would feel odd to me.

Thank you for the feedback. Every comment is thought over and greatly appreciated.

Darin

Could I suggest you fit a dead pedal to rest your clutch foot on when not using the clutch?

Easier to fit at this time than once it starts closing up down there!

Ian
 
Thanks Randy!

The weather stripping around the spider is already in place. I plan to get some more along the bottom though. Superformance has some neat stuff for on top of the sill although it is pretty pricey. I need something wide since I made my lower bodywork removable (installed rivet nuts and bolted it into place) so I can gain easy access to the fuel tanks when I have to replace the foam (oxygenated fuel is tough on it I understand) some day.

I will snap a photo and put it here showing what I have done. The kit builder specifies riveting it into place so this is a deviation I made and it will need a custom bit of molding to cover up the bolts/washers.


Thank you for your feedback!

Darrin,

Some really good progress!

Make sure you have your door gaskets in place when fitting them, you would be amazed at the difference it makes.
 
Last edited:
Darrin,
What are you using for a controller for the steering? I am about to order my column. I am thinking of going with the Corsa C, and a variant of the controllers out there. I tried to find out what Renato is or is planning to use but didn't get a response that directly addressed the controller. That is a key part. the final price of the Toyota is a little less than the Corsa with shipping included. So it is a toss up at this point.There are some guys working on a controller for the Corsa as well as some of the aftermarket guys on Ebay. Rallywhiz is about to come out with a Toyota Yaris controller, but haven't heard from them yet. Shipping is the biggest drawback with them. They aren't able to find any without ABS so they are working on an ABS model. Thanks for any help and/or pics you can provide.

Bill
 
Back
Top