DRB #5

Chris Duncan

Supporter
Went through all the same problems with my GT40 seats including buying seats and they didn't fit.

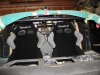
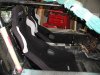
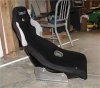
I ended up with the Corbeau A4's, they tilt so their heavier but oh well. The first seats I had didn't have enough angle and I think most rigid seats don't lean back enough to give head room in a 40. Although there's one from Australia that I had marked the post but with the old forum so it's gone. They were $500 ea, the A4's are only $300, but they are narrow, my chassis is narrower than most.

4" thick on the padding is way too much. My bud's MK-V has about 3/4". He has some of that wonder foam in the bottom, and the seat has no bottom, the upolstered pad just sits right on the floor. The A4's have about 1-1/2" to 2" which I will need to thin for taller people, (I'm 5'6")

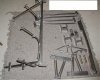
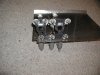
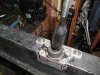
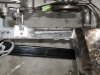
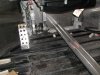
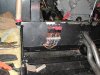
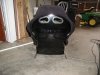
What I did to gain some room was to modify the sliders so the back of the seat was touching the floor and the front of the seat is about 2" off the floor. My floor pan has no ribs and it's at the bottom, lowest point on the car. The front of the seat can be up a little, it's the back that has to be on the floor, maybe you can remove one or two floor ribs and put strength back in with a thin flat plate.

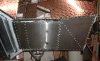
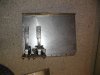
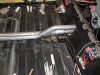
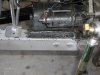
My floor pan is .063" alum with an added .090" alum plate where the seat mounts. No ribs but one cross brace at the front of the seat. So the seat bottom is about 1/8" from the lowest point of the chassis.

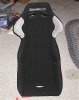
Don't know if you should worry about matching the firewall angle what is more important is the seat back laying down for enough head room. When the A4 is angled for the most headroom it is a wider angle than the firewall, of course that means the bottom of the seat is a little further foward but it's a compromise either way.
 
Hey Bill
Hope this pics helps. It's 2 inches from the top of the floor rib
to the floor.
 

Attachments

  • Chassis #64 back from Paint Shop 5 June 2006 003.JPG
    Chassis #64 back from Paint Shop 5 June 2006 003.JPG
    61.3 KB · Views: 1,290
Dave,
Do you ave a shot of the bottom of the car? It seems you tray would be 1" lower than the bottom of the car, which would mean your tray bottom would be the lowest part of the car. No?

Bill
 
That's right Bill the lowest part of the car is the seat floor, great inside
but a pain for ground clearance.
 

Attachments

  • 000_1082.JPG
    000_1082.JPG
    52 KB · Views: 1,205

Russ Noble

GT40s Supporter
Lifetime Supporter
Hey Bill,

That Corvette shifter is a nice looking piece of kit, but won't that give you an upside down shift pattern? ie lever position forward for 2 and 4 and back for 1 and 3. Because forward movement of the lever translates into rearward movement of the linkage. This is the wrong way round for the 930. I was lying in bed thinking about it (as one does!) and the penny dropped. Sorry to rain on your parade. Keep up the good work.

Cheers
 
Last edited:
I never said it would be easy. I was tinkering with bell cranks for the cable system. May have to work with them for this as well. Can still visualize a system. Just don't know if it will work or is worth it. Haven't really worked with it yet as so many other "little things" to be done. However it still could work for the ZF and others.
Speaking of little things, I have several rear clip parts which I will be sending out to a ceramic coater tomorrow. There is a shop in Conyers Ga.(about 15 miles from me) that does powder coating and ceramic coating as well. He has one small oven for parts up to 5 feet long, and a big one for automobile frames. Anyone looking to do their frame or parts might want to get in touch with them. Not hard to get to. They also have a powder coating process that is "like chrome plating". It looks like it with a haze finish. There was a discussion here not too long ago about chroming suspension parts. I think that ceramic coating will be a good alternative if not better. Just can't stand the paint finish that a lot of my pieces had on them when the car first got home.

Bill
 

Attachments

  • CSW (Small).jpg
    CSW (Small).jpg
    46.6 KB · Views: 1,108

Russ Noble

GT40s Supporter
Lifetime Supporter
Bill,
Sorry I didn't come up with anything constuctive in my post on the Corvette shifter. I ran out of time and had to get off to work!

Maybe an easy solution would be to cut a hole in the bottom of the housing, turn the housing upside down and fabricate a new lever to come out the new hole. That may give you a slightly longer throw though. Alternatively bolt or weld a lever to the existing one and bring it, in a dogleg, up the outside of the housing assembly. That's a bit of a maori option, although it wouldn't be seen! The critical point is that the pivot ball needs to be below the shift rod.

I have devised a precise action, simple and easily made setup, to build from scratch, not dissimilar to the setup on my old Brabham, but at this stage it's only sketches on the back of envelopes, and only I can decipher it! If you get stuck I can draw it up properly for you to consider. When I've built it of course, there will be photos on my build site, but you'll probably want something before I get that far. Most of my car gets translated into the construction materials direct from the envelopes! I think most scratchbuilts are like this which is why there isn't much available in the way of plans for potential new builders.

Hope some of that helps,

Cheers
 

Lynn Larsen

Lynn Larsen
Bill,

Just sent you a zip file on the Toyota/Morse cable setup. Now that I have properly anchored the cables in the tunnel it is doing fine; there's room for improvement in my particular application, but it does work, isn't expensive and parts are readily available or easily fabricated.

Lynn
 
Welcome back to the ongoing saga of DRB#5.I didn’t realize it had been so long since posting something about the car. I have really been busy with the car and not on vacation. Most of the work done since January revolved around outfitting some decent brakes for the front end. What I found was that NOBODY makes replacement brakes for the C4 corvette front ends. I have overcome that issue and should have the missing pieces back home soon and all will be divulged then. At the request of the individual who is modifying the brakes, I can’t say more than that until all is settled. But it will be worth it I believe. Once the brakes, axels, wheels etc. return, the car will be taken off its stand and off to the LineX shop and to the engine builders for the exhaust, ignition and fire up. Since those pieces have been gone for a month or two, I turned my attention elsewhere with the little things that had been put off.
The mounting of the rear radiators was not up to my satisfaction after talking with my engine guy. I saw how he had his mounted on his twin turbo 700 cu. in. Mustang drag car. So I promptly ripped mine out and redid them. I must say they look more the part now. After doing that all the pieces of the rear compartment were removed and sent to the ceramic coater. Well worth the $300 I should say, and a lot less maintenance to boot. I had removed the powdercoating of the trailing arms right after I received the car. Just couldn't put up with the black. As a result of the delay(s) in the building from one year to 4, a lot of surface rust had set up. All the bushings were removed and cleaned up. Putting them back on after the ceramic coating was a breeze compared to the removal.
I bought a lot of master cylinders off ebay, some for a song, some not. You guessed it the cheap ones need a lot of work, or weren't any good at all. So I used them to set up the Tilton pedal box. The box was narrowed by ¾”. Since the frame rails is where to mount them, the problem came up of how to do it. To keep from having the bolts stick through the frame rails, I figured out that the nuts would have to be attached somehow to the inside of the frame rails. This also had to be lined up at the precise point where the master cylinders mounting would be on the panel to the front clip area. Using a template I figured where the MCs would be mounted on the panel and attached the pedal box to it. Then I cut holes for the nuts to go into the frame rails, welded the nuts to large washers, attach them to the pedal box, put in place and welded the nut washer combo to the frame and voila, it was in. Let me tell you that took a good week to accomplish that feat.
Next the bottom panels were attached using oversize steel rivets. Calking compound was put between the head and the panel prior to cinching down. The frame rails have been notched to give the starter some room. A new set of ears is scheduled to be added to the starter so it can be secured. With the new lowered position of the motor and trans, the starter would not fit in its usual position without touching the rail. The wiring had a revision, as I didn’t like the way it wound up. The relays have been moved to the inside of the cabin and labeled. They still need a touch or two and will be finally left alone. HiFi buys had a store closing so a new set of speakers and amplifier were picked up for better than half price. Would like to get a radio unit, but that may have to wait.
After the pedal box was installed the new Saker seats from RaceTech arrived. Now I could turn my attention to the driver’s ergonomics. The new Corvette shifter was fitted. The linkage is ready to be trial fitted. I have worked out the reverse issues with this unit, and if all goes as I hope, it will be debuted here soon. I have the back and forth motion and the rotation worked out so that all is done with one shaft. The geometry works, now lets see what the real world is like.
I fabricated a dead pedal from some scrap stainless. I found out that the stock center console is way too high, and way too close to the pedal box to get the accelerator pedal in. DRB mounts their cooling pipes vertically. This was a problem with the new shifter as well. Since I had already installed the paneling in the engine bay for the pipes, I bent the pipes so they would lay flat on the floor. This gave me room for the accelerator, but no room for insulation hydraulics, or A/C (Doohhh). So it was expanded and raised and moved over toward the passenger side. I plan to give the passenger side a “foot rest/dead pedal” so they can have a place to “mash the brake” while ridding along. I will use PVC to house one set of wiring that runs down the middle. It will have to be “customized” to make the bend around the pipes in the rear. The bending of the cooling pipes, gave me some extra room for the shifter and shifter shaft. Once all is laid out, then the open areas will be closed off and the expandable foam will be laid. Still have to get the hydraulic lines and A/C laid before that. Then Dynamat it all in. the dash has been sent off to the upholsterer. He is a top-notch guy. Lives about 6 miles from the house. He is the one who does all of Year One’s customs that wind up on Barrit Jackson. The two skins alone for the dash are around $600.
The rear camera has been altered and mounted in a third light that will be molded into the body and painted. May still change that to a vent since the body has to be worked on anyway.
Well I won’t wait as long for the next installment. Hopefully the car will be finished this summer. We’ll see!!!!

Bill
 

Attachments

  • Web P1010263.jpg
    Web P1010263.jpg
    102.9 KB · Views: 1,022
  • Web P1010273.jpg
    Web P1010273.jpg
    93.9 KB · Views: 1,003
  • Web P1010285.jpg
    Web P1010285.jpg
    69.5 KB · Views: 1,008
  • Web P1010317.jpg
    Web P1010317.jpg
    78.2 KB · Views: 981
  • Web P1010366.jpg
    Web P1010366.jpg
    89.3 KB · Views: 1,040
  • Web P1010306.jpg
    Web P1010306.jpg
    93.6 KB · Views: 1,000
  • Web P1010307.jpg
    Web P1010307.jpg
    99.7 KB · Views: 1,005
  • Web P1010310.jpg
    Web P1010310.jpg
    77.6 KB · Views: 1,028
  • Web P1010312.jpg
    Web P1010312.jpg
    98.1 KB · Views: 1,005
  • Web P1010321.jpg
    Web P1010321.jpg
    109.1 KB · Views: 1,007
  • Web P1010322.jpg
    Web P1010322.jpg
    37.7 KB · Views: 967
I sent the other RaceTech seats back. They were just too upright. The new Sakers are reclined and like a glove. This is all for now. Will have more when the next shipment comes in. hopefully this week.

Bill
 

Attachments

  • Web P1010355.jpg
    Web P1010355.jpg
    103.4 KB · Views: 1,009
  • Web P1010364.jpg
    Web P1010364.jpg
    80.9 KB · Views: 981
  • Web P1010365.jpg
    Web P1010365.jpg
    74.3 KB · Views: 973
  • Web P1010367.jpg
    Web P1010367.jpg
    117.1 KB · Views: 1,017
  • Web P1010368.jpg
    Web P1010368.jpg
    97.2 KB · Views: 1,010
  • Web P1010369.jpg
    Web P1010369.jpg
    98.7 KB · Views: 988
  • Web P1010370.jpg
    Web P1010370.jpg
    119.7 KB · Views: 1,000
  • Web P1010371.jpg
    Web P1010371.jpg
    92.5 KB · Views: 1,017
  • Web P1010372.jpg
    Web P1010372.jpg
    104.6 KB · Views: 1,030
  • Web P1010374.jpg
    Web P1010374.jpg
    118.5 KB · Views: 1,018
  • Web P1010376.jpg
    Web P1010376.jpg
    90.7 KB · Views: 966
  • Web P1010377.jpg
    Web P1010377.jpg
    113.3 KB · Views: 978
My car came with some side marker lights and turn signal lights as you see in the pics. I have contacted Hella and DRB/GT40 Australia to try and trace these lights. I don't have any connectors for them. I would really like to use them. Otherwise I will have to do some body work. I guess I could leave them on as reflectors. Does anyone have a source for these, or do I just have to give up and go for the round spots?

Thanks

Bill
 

Attachments

  • Web P1010378.jpg
    Web P1010378.jpg
    87.3 KB · Views: 875
  • Web P1010335.jpg
    Web P1010335.jpg
    79 KB · Views: 867
  • Web P1010352.jpg
    Web P1010352.jpg
    76.8 KB · Views: 869
Last edited:

Dimi Terleckyj

Lifetime Supporter
Hi Bill
Could you post a pic showing the end shape of the connector and the pins.
This looks very much like a Mitsubishi side marker light

Dimi
 

Randy V

Moderator-Admin
Staff member
Admin
Lifetime Supporter
I sent the other RaceTech seats back. They were just too upright. The new Sakers are reclined and like a glove. This is all for now. Will have more when the next shipment comes in. hopefully this week.

Bill

Could you please post pictures of your new seats?

Great progress!!!!
 
I originally ordered the seats that were in the Corvette, and discovered they sat too tall. I talked to the company and they had a laid back seat that was originally made for the Saker cars. On their web site I found a GT40 with the Saker mounted in it. It belonged to Gary Gibbs in Virginia. I had met Gary and his wife in Nashville a couple of years back. Gary confirmed the seat is very comfortable and not that hard to mount. He uses one for the driver in competition events.
Racetech North America

The only drawback is the mounting hardware if you want to say there is a negative. Being built for the Saker, they mounted the seat into the frame of the car with tabs that actually bolted into the back of the seat. So no mounting hardware was designed for the seat. What they did was use the hardware from another seat. The front bolt goes correctly but there is no hole for the rear bolt. So you have to drill it yourself. I set mine where the seat is 1/8" off the floor. then I positioned it about 1/8"-1/4" away from my relays. This gave me a great position with respect to the pedals.
These seats run in the $785 range. I say range because they are manufactured in New Zeland. Here are some more pics.
I have the pics of the connector socket for the side lights. Anybody recognize them?

Bill
 

Attachments

  • Web P1010380.jpg
    Web P1010380.jpg
    45.4 KB · Views: 911
  • Web P1010381.jpg
    Web P1010381.jpg
    86.8 KB · Views: 882
  • Web P1010383.jpg
    Web P1010383.jpg
    38.7 KB · Views: 830
  • Web P1010379.jpg
    Web P1010379.jpg
    83.4 KB · Views: 864

Randy V

Moderator-Admin
Staff member
Admin
Lifetime Supporter
Thank you for the pics Bill - Perfect.. I was hoping that you'd include the mounts and you did! :)
 
Good work Bill, I allways look forward to your updates.
My guess on the lights is that they are off an 1998 VT Commodore.
I took some pics of my VT lights as they look pretty close. If they are right I could go down the wreckers and cut a few plugs off for you and post them.:)
 

Attachments

  • kight2.JPG
    kight2.JPG
    23.9 KB · Views: 773
  • light1.JPG
    light1.JPG
    27.2 KB · Views: 795
Dave,
That's them. If it isn't too much trouble I would like the whole light assembly. In my inexperience in working with these types of lights I broke one of the spring clips(plastic) off on one of them while trying to remove them. If you could locate four of them I would appreciate it. Try and get them with an inch or two of wire. If they insist, get the full lenght of wire to its next connector. I will reimburse you for the expense, trouble, and shipping. Email me and I will send you the particulars. It will give me your email address so I can send you the funds. Really appreciate the help.

Bill
 
Back
Top