Ford F3L and David Piper

Hi guys,

thanks a lot for the nice words, I honestly appreciate what you are saying.
Scott, I didn't think that in this forum tooling was of interest. Nice to see however, that the stuff that really consumes a lot of thought and attention is something of interest, too.

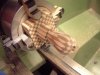
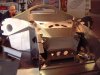
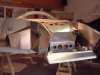
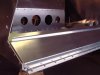
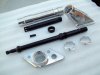
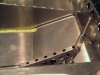
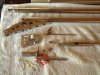
If you want to build a bending tool like that one I could share some of the experience I had wo far with you: For example the wooden blocks are a little critical. I have designed the static block so that the max pressure that the pipe exerts on it is I think not larger that about 30MPa (I have to look up my notes, so don't take this number for granted). That is a little much if you consider the birch plywood. What you could do is to make this block longer towards the mandrel carrier, or use e.g. plastics (like PA or POM) for the job.
The round wooden die is not so much of a problem, however the pipe exerts a "opening" pressure on it as it tries to become oval during bending. So what you have to make sure is that if you glue together plywood the glueing interfaces have to be very good, means the surface should be well preparedn and while the glue sets you should have a proper amount of pressure on the package.

Tell me if you need some more info.
 
Hi Leopold,

I just looked at this thread yesterday and had to post...
This is amazingly awesome work, I thought that I was making a decent attempt at doing things 'properly' but you've ratcheted up the bar by orders of magnitude. Big respect.
 
Hi guys,

Hi Doug, thanks, I appreciate what you say. I guess that "bar" that has been mentioned a few times is quite imaginary ;-)

Well attatched are some pictures of the weekend progress.
My father had to show off some of his woodworking skills by making the shift knob in a way so that it looks like the checkered flag.... I was really impressed. It is currently awaiting its 3 layers of varnish.
I could manage to make all the weld on fittings for the waterpipes, do the welding, dye penetrant testing and polishing. Now we are ready to install the pipes and continue with the last left panels on the monocoque.
 

Attachments

  • DSCF0016.jpg
    DSCF0016.jpg
    36.9 KB · Views: 845
  • DSCF0020.jpg
    DSCF0020.jpg
    44 KB · Views: 708
  • DSCF0023.jpg
    DSCF0023.jpg
    41 KB · Views: 716
  • DSCF0026.jpg
    DSCF0026.jpg
    30 KB · Views: 721
..some updates from the last weekend:
We fitted the waterpipes and installed some quite important panels.
Now there is just two full days or so missing to complete the sheet metal work on the monocoque and finish it.
 

Attachments

  • DSCF0027.jpg
    DSCF0027.jpg
    46.4 KB · Views: 678
  • DSCF0033.jpg
    DSCF0033.jpg
    41.7 KB · Views: 824
  • DSCF0044.jpg
    DSCF0044.jpg
    38.6 KB · Views: 762
  • DSCF0046.jpg
    DSCF0046.jpg
    30 KB · Views: 669
..as we currently got some time to do more fabrication, we could manage to finish the monocoque.
It is easy to carry even though the fuel cell and the water pipes are already fitted (..and don't forget the 12kNm torsional stiffness).
As today is the birthday of chassis #1 we will take the liberty and have a glass of Zirbenschnaps.


Greetings and best regards from Austria!

01.JPG02.JPG03.JPG
 
excellent pictures Leopold ---
a great shop scene if that is indeed an Austrian "Alp"
in the background . . . . . .

thanks for your listing of the construction details regarding
your woooden bending fixture.

scott
 
Leopold,

I know you have heard this before but it is worth repeating... your work is absolutely stunning... that is one of the prettiest bodies i have ever seen... your workmanship is Olympian...you deserve all the praise you can get... true
 
Dear Gentlemen,

thank you very much for your progressive comments. We totally appreciate..

Just so you know we didn't run on idle in the mean time, however some very demanding metal parts had to be machined (of course conventionally, CNC technology is limited to the body moulds ;-) ), which kept us busy.

some of the steering parts prior to installation:

attachment.php


shifting lever with locking mechanism for reverse gear:

attachment.php


shifting mechanism assembled for testing:

attachment.php


and parts polished prior to final assembly:

attachment.php


.. meanwhile best regards from Austria
 

Attachments

  • Fortschritt_110326.JPG
    Fortschritt_110326.JPG
    96.3 KB · Views: 1,879
  • Fortschritt_110411_03.JPG
    Fortschritt_110411_03.JPG
    145.4 KB · Views: 1,897
  • Fortschritt_110411_05.JPG
    Fortschritt_110411_05.JPG
    123.5 KB · Views: 1,952
  • Fortschritt_110501.JPG
    Fortschritt_110501.JPG
    170.9 KB · Views: 2,004
Hi Leupold!

I'm waiting for your updates with impatience!

I should stop looking at it because I almost have an erection each time! OK, I may have some problems, but, hey! I can't control this...

More seriously, would you drop me your email?

Thanks

Olivier.
 
Servus Leopold,

First off I think it's been said a few times but it has to be said again and again. Fantastic project!! Thoroughly inspiring stuff.
I also have a project I would like to get going and will use similar techniques. I have a CATIA model that is getting close to completion and will also use a prototype foam but do not have a supplier yet. Can you tell me which grade of Necuron you used for the moulds and also which supplier you used? An approximate cost of the material would also be good to know.
Keep up the good work. I am looking froward to seeing the result of your hard work. It's like watching a really good movie (for car geeks like myself) is this thread!!

regards

Nic
 
Back
Top