Howard B's RCR 40

Howard:

Beautiful machine work!!

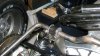
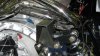
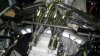
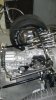
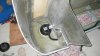
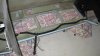
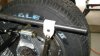
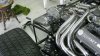
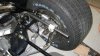
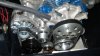
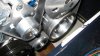
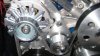
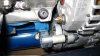
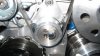
When I mounted the door catch mounting posts they were slightly angled in relation to the fire wall to properly fit the door latch. When mounted flat they did not work well. Attached are pics of the hardware we used. Note the slight angle on the spacer blocks.

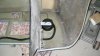
I appears that yours set flat perpendicular to the firewall.

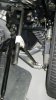
Have you tried yours with the doors in place? Hopefully this won't be an issue for you.


Hi Chuck,

Good to hear from you. Your note sent me back into the garage to scope it out. The firewall and the door latch seem to be parallel. I had made a model of the set-up in oak and tried it out before Bill machined them. Thanks for keeping me on my toes.

Howard
 
Continuing from a previous post, buddy Bill Tuttle has pulled together more of the rear stabilizer set up. In the pictures you will see the latest rendition of the mounting brackets, bushings and brackets from the local Nissan dealer for a 280Z. Pictures of the bar set in place without the down rods, which are yet to be measured and manufactured. Maybe this weekend, we'll see what happens.
 

Attachments

  • Stabilizer Bar rt.jpg
    Stabilizer Bar rt.jpg
    48 KB · Views: 484
  • Stabilizer Bar lft.jpg
    Stabilizer Bar lft.jpg
    40 KB · Views: 483
  • Stabilizer 280Z.jpg
    Stabilizer 280Z.jpg
    32.7 KB · Views: 443
A couple of the pictures didn't make it. I guess from pilot error.
Here they are....
 

Attachments

  • Stabilizer Mnt rt 1.jpg
    Stabilizer Mnt rt 1.jpg
    44 KB · Views: 429
  • Stabilizer Center.jpg
    Stabilizer Center.jpg
    45.2 KB · Views: 441
  • Stabilizer Comp.jpg
    Stabilizer Comp.jpg
    26.3 KB · Views: 547
Wiring the back...

Finely spent time wiring the rear clip...lights, lights, lights... I used a Genesis weatherpack kit worked quite well. It is quite easy to use.
 

Attachments

  • Wiring Back 1.jpg
    Wiring Back 1.jpg
    35.8 KB · Views: 398
  • Wiring Back 2.jpg
    Wiring Back 2.jpg
    35.1 KB · Views: 370
  • Wiring Back 3.jpg
    Wiring Back 3.jpg
    35.6 KB · Views: 400
The first of the two rear stabilizer down rods is here. Bill Tuttle brought it by for a fitting. We put it on, it looks to be a perfect fit. One side down, one to go.
 

Attachments

  • Stabilizer Back.jpg
    Stabilizer Back.jpg
    24.1 KB · Views: 377
  • Stabilizer Inside RT.jpg
    Stabilizer Inside RT.jpg
    41.1 KB · Views: 396
  • Stabilizer Comp Rt Side.jpg
    Stabilizer Comp Rt Side.jpg
    48.3 KB · Views: 400
  • Stabilizer Upper Brkt.jpg
    Stabilizer Upper Brkt.jpg
    33.9 KB · Views: 396
Tom,

I have the frame cut and welded. It has a slight twist in it and I need the mounting tabs welded on it. It's sitting next to the car and has been moved to the "B" list. It needs attention.

Cheers,
Howard
 
A question for my GT40 brethren out there in GT40 land
Any suggestions on the best exhaust manifold gaskets to go with SBF Canfield aluminum heads?

I think Canfield has gone out of business or I would call their tech line.

Thanks for your input!
Howard
 
Howard,
You are really moving along. Great work. I would think that any of the aluminized gaskets like Felpro or others would do the bit. I took mine and cut the gasket for each cylinder. Just looks neater that way. I had to trim down the studs on two cylinders after the 12 point nuts torqued the gaskets down. The transition from square to roound made it difficult to get the wrench off the nuts. I will be updating mine soon.

Bill
 
Bill,

I pictured buying something for this car with out cutting or hacking on it to make it work out of the box/carton. Maybe I am sadly mistakened! :laugh:

Thanks for the info though. I was hoping someone with those heads had made a discovery and could point me in the right direction.

I can cut though!

Cheers,
Howard
 
Thanks Pat,

I appear to me responding on two posts, mine and Tom's. I just woke up!

Pat, did you cut them so there was aseparate gasket for each header tube?

Howard
 
Thanks guys, one and all.

Here's some of the latest progress pictures of my car. John from the previous post made up some parts for me in his shop. They are a set of serpentine pulleys, a mounting bracket for the A/C compressor and alternator. A separate bracket for the back of the A/C compressor to the block, a free wheel and a tension wheel. The work is outstanding.

The system is designed for ease of use. The parts are all custom made and fit nicely between the engine bay walls and the trailing rod mount for the rear suspension. The entire set-up works without a fire-wall bump out. The timing mark is accessible and nothing is bumping against the block, the alternator clears without any problem.

The engine was moved back about 1 inch.

Thanks Brian and John at Design Enterprises. :thumbsup::thumbsup::thumbsup:
Howard
 

Attachments

  • Pulleys 003.jpg
    Pulleys 003.jpg
    37.3 KB · Views: 472
  • Pulleys 008.jpg
    Pulleys 008.jpg
    35.2 KB · Views: 379
  • Pulleys 009.jpg
    Pulleys 009.jpg
    41.3 KB · Views: 383
  • Pulleys 010.jpg
    Pulleys 010.jpg
    35.7 KB · Views: 393
  • Pulleys 011.jpg
    Pulleys 011.jpg
    36.6 KB · Views: 395

Pat Buckley

GT40s Supporter
Howard -

No I didn't - I just made sure they matched the ports - and I did use some of the aforementioned RTV with them.

REMEMBER to tighten the primary pipes to the heads first BEFORE you try to put the collector on!
 
HOward

very nice pulley system. The waterpump pulley seems to be quite big in diameter. Usually the are app 2/3rd of the dia of the crank pulley. So i wonder if it will run fast enough.

TOM
 
Hi Howard
Really enjoyed your build thread. That new belt sysyem is very cool.
My 2 cents worth on your headers. After many years of dynoing engines and changing headers a dozen times a day and using every type of gasket avalible believe me the very best is none at all !
Hi temp RTV wins every time, it doesnt leak and will last the distance.
BTW: Engines that turn high RPM need bigger water pump pulleys to slow them down and prevent cavitation,
 
Back
Top