Kiwi scratchbuilt

Russ,

You have got most of it right, not one but several unforced errors whilst exploring.... no damage other than my ego which was well and truly over inflated before this weekends racing. Dont want to hijack your thread so have tried (unsuccessfully) to post a few photos on the paddock thread
 
Just watch out for narrow bridges!! & bring large sieve for grading sand plus diesel for furnace. :). Have 20 ton shovel so no problems there, just dont park your Merc within shovel reach.

Leave it for another month & you can pour my castings as well ! Doubt Russ will get his car going this year anyway.. its taken him all year to get what was going to be finished in January done....:)

Jac
It will be my pleasure to pour your casting:thumbsup:
I have shorten my Merc, few mm front and back since my last visit to your place. If you can flatten my Merc,:idea: boy .... o.... boy you makes my day.:thumbsup:

Just finished Russ oil pump attachment to lubricate the engine before it fire up.

Looks like our celebration to start the car is very soon............... will be having a few drinks and a BBQ:pepper: . You are welcome to join us though.

LIM
 

Attachments

  • IMG_3043_2_1.jpg
    IMG_3043_2_1.jpg
    50.5 KB · Views: 404

Russ Noble

GT40s Supporter
Lifetime Supporter
Russ the panel under the sloping one with LHS on it looks a bit wonky, is that the finished article? Will you be ready for SFOS 2010? I'd like to be there for the first flight.
Ross:whip:

Ross,

Hope the RHS panel is more to your liking!

Will be be ready for 2010? Who knows......but just let me say we (or more correctly, Lim) have just made up the removable adapter that engages in the lightening holes in the dry sump pump pulley so we can slip the belt off and prime it with an electric drill. Just using a ball end driver in the drill engaging a cap screw in the adapter. Engine fire up is just a matter of days......

I have also been attending to all those silly little scrutineering requirements. eg Exterior kill switch pull, mounted above the RHS panel, fire extinguisher mounted in passenger footwell etc

Also some non-essential items fitted up in the shape of a data logger and camera. Finally finished the wiring tonight, thanks for your help on that one. Another few days will see all the suspension on and the car down off the table and sitting on it's wheels for the very first time. The excitement is building.......

Still have to build the steering arms, make and fit the poly-carb bits, windows etc. There's also some bodywork to revise and improve but if I can get away with it, I think I'll leave that til after we've had some track time. Although I'm not 100% happy about taking it out with the body looking a bit crappy, it is after all a race car and will look OK on the track!
 

Attachments

  • RHS panel 0873.JPG
    RHS panel 0873.JPG
    71.9 KB · Views: 381
  • RHS panel 874.JPG
    RHS panel 874.JPG
    81.8 KB · Views: 419
  • primer 868.JPG
    primer 868.JPG
    57.6 KB · Views: 352
  • primer 869.JPG
    primer 869.JPG
    60.6 KB · Views: 350
  • primer 872.JPG
    primer 872.JPG
    76 KB · Views: 436
  • interior 0877.JPG
    interior 0877.JPG
    83.3 KB · Views: 455
  • camera 0882.JPG
    camera 0882.JPG
    93.3 KB · Views: 436

Russ Noble

GT40s Supporter
Lifetime Supporter
Another milestone!

Car lifted off the table and sitting on it's wheels with complete suspension for the first time. Motor about to go in. Initial fire up is getting close.....
 

Attachments

  • Roller 886.JPG
    Roller 886.JPG
    88.3 KB · Views: 590
  • Roller 888.JPG
    Roller 888.JPG
    91.3 KB · Views: 595
  • Roller 889.JPG
    Roller 889.JPG
    91.4 KB · Views: 674

Keith

Moderator
Looks very very good Russ, especially the rear chassis - most unusual but it looks right (and light).

The thing that bothers me is, how on earth were you going to get the car ready for the racing in, what was it, February/March this year?

On refection and with hindsight, was that goal realistic?

Edit: Meant to ask - what body are you using?
 

Russ Noble

GT40s Supporter
Lifetime Supporter


Keith, that is a very good point!

Were the goals realistic? Obviously not, or we would have been racing back then! However at the time I set them I felt that they were.

This thread is a warts and all record of the build. The good, the bad and the ugly. The expectations, the achievements, the disappointments and the cock ups. From my very first post I laid out my time expectations for this build. This has needed to be revised several times but I am getting very close now. I am quite comfortable about posting my goals, even if it means egg on my face if I don’t achieve them!

However, the goal posts have shifted too from when I first started this build. It was going to be a track orientated road car with a basically stock block, stock internals, stock iron heads, balanced and ported with a mildish cam. Over time that mutated into a small journal, Dart blocked, fully forged, 225 Brodix headed, solid roller engine. Almost everything has been optimized for racing and doing this is a lot more time consuming than building a road car.

As you are no doubt well aware, with a road car you might mount something on a flat bracket of 5mm plate, for a race car you will spend hours making up a nice gusseted lightweight item to do the same thing. Plus with Lim on board if we have felt we can build something better than what is available then we have done that too. In fact there are very few items that I have purchased for this build that are exactly as I bought them. Most have been either rebuilt, rectified, blueprinted, lightened, balanced or modified in some way. And of course, quite apart from that, the majority of this car has been built from scratch. In a build that has spanned almost five years, it was inevitable too that life would intervene and slow progress from time to time!

And then there is the research…… Hours and bloody hours! Before I started this project I knew very little about GT40s (had to do a search to find out what 1075 was!), or high performance American V8s (Rovers were my limit and they’re certainly not hi-po), or transaxle choices etc. Knowing what I do now, I could build a car much quicker and easier and had I known then what I know now there are some things I would have done differently…….

One always has to have goals! The time frame is one thing, but the basic goals for the car are another and ever since it became race only there have been two overriding goals. That is to weigh in at 900kg dry. Secondly to go under the Classic Sports/GT lap record at an early stage of development, hopefully the first dry race meeting. If I can achieve both these main goals then I can live with the time overruns in the build process, if that’s what it takes.

I will be cornerweighting the car in the next few weeks so that will resolve the weight issue. And WRT the lap record, when I started the build IIRC it was held by a T70 at 1:30.4. It’s since been lowered to 1:29.5 by a very quick and well driven B16 Chevron BMW. Time will tell…….

BTW we built the molds and body ourselves, some details are contained in the first page or two of this thread. Thanks for the positive comments about the chassis.
 
Last edited:
I think the car looks great Russ. Always an interesting read on this thread. Is Lim's car at the same point in the build progress?


Regards


Cam
Auckland, NZ
 

Keith

Moderator
Hey Russ, don't be too hard on the little Rover V8, after all it powered Brabham to two F1 titles in Repco form and with two cylinders sawn off it made the butt ugly Metro 6R4 almost unbeatable (still)... :)
 
Russ:

The Kiwi 40 looks good. You and Lim should be proud!!!!
I agree time and goals are important with a scratch build. But time is the cheap part! It seems that little things add huge amounts of time.
The funny thing is that it takes as much time to build one as it does to build three. Once the fixtures are built you can make things a whole lot easier and faster.
 

Russ Noble

GT40s Supporter
Lifetime Supporter
Cam, Lim has been helping me with mine, his is still at an early stage.

Yeah Dave, I am proud. Not sure about Lim though, he expects perfection!!!:rolleyes:

Ultimately, my greatest satisfaction and pride will be the day it lives up to it's promise under racing conditions. That's what all this work is about.

Ahh, Keith, I'm sorry, I can't help being hard on the little Rover V8. I costs a bloody fortune to get good power with reliability out of one! Ask Brabham or TWR and I bet the 6R4 engine (420 bhp I believe) cost mega times more than my 500ish bhp 351W :shrug: I rest my case......

However one thing I never suffered from with the trusty? Rover was excess oil delivery! Which brings me to the next part of this build log.......

the disappointments and the cock ups.

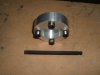
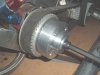
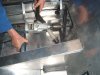
The engine/trans was installed and startup was planned for last Sunday. Hook everything up. Fill everything up. The cooling system bled easily as planned. Used the drill to drive the oil pump and prime the engine. The oil pressure climbed to over 100 psi after only a few seconds. So wound the pressure relief adjustment right back, still the same. Hmmm.... Not good.... By then it was getting close to midnight Sat night, so I decided to call it a night and take some time to think about it.....

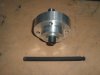
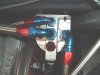
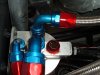
The oil pump itself does not have a pressure relief, that job is taken care of by an adjustable valve incorporated in the remote filter mount and I have fitted a -8 line to bleed this back to the oil tank.

So come Sunday morning and I had figured that because adjusting the valve made no difference, it seemed logical that either the spring was much too heavy, or the valve was stuck, or there was a restriction in the return line. Well the valve was free and the bleed port in the housing had a smaller cross section than the -8 hose, so that appeared to rule out those two theories. Particularly since when I tried removing the valve completely, the pressure dropped off to about 75 psi. Still a bit high I thought, but better. I have had no experience with these pumps so didn't know what was normal and what wasn't, so a quick call to the long suffering Jac Mac to draw on his experience. His main concern was that I should have been using a straight 30 with preferably good quantities of ZDDP for the initial 1/2 hour no load break-in.

So today (Monday) I got some Delvac 1330 and a range of lighter springs. Changed the oil and immediately the pressure dropped to 60 psi without the valve. Getting better. Put the valve and a light spring in, still 60 psi. Put in a heavier spring and got 70 psi but both times couldn't get any pressure change on the adjustment screw. So in desperation made up a temporary fit up of a large diameter relief return hose and bingo! Pressure down to 45 psi and adjustable up and down on the screw. I still can't believe that a -8 hose was restricting the return!! And at the 650rpm that the electric drill was turning. Equivalent to about 1000 engine rpm. Going to be interesting to see what happens at higher revs and temperatures. May need to further underdrive the pump....

Incidentally the trans pressure was running at 15psi at the same time and not bypassing, so I am happy with that.

I can't get into town till Wednesday to get new fittings for the larger return line so first start up will not now occur til later in the week.

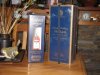
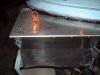
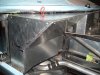
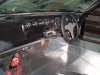
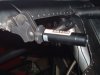
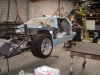
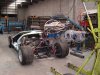
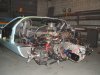
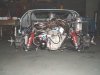
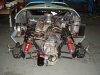
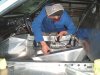
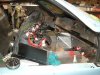
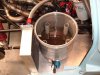
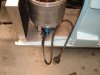
Anyway pics below show engine/trans installed. And driving the oil pump whilst keeping an eye on the pressure gauges.
 

Attachments

  • Engine in 890.JPG
    Engine in 890.JPG
    78.9 KB · Views: 467
  • Engine in 891.JPG
    Engine in 891.JPG
    81.8 KB · Views: 494
  • Engine in 892.JPG
    Engine in 892.JPG
    83.3 KB · Views: 477
  • Engine in 893.JPG
    Engine in 893.JPG
    81.4 KB · Views: 446
  • Priming 897.JPG
    Priming 897.JPG
    77.1 KB · Views: 445
  • Priming 898.JPG
    Priming 898.JPG
    85.6 KB · Views: 489
Last edited:

Russ Noble

GT40s Supporter
Lifetime Supporter
It is now a source of some considerable relief that I decided to configure the dash and wiring so that the dash could be easily laid over in order to more easily get at the rear of it merely by removing four holding screws and no wiring to disconnect. About a two minute operation that just makes life so easy. Just as well too, because it has been in and out constantly, for all manner of different reasons!

Still playing with the start up high oil pressure issue. And have decided I need to hook up the heating elements in the dry sump tank. I wasn't going to use these, they just happened to be a fitment on the exNascar item I bought on ebay. Four elements seperately wired in two banks of two. Of course USA 110V system. NZ is 240V! Not being an electrical genius, I was greatful for the fact that Maurice Butler, once when he was up here, mentioned in passing that if the two banks were hooked up in series then they would be OK on NZ 240V. So thats what I did, snipped off the old plugs joined them up in series and wired in a neat wee Anderson mini connector and made an adapter lead to plug it into either the mains at home or the generator at the track. Thanks Maurice! Incidently it heats the oil to 200 degrees in about 10 minutes and draws about 8 amps. I think this is just another thing that will make life easier. Have yet to crank things up, still waiting on some fittings, but everything seems fine and all set to go.

One source of minor aggro is some very small weepage from the head gasket which has now almost completely taken up. I have read that the Cometics are prone to this and that many people use a copper spray on them for sealing purposes. Some have said they have never had problems. I reasoned that with everything new and double checked, and the surface finish RA within spec, and with careful assembly that there should be no need. Not so!
 

Attachments

  • Dash out again! 900.JPG
    Dash out again! 900.JPG
    92.8 KB · Views: 396
  • Oil tank heaters 901.JPG
    Oil tank heaters 901.JPG
    87.4 KB · Views: 1,324
  • Oil tank heaters 902.JPG
    Oil tank heaters 902.JPG
    74 KB · Views: 364
  • Oil tank heaters 903.JPG
    Oil tank heaters 903.JPG
    80.3 KB · Views: 367
Hi Russ, Just got home on thursday and did a little work on the project today. I have been watching your last few post's and so good to see the car on its wheels, and with the start up only a short time off I,m sure you are starting to get fired up your self. The whole thing looks great and look forward to hearing that the start up and hopefully the first drive live up to your dream. I'm sure they will !!!!!!!

Cheers and good luck Leonmac.
 
Russ, you mention high oil pressure at start up. Do you have a bypass fitted AFTER the oil filter in the pressure line? A lot of people lose an engine because they have not fitted a valve.
 
Not being an electrical genius, I was greatful for the fact that Maurice Butler, once when he was up here, mentioned in passing that if the two banks were hooked up in series then they would be OK on NZ 240V.
Its a shame I live 2hours away or your would see more of me, as I would love to help more as it is a work of art.

Maurice
 

Russ Noble

GT40s Supporter
Lifetime Supporter
Its a shame I live 2hours away or your would see more of me, as I would love to help more as it is a work of art.

Maurice

Thanks Maurice, your occasional pearls of wisdom from time to time are much appreciated.


Russ, you mention high oil pressure at start up. Do you have a bypass fitted AFTER the oil filter in the pressure line? A lot of people lose an engine because they have not fitted a valve.

Bram, the bypass is incorporated in the filter housing and is situated on the outlet side of things after the oil has been through the filter. The oil comes from the pump, through the cooler and (with reference to the first photo) goes into the filter through the -12 line on the right hand side. The oil exits to the front of the block through the-12 line in the middle, and to the rear of the block through the -8 line next to it. The fitting without a hose is the new -12 bypass to the tank, and the pressure adjustment screw can be seen on the side adjacent to it.

I don't think there is any chance of losing the engine, this is why I am double checking and rectifying anything that I think could be a potential problem at start up. And I will be watching and listening like a hawk as it warms up!
 

Attachments

  • Filter housing 905.JPG
    Filter housing 905.JPG
    79.3 KB · Views: 316
  • Filter housing 907.JPG
    Filter housing 907.JPG
    81.4 KB · Views: 279
Last edited:
Russ,
Look's good. It's finally coming together. As for your voltage issue we have power inverters that plug into the 12V accessory socket/lighter socket of your vehicle. Small ones 1500 watts and up. You use your vehicle as a generator. In the shop you could hook it up to a battery charger to give you a few 120V lines. They are not very expensive.
As for the Chevron I think the only place to overtake them is in the long straits. That's where your horsepower come in.
Dave
 

Russ Noble

GT40s Supporter
Lifetime Supporter
Thanks Dave. Yep, nearly there, it's been a long haul. Almost five years to the day.

My service vehicle has actually got a 110V inverter fitted to power each of the electric side awnings. Runs off one of it's four massive 12V batteries, but the 230V is a much better option for me as I will have a generator on board anyway.

The Chevron is a pretty nippy wee car and it's BMW donk coupled to an FT200 is no slug down the straights either! Could be one of those David and Goliath battles where everyone cheers on the smaller car! Still, even though I am likely to get driven around in the corners, I am heartened by that old adage...."There is no replacement for displacement". And hopefully the mighty 351 will come out on top! Time will tell....

At least its going to go round the corners miles better than my old TR7V8 and have heaps more wick in a sraight line to boot. That's got to be all good. The proof of the pudding is getting very close....
 
Ok, just a little warning because people tent to forget that.
What filterhousing is that? I'm looking for one with a bypass in it, but there aren't many around.
 

Russ Noble

GT40s Supporter
Lifetime Supporter
Thanks Bram, it's always good to have input, just in case something has been overlooked.

The filter housing is Raceline. I'm using two, one for the engine, one for the trans. Got them off US ebay. Usually ex NASCAR, I think, from memory one was US$36 the other US$49. But that was a couple of years ago, they were reasonably plentiful then, not sure what price and availability is now.
 
Back
Top