M20 Dreaming

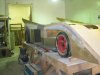
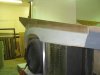
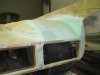
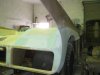
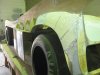
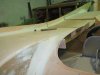
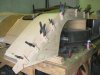
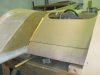
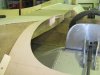
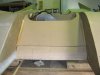
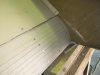
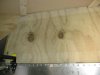
Well the work continues on. I have moved my focus to the front clip for a while (I have a small issue on the back so I'm doing the Ostrich thing) I have started the fence on the left side now and the front panel/wind screen surround. The fence is pretty simple, just cut it to the right shape glue the edge with PVA and support it while it dries once that is done radius the inside with some bog. The front panel is a little more complex, it has to have the bottom rounded to drop at the bottom. I did this by making ribs inside then scouring deep lines in the sheet so it would bend easier and glued it in place. then the wind screen surround has to be shaped as it goes back to match the door which has a 45 angle side so I made some ribs and curved it back and attached it so it would hold the shape then there is a second piece on the inside where the actual screen will screw to. This will create a lip so the screen will be flush with the outside panels. The next step is the panel that goes down the sides and across the front where the clip will rest on the alloy tub. I have done the front and left side which is quite a bit of work as it has to fit the shape of the fender and the ribs inside as well as over the top rear link. The pictures should show what I've tried to explain.

Cheers Leon
 

Attachments

  • IMG_2732.jpg
    IMG_2732.jpg
    135.1 KB · Views: 331
  • IMG_2733.jpg
    IMG_2733.jpg
    96.7 KB · Views: 277
  • IMG_2734.jpg
    IMG_2734.jpg
    110.3 KB · Views: 325
  • IMG_2735.jpg
    IMG_2735.jpg
    102 KB · Views: 304
  • IMG_2736.jpg
    IMG_2736.jpg
    103.1 KB · Views: 237
  • IMG_2737.jpg
    IMG_2737.jpg
    98.5 KB · Views: 247
  • IMG_2738.jpg
    IMG_2738.jpg
    91 KB · Views: 287
Beats the hell out of my high school wood shop project ;)

If I ever get feeling a little too satisfied with my work, I just need to check in here.
 
I'm not sure how they did the first M8 but I know when they did the M20 they took a M8F body and sat it over the chassis and cut it through the middle stretched it out and filled in the gap then they added about 6" to the front of the rear clip to make up for the extra length from the front of the engine to the rear axle line, cut the radiator cover section out of the front clip and trimmed the sides off below the top of the front wheel arch right back to where it intersects the rear wheel arch. Reworked the front screen surround to move it forward 2" and that was basically it. If you look at a M8F rear clip it is almost Identical, the doors are the same except for the bottoms where they match the "coke bottle" sides on the M20. If you get a photo of a M8F and a M20 taken at the same angle etc and then flick from one to other rapidly you can see how they differ, the M20 is lower and longer and also wider it is an interesting comparison. I have worked on the windscreen surround yesterday, interesting trying to get that smooth transition from the flat front section moving around the side to a 45 degree slope on the side with the lip that the screen will screw to. I will put up some picks when its done.

Cheers Leon.
 
Well I have started the shaping of the sides now, I have used surfboard foam off cuts and glued them to the ply buck then shaped it with a coarse grit sand paper. Once it is pretty close I give it a thin smear of Bog and sand to the finished shape. I have done both doors and part of the R/rear 1/4 panel. I have also done the shaping for the base of the wind screen now as well, just need to put the finishing touches to it. I'm hoping that when the G/Fibre is done on the out side I will be able to extract a lot of the wooden structure from it and glass the inside for strenght.
I will keep plugging away at it and get some more photos up soon.

Cheers Leon.
 

Randy V

Moderator-Admin
Staff member
Admin
Lifetime Supporter
Years ago, I knew a fellow that was making some rather extensive modifications to an old Mercury and he wanted to build fiberglass parts for the car to replace the front fenders and hood. This sounds rather crude but it worked... He made his modifications with chicken wire and strips of cloth soaked in a very wet plaster. Once they had set up over his form, he slowly added more plaster to get the height he needed, from there, it was a lot of hand sanding to get the contours he wanted.
He primed and painted the body with an enamel paint. It actually looked quite good!
When completed, he made plywood profiles of the body. Then he used a mold release agent on the body work and proceeded to lay down a couple of layers of chopped strand fiberglass mat. Then applied the plywood profiles to the work and glassed them it. He let them sit for a couple of weeks and then set to work to pull them off the car.
He had a really tough time getting the molds to pull free and ultimately pulled some of the plaster structure from the car in the process. But carefully he pulled that mess from the inside of the molds.
Ultimately he was successful and he had molds for the front fenders and hood of a highly modified Mercury Lead Sled. I think he might have sold one or maybe two of the sets and of course he had made a set for himself.
..
So why did I post this? Just thinking that plaster may be a way to make the job easier than sanding the bondo/bog. It would be less expensive anyway and not sure if it would be sturdy enough for you..
...
Keep soldiering on... Looking forward to reading more progress on this great project!
 
Hi Randy, I watched a thing on Utube the other day and the guy was making a race seat and he used something that was half the price of "Bog" and easier to sand but I can't remember what it was and I had thought about plaster as well. The main reason for my path is 1) I'm kinda thinking that this may end up as part of the body with my glass over ply method so I don't want to leave a sub standard product in there. 2) the bog layer is very thin so I'm not using a lot of it and there is no weight in it realitively. and 3) most of the body will have the ply core left in the body. Remember, I'm not making a buck to take a mold from, I'm making the actual body and I may take a mold from it later if I require it.
Thanks for the comments, I love to hear the different ways to skin this cat and some of them I have used over this project.

Cheers Leon.
 

Terry Oxandale

Skinny Man
One thing that I use universally is a good quality masking tape. I use wide rolls (about 50mm) that cover the entire surface that will be covered in fiberglass. the rows only need the very slightest overlap if any. I don't have the 3M numbers but I try to use the painters tape that has a smooth surface other than the typical mottled surface of typical masking tape. It is thin enough that even several layers laid into/onto a very complex shape, has no impact on the resulting exterior surface of the fiberglass laid over it. Anyway, I've found that fiberglass will pull away from this surface (and for those areas that it doesn't, the tape then separates from it's surface). Spraying a towel with WD-40, and then wiping that over the surface of the tape is extremely helpful. The oil does not interfere with the catalizing of the resin, and can be removed very easily from the glass' back surface if other structures need to be bonded to the underside for mounting/reinforcing/latching/etc. I use this painters tape as a boundary for any fiberglass part that I need to add to fabricate, and then place ont the surface of any other body panel (e.g. for making brackets, scoops, mounting bosses, etc). It allows the overlaid glass to "kick" with the same contour as the underlying panel this new fiberglass piece must bolt onto/bond onto later. Hood scoops are a perfect example in which the flange perfectly matches the contour of the hood (I used rivets in that example).

Lastly, and I know you've considered this, but when doing this method of body glasswork, always remember that the thickness of the glass must be considered in making the underlying structure. If my glass is expected to be 1/8" or 1/4" thick, then the total width of the part I need to turn into a fiberglass piece will need to be 1/4" or 1/2" narrower than the final product's size. Does that make sense?

Keep the heat down to a reasonable value for curing. This will reduce the amount of warping for any hard angles. I've found that a hot cure sometimes results in an intended 90 degree angle on a fiberglass piece ending up being about 85º or even less (a tighter angle) once it fully cures and cools off.
 
Last edited:
Hey Terry, you are my man!! The tape idea for a parting medium is awsome.
At trhis stage its only the side peice's that i'm thinking of seperating from the wood and the reason for this is it will be realitively easy and the other parts such as the doors are too complexed, I would have to cut them into several peices then glue them back together, they are so light it's not worth the hasel. As for the front clip there will be quite a lot I can remove but some will stay just for the same reason as the doors and same with the rear clip. I am moving really quickly with the body and can't wait to get Glass on it, the other thing with doing it this way is the ply structure as such doesn't have to be a perfect "Ready to paint" finish as I will be doing that prep to the glass surface although it will still be pretty good as that will reduce the final finish work.

Thanks again Terry.

Cheers Leon.
 
Hey Guys back on the body again today, Started the shaping work down the sides, I have pretty much done both doors I will put a couple of coats of sealer on them and prime them this week. The r/rear guard is also coming along well using the surf board foam and finishing with a skim of bog.
I received something awesome this week, its a genuine design drawing of the roll bar, this was sent to me by Ray Franklin from Vintage Engineering. A very kind thing to do. It shows how the brackets for the back stays are constructed and all the right angles and radii for the bends etc. Unfortunately it has also shown up a wrong dimension in my tub, I'm 2" too narrow at the rear bulkhead. I can live with his but it would have been nice to have that extra inch in the seat especially as we get older and start to gain a little weight.
Will get some photos up as I get closer to finishing the shaping etc.

cheers Leon.
 
Hey mate, i havnt been able to reach you via message so can you give me a quick ring when ever you can
cheers John
 
Hi Leon, This is fantastic stuff! I'm going to be following this step by step, where are you getting all your dimensions from ?, or are you like me, and keep looking at pictures a thousand times over until you can have a reasonable guess at it. Love the work.

Regards, Udo
 
Hi Udo, You pretty much hit the nail on the head, I trawled the internet for 6 months finding all the info I could and I also have a lot of Books about Can-Am and the McLaren team history so I had the basic dimensions, Wheel base, Track, height, width and did some scale drawings from photo's then as you say, looked at them thousands of times until I had a clear picture in my head. The Vintage Engineering parts are beautiful and will certainly make your build high end and authentic looking, I wish I had that kind of budget. Looking forward to watching your car take shape and I'll try to be of assistance where I can and keep this one rolling along, you will probably finish before I will. Interesting point, all the castings for your transaxle are made here in New Plymouth by the company that has done all my uprights, and Transaxle parts, Very clever and awesome guys.

Cheers Leon
 
Last edited:
Well the dust continues to cover everything in my workshop one of the things I hate about making bodies from timber and fiberglass but the progress is steady.
The body is complete as far as the surface structure is concerned, now I'm doing all the shaping and contouring all the corners and blending the surfaces to each other.
The rounded surface along the right side is done and I'm quite happy with the shape. The front clip is getting close to finished and I will be putting primer on it soon so I can get final shaping done. Once this is done I will put the first layers of F/Glass on it and get a finished surface before I pull the wood from the inside.

I have attached some Photos of the progress so far. Hope you enjoy and as always your comments and ideas are welcome.

Cheers Leon.
 

Attachments

  • IMG_2739.jpg
    IMG_2739.jpg
    117.6 KB · Views: 301
  • IMG_2740.jpg
    IMG_2740.jpg
    95.2 KB · Views: 227
  • IMG_2742.jpg
    IMG_2742.jpg
    104.4 KB · Views: 243
  • IMG_2741.jpg
    IMG_2741.jpg
    102.5 KB · Views: 234
  • IMG_2743.jpg
    IMG_2743.jpg
    127 KB · Views: 240
  • IMG_2744.jpg
    IMG_2744.jpg
    101.5 KB · Views: 300

Terry Oxandale

Skinny Man
Continuing to look good Leon. Once it is all primed, you'll be amazed at how it will finally look like a car. This is the point where you may be skimming filler over the same place half a dozen times simply to get it right. Unlike mechanical stuff where it is either right or wrong, bodywork has a million shades of gray. Even though the eye is useful in building the bodywork, a closed eye, and sensitive hands and fingers will tell you more about the quality of the curves, filler, and shape.
 

Randy V

Moderator-Admin
Staff member
Admin
Lifetime Supporter
X2 on everything Terry said...

Oh, and as I have verified - Oddly enough - a Gloved Hand is actually more sensitive when it comes to picking up on the variations in surfaces...

I use the blue nitryl gloves and they work rather well..
 
Funny you say about the gloved hand Randy, When first came out of my time (apprentiship, not prison) I got a job in the Nissan Assembly plant as a metal finisher, the guys were wearing cotton gloves and I made the comment, How can you feel the panel and then I used them and wow what a difference, 5 years in a body shop and nobody had ever used gloves.
Terry, your right about the multi layers of filler and the touch of a hand but its the eye that's needed for the lines and I noticed in photo #4 the round over the wheel arc where it meets the tail fin has a wee flat spot at the back which makes it look sharpish but from the side and front it looks fine, I will correct this.
More work today, I will be heading to the shop soon.

Cheers Leon.
 
I wonder how Mclaren made the fences on the original bodies. If using a negative mold it would have been a serious pain to get the glass up into the channels that would have been needed to make such. I suggest making sure there are no big waves in the work and the lines are straight. Don't be too fussy about the small stuff as the glass will fill it in anyway. That kind of work will be done over the glass after you apply it. But then you probably know that already.

I'd come over and help (really) if it wasn't such a long walk (nevermind the swim)
 
Hi Rob, when I pull the timber out I will be leaving the timber in the fences and tail fins for 2 reasons 1) can't imagine how I would get it out without cutting the body 2) it will give the tail fins a lot of strength. I think it will be needed to hold up that hugh rear wing.

Cheers Leon.
 
Back
Top