
You are using an out of date browser. It may not display this or other websites correctly.
You should upgrade or use an alternative browser.
You should upgrade or use an alternative browser.
M20 Dreaming
- Thread starter leonmac
- Start date
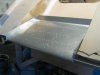
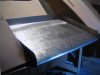
Well that high stud might be a problem already, It has been very wet here in Taranaki for the last week and very humid and this has had the affect Jackmac spoke about way back when I started the body. Dam you Jack, always right!! The flat surfaces over the wheels have become a bit distorted, not a major but enough to be a problem. So how do I fix this?? fill the workshop with dehumidifiers? start a fire? or wait until next summer before I glass it up. One thing is for certain, the wood will definitely be coming out of this body. Having said that, the plywood seams OK so the doors are not affected, its the thin MDF I used on the top surfaces that have sucked up the moisture and distorted.
Anyway not to be held back I have now started on the wings. I have made Ply ribs with alloy stringers then a thin sheet of alloy will cover the frame work, I've done the front wing frame and hope to have the rear done over the weekend, the wings are 20" deep, the front is 36" wide and the rear is 76" wide. I know the width is right not so sure about the depth but it looks good so I'm happy with that, Hey, go big or go home, that's my moto. Photos soon.
Cheers Leon.
There is an old story about leading your horse to the water trough.......
thin plywood as used in some homebuilt aircraft fitted @45° might work better--- but costs.
IIRC you intend this to also be your body as well as potential buck?
MDF is compressed wood fibres impregnated with resin and rolled/pressed/heated during manufacture, its for indoor/dry applications only, chuck a scrap piece outdoors for a few months and it will swell to approx 4 times original thickness, leave a piece of the thinner stuff you have on a concrete floor overnite and it will begin to curl up at the edges.
Last edited:
Not sure this will work for you, but it's worked marginally well for me in a different application... Consider using Polyester Resin (fiberglass resin) on your MDF.. Seals it up tight and will not absorb moisture.. Well at least not very much if it does at all in was imperceptible to me...
As far as MDF that has already gone dancing on you due to humidity, you may well be stuck with the shape you have even if you pull all the moisture out of it. I'd dry it out with a dehumidifier and heater, then seal it, then reshape with putty...
As far as MDF that has already gone dancing on you due to humidity, you may well be stuck with the shape you have even if you pull all the moisture out of it. I'd dry it out with a dehumidifier and heater, then seal it, then reshape with putty...
As it is only the tops of the front fenders that are affected I will see if it goes back to a reasonable state where I can just bring it back with some filler. If not I will cut out the affected areas and replace with fiberglass sheet. As I said, not a major set back, just a pain in the butt.
Cheers Leon
Cheers Leon
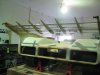
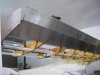
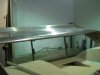
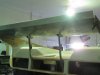
Started my wings last month before I went back work, did some more today. Made the mounts which are steel bushes in each rib then a 1/2" tube is past through which will then locate in each tail fin. I will then make the stays that come off the G/Box and support the middle of the wing, I will paint the ribs with a sealer tomorrow and once they are dry I can start putting the alloy sheet on. Some photos of the wing frames for you guys to check out, Cheers Leon
Sorry guys having issues downloading photos, will try later
Sorry guys having issues downloading photos, will try later
Last edited:
Try again, Success finally. There was a photo of the front wing but for some reason the computer doesn't like it and appears to be the reason I couldn't load the others until I tried without that photo.
Cheers Leon
Cheers Leon
Attachments
Last edited:
Terry Oxandale
Skinny Man
Very exciting to see the progress. How will the sheet be attached to the wood ribs?
I was intending to glue the alloy as well as rivet a long the alloy stingers, glue along the ribs and screw into the ply. I intend to wrap the wings (in fact the whole car) instead of painting so you won't be able to tell the screws from the rivets anyway. I could probably rivet into the ply as well as the adhesive will be holding the sheet more than the rivets. I sealed all the ply today to stop the moisture so hopefully will get the alloy sheet on in the next few days.
Cheers Leon
Cheers Leon
Andrew Robertson
Supporter
Looking great Leon.
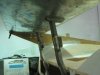
How have you determined the angle of attack to set the wing at? When I was faffing around with the wing on the M1 I set it at 12 degrees, after a general trawl through the literature (particularly Competition Car Aerodynamics by Simon McBeath) indicated maximum downforce on a single element wing usually occurs at between 14-16 degrees, and flow seperation + high drag occurs soon after that.
You look to have a fair bit of angle on there but I assume there is adjustability and I have no idea what they ran back then?
Cheers, Andrew
Hi Randy, "Estapol Hi Build Sanding Sealer" Some friends of mine who are making a lot of timber patterns for a car they are building told me about it. It works real well on MDF but will work on any timber and hardens to a sandable surface, it seals MDF and stops it swelling so will be good on the ply.
Andrew, The wing angle is adjustable and it is at its maximum angle in the photos.
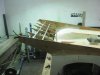
I have been working on them today and have the front wing finished, the back lip on the rear wing and started to make the support struts for the centre of the rear wing. They are a Diamond section tube which I have folded up in 1mm steel and gas welded down the trailing edge, they then have a kink half way which has a sandwich plate and some brackets are then welded on for the support rods that go forward to the roll bar.
I hope to have some Photos tomorrow.
Cheers Leon
Andrew, The wing angle is adjustable and it is at its maximum angle in the photos.
I have been working on them today and have the front wing finished, the back lip on the rear wing and started to make the support struts for the centre of the rear wing. They are a Diamond section tube which I have folded up in 1mm steel and gas welded down the trailing edge, they then have a kink half way which has a sandwich plate and some brackets are then welded on for the support rods that go forward to the roll bar.
I hope to have some Photos tomorrow.
Cheers Leon

Lets see if this works.
Well they are not great quality as I was too lazy to go to the shop so I just re shot them off the Computer screen, but you can get the drift of what I'm doing.
Cheers Leon
Well they are not great quality as I was too lazy to go to the shop so I just re shot them off the Computer screen, but you can get the drift of what I'm doing.
Cheers Leon
Attachments


Last edited:
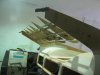
Well I have pretty much finished the wings today, The struts that hold the centre of the rear wing were the last thing to do. I folded them up to the diamond section welded the bush in each end, cut an angle in half way down to give it a bend then made sandwich plates to strengthen where it was welded, made the plates to locate the adjuster turnbuckle and the stays that will run back from the roll bar. All that is left is to make the turnbuckles and the stays.
Now that they are done I will finish the body wood work and get ready for Fiberglass.
Some photos for your viewing.
Cheers Leon.
Now that they are done I will finish the body wood work and get ready for Fiberglass.
Some photos for your viewing.
Cheers Leon.
Attachments
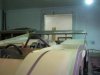

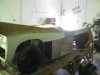
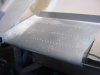
Well I'm getting close to fiberglass now just some shaping to finish on the left side and a bit more timber work on the top of the rear deck. The good news is the deformation of the front fender tops isn't as bad as I first thought so I don't have to cut out any MDF and can smooth it out with a little filler.
Russell, I priced up all the cloth and resin from "NZ fiberglass" and the same from "The Fiberglass shop" in Hamilton and it works out to be the same. The reason mine is a bit more expensive is the weave cloth is more $$ and I was going to use Epoxy resin. I see you have used Ester resin, whats the difference?? I have done quite a bit of Glassing and always used Epoxy I'm going to use the chopped strand mat for the first layer then put 1 layer of weave for the finish and use the chopped strand on the under side, this saves quite a bit of money. The CS is $180 for a 96mtr roll and the weave is $650 for the same amount.
I'm going to spend a bit of time on the Trans Axle now so will be a bit slow on this side.
Cheers Leon
Similar threads
- Replies
- 7
- Views
- 876