Mclaren M8b replica (visual)

Back from our break and Carol will be home tomorrow from her op.
Trying to keep things normal moving forward however progress has been slow with my mind and time elsewhere.

Jac, a couple of questions thanks.
I have standard master cylinders set up the same as my last car yet these ones are not pumping / bleeding as I would like. They seem to push fluid then suck it straight back, not building any pressure? any clues before I pull them out thanks.
I take it this is brakes, that's normal if your not using a pressure bleeder process. Push the brake pedal down ( I use a piece of broomstick of appropiate length to hold it in down position against seat or other part of car chassis when doing it by myself ) then open the bleeder screw to expel air -preferably with a plastic hose on bleeder into old coke bottle so you can tell when air has been expelled-close the bleeder then remove the broomstick, repeat that process until you only get fluid, no bubbles.

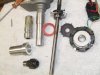
I have also just fitted the standard Audi clutch slave cyl and have needed to firmly push it in to bolt up. This makes me think that it is exerting pressure on the clutch fork and I need to shorten the piston pushing rod! Given that the slave has a small spring inside keeping `pressure` up on the rod, what sort of clearance should I have (allowing for that spring) I think that what ever I cut off will be taken up by the slave cyl and should back of slightly once the pedal is released.
Have you already bled the clutch system? there is a possibility here that the clutch master cyl push rod may need to be adjusted for some freeboard and MC complete piston return to allow the fluid in the slave to return to the master cyl, check this before shortening the slave pushrod- this could be giving you a false impression about the slave pushrod and as you suggest partly releasing clutch when you have to force the Slave cyl into position.

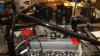
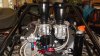
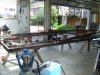
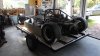
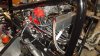
Did the drill down the dizzy hole and got almost instant oil pressure 75psi....things worked better once I had the hoses on the remote oil filter around the right way. I am in the process of shortening a Chevy distributor and then will be in a position to fire it up for the first time. I will be nurse / chief cook and bottle washer for a while so the car takes second place.

Keep at it, what Carol & you are dealing with is tough going, but having your project to give you a short distraction occasionally is a good thing.
 
Last edited:
Thanks Jac,
Just realized that I was not doing the open close bit....doh!
As for the clutch, I have not bled it yet, just wanted confirmation on what I was thinking.
Thanks again for your help and words.
Regards
Russell
 
Had some quiet spare time today so decided to start shortening the Chevy distributor. Set up the new dizzy in the lathe and turned the shaft down to allow for the new sleeve and collar. Next turned up the new collar and sleeve, and taking great care managed it first pop. All I need to do now is put in a couple of lock screws and epoxy it all together. Fortunately the new Rover dizzy and oil pump drive has not been drill so this will make it easier to have all in line for the tube rivet. Then its a case of sticking it back together!
Cheers
Russell
 

Attachments

  • DSCF7787.jpg
    DSCF7787.jpg
    172 KB · Views: 244
Jac,
Well the dizzy is all done and fitted so I went back and pulled the clutch slave cyl out to measure the length required and the standard rod length was about 12mm longer than I needed so have shortened the rod and all good now.
All my wiring is now completed and the starter even turns the motor over! A few more checks and then it will be action followed by `noise` .
Just confirming that I need to run it at around 2 - 2500rpm for about 20 mins to bed the cam in.
Last expensive job now is to get my rear axels machined $$$. Almost tempted to weld an Audi end onto a Subaru shaft and see what happens.
Cheers
Russell
 
Camshaft-first start. before you fit that dizzy use an old one less gear to prime up some oil pressure- remember to turn it in correct direction. Then fit dizzy, double check stuff like firing order, fuel in carbs, timing set as accurately as possible... then hit the go button, check for oil pressure and take it straight up to 2000/2500 rpm. Listen carefully for any odd noises and if all good keep it between 2000/2500 until it reaches operating temp- you can check total ign timing now if you have timing light handy ( don't worry about idle timing at this point, check the temp to ensure fans etc are holding that temp and if so run your ~twenty minutes like that. If temp keeps climbing close throttle and shut down- don't allow to idle. I often find after a first start the engine might not want to stop if carb etc is a bit off tune so its handy to have brakes/trans operational to 'kill' engine with if it tends to 'run-on'. Good Luck.
Sorry-Friday nite & brains still unwinding- if you have strong valve springs either remove the inners or find a softer spring for that first start- resist temptation to 'rev it' above 3500with softer springs.
 
Last edited:
Yes I should have:), along with lifter bore grooves or face oiler lifters which I think I might have mentioned in the past to Russell.
 
Thanks for that Jac.
I have already done the oil pressure bit, had taken great care when I rebuilt the pump so had almost instant oil pressure of around 70psi. Everything has been assembled with `special sticky stuff` so hope its well protected.
Before I fire it up, I need to talk with Murray at Webber specs to get the correct jet screw turns for first set up as I cant remember from last time and standard Alfa jetting is spot on when running four carbs on the Rover.
I have set the timing up as per your comments, taking care not to be 180deg out like last time so next week should see some action.
Regards
Russell
 
A little more progress, Carol is recovering well with Chemo planed to start in a couple of weeks so I am getting a bit of shed time.
I am going over and over the chassis to ensure that all is well on start up, have also started molding the carb trumpets and managed to pull 4 off the mold today. Must have known something when I sold the other car as I kept the molds and a few other bits,
The motor looks the business now so cant wait to have it buzzing behind my ears.
Every day sees another list of small jobs completed...soon there will be none and then its build the trailer so that i can put the chassis in storage whist I build the body buck.
Regards
Russell
 

Attachments

  • DSCF2956.jpg
    DSCF2956.jpg
    291.8 KB · Views: 293
  • DSCF2957.jpg
    DSCF2957.jpg
    291.8 KB · Views: 278
  • DSCF2958.jpg
    DSCF2958.jpg
    159.3 KB · Views: 253

Keith

Moderator
Hey Russell, what kind of mods have you done to the Rover? And is there any reason why the Rover seems to be the motor of choice for these kind of projects, despite the fact there must be acres of SBC's lying around in OZ not to mention SBF's :eek: 
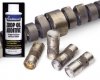
I seem to recall a McLaren did actually run with a SBF back in the early Can-Am days? Sunoco?

Ed: I meant NZ of course. Sorry!:hanged:
 
Last edited:

Randy V

Moderator-Admin
Staff member
Admin
Lifetime Supporter
Happy to hear of Carol's progress.. Prayers to continue...

I'll be excited to see how your trumpets turn out!
 
Keith, the choice of the Rover is to do with old school! Their simple to work on, sound great, are light and do not produce too much horsepower which is easier on transaxels. Sadly they do cost more to bring up to scratch. I like to think there is some tangible connection to the original cars as they used a track Oldsmobile which in turn became a Rover.
Cheers
Russell
750kg and 240hp gives a pretty good power to weight ratio.
 
Nothing to trumpet here!!!
Probably have gone a bit severe on the height difference but hey its just for looks....and to smooth out that excessive horsepower!
The other view is from our lounge to the `man cave`.
Cheers
 

Attachments

  • DSCF2962.jpg
    DSCF2962.jpg
    274 KB · Views: 281
  • DSCF2963.jpg
    DSCF2963.jpg
    278 KB · Views: 291
  • DSCF2961.jpg
    DSCF2961.jpg
    269 KB · Views: 269
Hi
Now with the car is on its wheels and supporting itself its good to see that ride heights are close to what i had guessed...no science here. Its a low sucker but good to see it roll around.
Well did the start up thing on Thursday (Carol was out of the house) and whilst doing all my pre start checks now that I had fuel in the car...bugger had a fuel leak from the surge tank. As this was more than a 5 min fix, decided to leave for latter and concentrate on building the car transporter whilst I had 3 days to myself. Got all done and now just the ramps to complete. I have had to make the trailer now because I need to put the chassis into storage whilst I make the body buck and then do the final shell.
Jac, I think my leaks coming from the parallel threads i put in the outlets...the aly fittings are all taper. Do you know of any goop that I could seal the threads with to prevent this leak, I was thinking of that grey gasket goo ``three bond``. Any thought would be welome.
Cheers
 

Attachments

  • DSCF7789.jpg
    DSCF7789.jpg
    200.2 KB · Views: 329
  • DSCF7790.jpg
    DSCF7790.jpg
    201.6 KB · Views: 377
  • DSCF7793.jpg
    DSCF7793.jpg
    219.2 KB · Views: 268
Couple of ideas that might work with captive o-ring grooves etc,, Ive used that sealant for Jerico's and T101a metal to metal no gaskets trans rebuilds, so I guess it will work on fuel with some cure time, but if your taper thread fitting is right up to the shank it might only take a bump to start leaking again.
 

Attachments

  • russell keach.jpg
    russell keach.jpg
    18.6 KB · Views: 203
Hi
More progress of sorts, got the car sitting on the trailer today and now need to slide the axel assembly to the correct balance point then bolt in place. Height worked out great and it was an easy load.
Finally solved my brake bleed problems...faulty master cylinder so will get a new one on Tuesday.
Having cured my fuel leaks, it was time to hit the start button, plenty of cranking response but no noise at all. Checked everything, full power to the coil and correct polarity, rotor fitted and turns yet still no spark!!!! seems like the ignition module may be faulty so will need to see my friendly auto sparky to check it out. Bit frustrating to say the least.
Still with the car on the trailer, it easy to catch up on the numerous small bits that need a tidy or solution.
Tomorrow Carol starts 6 courses of chemo so the car will be taking second place, it has been help full having an outside interest to keep me sane.
Cheers
 

Attachments

  • DSCF2972.jpg
    DSCF2972.jpg
    235.4 KB · Views: 256
  • DSCF2973.jpg
    DSCF2973.jpg
    228.2 KB · Views: 291
Back
Top