
You are using an out of date browser. It may not display this or other websites correctly.
You should upgrade or use an alternative browser.
You should upgrade or use an alternative browser.
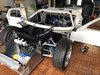
Hey Gerorge, I love it, it’s coming along nicely. I like your aluminum plate in the front, great idea! Haha.
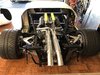
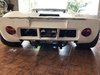
I assume that the rear sway bar came with the car. Any idea what kind it is? I wonder if Chris had it made or it’s an off the shelf product?
I assume that the rear sway bar came with the car. Any idea what kind it is? I wonder if Chris had it made or it’s an off the shelf product?
Interesting. It looks great and fits perfectly. What did you have to do, crush the ends? And I know you took my idea, I was being sarcastic which is why I said haha ... I love it!
Last edited:
NICE CLEAN JOB...LOOKS GREAT
Ohhh, great idea! Do you remember the sleeve size? I have an extra C5 sway bar.Thank you for the compliments. For the sway bar all you need to do is cut 9 inches (angle cuts) from the middle and then weld together using a steel sleeve for strength. Don’t need to do anything to the ends.
Last edited:
I was not able to find a steel pipe to properly fit the 30mm size sway bar so I cut a 6 inch long, one inch diameter steel pipe down the middle and sandwiched it. I then welded together filling in the gaps. Measure your sway bar because the C5 sway bars came in different diameters depending on the model. Hope this helps and believe me it is very strong.
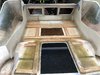
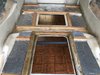
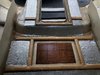
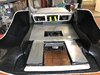
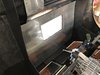
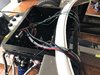
Used some of the ideas discussed in the forum and just completed adding strength to the rear shell and solving the exhaust heat issue. I fiberglassed 1x2 wooden strips and placed sticky shield as you can see from the picture. I then used aluminum sheets and created what I believe will work great.
I coated the shell with POR15
Attachments
-
 56A42178-3339-430F-AF53-62825DEB76BF.jpeg456.2 KB · Views: 777
 -
 EF89B4F8-2CAA-4510-A0DE-1F5FC4EF4271.jpeg611.3 KB · Views: 776
 -
 69F2CA7C-0264-416C-8628-08A868FD12F5.jpeg636.7 KB · Views: 746
 -
 10FD7438-F22C-451A-921A-0AF883104555.jpeg370.3 KB · Views: 738
 -
 B333F79A-1F99-4C36-BC66-E2F8D17FB081.jpeg466.2 KB · Views: 725
 -
 63B969C8-4A4A-4B62-AF35-5CB78C50B716.jpeg397.7 KB · Views: 751
Dr. Bob Woods
Supporter
George, your heat shielding looks great. Glad you could do it before paint. Give some consideration to the vertical walls that are close to the headers too. I guess you saw my solution.
Bob Woods
Tornado GT40 in Texas
Bob Woods
Tornado GT40 in Texas
Doc your Idea certainly helped me and thank you for your postings and helpful suggestions. Have you or anyone else use some type of foam to fill the void in a fiberglass spider that will not distort or separate the panels??? I’m looking for something that will provide a more solid foundation. Thanks
need more updates
mark
mark
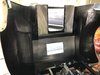
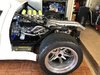
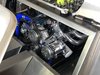
So far its been fun and currently working on the wiring and fuel cell plumbing. Planning to start the engine by the end of the month and hopefully with no leaks.
Attachments
-
 D929EB81-A762-48AE-B3F1-6831449965BC.jpeg493.7 KB · Views: 717
 -
 0939612F-E75D-4B99-A4EF-52CE8A6412D1.jpeg466.8 KB · Views: 664
 -
 B5FD4191-9441-4407-A7E4-A97183D86104.jpeg517.2 KB · Views: 660
 -
 54A8FE83-9282-49E9-9B07-362BB3C4C2CF.jpeg414.9 KB · Views: 735
 -
 3130C0BF-0B07-455C-9047-57F151ACB8A1.jpeg428.4 KB · Views: 655
 -
 8FF4225D-6066-4317-B7D7-CAC7989A479C.jpeg387.3 KB · Views: 675
Similar threads
- Replies
- 16
- Views
- 2K