Roaring Forties 105

Been a while.
I am resigned that this is going to take some time.
Some of it is because I dont know what I am doing and I have to figure it out on the job,Sometimes I have to cut a section off because I get ahead of myself and you work an area and it changes the fitment in another area so you have to redo a part, I have learnt that it is clean as you go and move through when you are happy.

Some of what I am posting is in the build stage.


I have purchased more tools as time has progressed to deal with some of the issues you have to hurdle.
They all make noise.

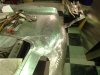
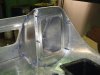
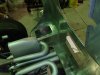
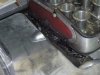
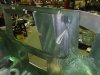
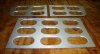
1st pic is the rear shell with the wire form still inside.
This was just before I cut it out with bolt cutters.

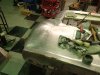
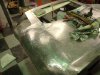
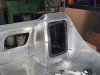
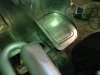
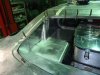
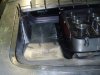
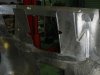
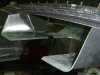
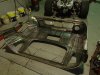
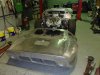
2nd 3rd is the shell with all the welds still exposed.
 

Attachments

  • REAR CLIP S1.jpg
    REAR CLIP S1.jpg
    125 KB · Views: 435
  • REAR CLIP s3.jpg
    REAR CLIP s3.jpg
    194.1 KB · Views: 441
  • REAR CLIP s5.jpg
    REAR CLIP s5.jpg
    169.6 KB · Views: 475
Last edited:
The welds are filed back, bumping up all the lows and srinking down the highs to get a file finish.
Yes I will use some fillers in areas because I cant warrant the time and to go to the enth degree in some areas.
 

Attachments

  • REAR CLIP s7.jpg
    REAR CLIP s7.jpg
    189.2 KB · Views: 339
  • REAR CLIP s8.jpg
    REAR CLIP s8.jpg
    186.5 KB · Views: 330
  • REAR CLIP s11.jpg
    REAR CLIP s11.jpg
    198.8 KB · Views: 365
for someone who does not know what there doing you are doing
a fantastic job i have enough trouble bending alloy in a bender
but to take a flat sheet of alloy and put compound curves and
returns and recesses shows how clever you are keep the photos
coming what would the weight of the rear clip be jim?
chris
 
I had to mount the rear clip to sort out the body gaps so I had to make the rear light boxes.
This was the sollution after trying a few experiments.

The flanges I use a shrinker stretcher to get the shape very close to the body shape.
These are bonded in, I use a counter sunk rivet at the begining and end of each bracket for shear.
These rivets are on the outer skin and will be filled.
The box skins are bonded to the brackets as well as riveted.

pic 1 brackets.
2 dummy up face sheets.
3 is fiberglass tools boxes that I used in the other body, I use them on a long trip.

Chris 13.5 kg at the moment and I am expecting 20-22 fitted with poly back window.
The glass clip was 55kg fitted up with a glass rear window.
I have tortured myself with this Chris but I will win.
 

Attachments

  • P3290006.JPG
    P3290006.JPG
    174.5 KB · Views: 362
  • P3290004.JPG
    P3290004.JPG
    184.5 KB · Views: 371
  • P3290003.JPG
    P3290003.JPG
    173.2 KB · Views: 374
Last edited:
This is the light boxes fitted up and hinges mounted for the rear clip.
I mad the lids with a raised perimeter for a rubber seal to sit in and the box is nutserted for the 4 screws.

The clip is on the car and I have to sort out some body gap issues, its all fixable but it is the price for moving to fast.
The gap across the roof is bang on and that is all I need, the others are an easy fix but the gap that meets the roof would have been a mission if I had f**ked that up.

Rule # 1 finish as you go.
Rule # 2 finish as you go.
 

Attachments

  • P4010011.JPG
    P4010011.JPG
    183.2 KB · Views: 328
  • P4060026.jpg
    P4060026.jpg
    70.7 KB · Views: 320
  • P4010015.jpg
    P4010015.jpg
    150.9 KB · Views: 345
Last edited:
I have been working in the rear window area under the screen.
I have to do this because when all the panels are fitted they will hold the shape where the roof and the clip meet.
After this I plan on moving down the sides.

pic 1 is the general idea, I have tried to copy what I had except for the panel at the rear under the window above the collectors.
I run a modular eng and they are tall and I had to cut away some of the f/glass because it was that close on the original clip.
On this one I changed the shape to get the floor closer to the air box.
I had to clear some mechanical components so cut outs had to be put into the sheet.
A nice little cover will be made for both sides, plus the floor line looks less disrupted with the bubble.
 

Attachments

  • P4010009.JPG
    P4010009.JPG
    196.5 KB · Views: 357
  • P4060020.JPG
    P4060020.JPG
    180.7 KB · Views: 331
  • P4060021.JPG
    P4060021.JPG
    183.7 KB · Views: 323
Last edited:
Pic 1 building the L/H side
2 is both sides
3 I radiused all the edges of the sheets to add stiffness.
I still have to do a bit of finish off in the flanges and trimming off areas before bonding it all in.

Thats all for the moment.

Jim
 

Attachments

  • P4010016.JPG
    P4010016.JPG
    172.6 KB · Views: 315
  • P4060024.JPG
    P4060024.JPG
    149.4 KB · Views: 317
  • P4060023.JPG
    P4060023.JPG
    154.8 KB · Views: 326
  • P4060028.jpg
    P4060028.jpg
    189.7 KB · Views: 371
jim is the alloy normal grade i have heard you can anneal it by
oxy and acetlyne and does it work harden like s/steel
chris
 
Yes it gets harder the more you work it.
The R/H gaurd is the only part I have anealed so far, only because I tortured it by trying to get it into shape.
You soot it with acetlyene first then heat it with the torch.
When the black is gone it is anealed this is maybe 500-550c I would think.it will melt at 650c.
If you over work it and it is stretched you can shrink it as well. if you soot then say # 6 or 8 tip on a neutral flame you apply the heat to the stretched area ,when the soot is gone you hit it with a spray of water from a spray bottle.
You do curcular areas and it will pull down.
If you stretch to far you generally get panel pop when you push on it, you have to much metal and if it is in the middle of a panel it will be trapped by the surrounding metal and shrinking will fix it.

The alloy is 1.6mm 5005 grade.

The biggest issue with a 40 is the shape, it has changing curves and you have to read it or you will cock up real quick.
EG On the rear gaurd you have the compound shape of the top of the hip , as the shape travels into the deck area where the vent lives you go from compound convex to concave ,if you work the convex with a tool to stretch it will come up but it will make the concave go down.
When these areas are right next to each other in the shape you have to be carfull or you can change the shape in an area you dont want to change.
sorry to ramble

Jim

Jim
 
Last edited:
Ok... We are at a new level of "build" with this one! Absolutely amazing! I looked at the dates that you have been posting and I'm shocked by your progress. Quite a skill you have there. Great read while drinking my morning coffee.... I should be out in the garage! Really terrific work Jim.
 
Thanks Jim I do have days when I think to myself ,SELF what are you doing.

Z I know you are a sheet metal man I look at your boat thread, you would understand the issues that haunt you on this type of job.

I should put in a word for two gents that help on this project.
Albert and Rick,

Albert is about 70 he is a retired electrician, he has arthritis and has lumps and bumps all over him.
He is a very handy guy and amazingly is still good with his hands considering.
He has helped on the car every Saturday for 8 years.
When we go to the track he is on my doorstep at 4.30am.
He helped through the registration period of doing tests and trailering it to airports and emissions tests so he has seen it all.

Rick is 48 he is a milk man and has been here every Saturday for maybe 5 -6 years.
He just volunteered his time because he wanted to be involved, he turned up and wouldnt go away so I started giving him things to do.
He came with absolutely no skills at all but over time he has mastered some of the gear and makes some nice stuff.
He struggled to cut a straight line at first and it became a running joke in the shop,if you want a curve give it to Rick.
Rick has started tracking his car through enthusiasm of doing track work with the 40 and he loves it.

Some days I get frustrated with the two guys but I couldn’t do some of this work without them.
They are true friends who treat this car like it is their own.
I want to do a P4 next with a alloy riveted tub and alloy body and they have already put thier hands up for that one, we often toss around the design ideas and we have it built in our heads.

Jim
 
Last edited:
once this project is finished you will have to start another
or else you albert and rick will have nothing to do on a saturday
except drink beer and you dont want to end up with a beer gut
like me roll on p4
rick and albert are true mates
chris
 
Goldsmith

Its 10.15 am yoooooou should be in the shed working on your car not dreaming about beer and sitting on the net.

They have made it very clear that they dont want to be at home on Saturdays.
Ricks wife is already calling the 40 "THAT BLOODY CAR"

Jim
 
if rick and albert want something to do on sundays i could do with some help cause i keep stuffing things up i am just down the hume freeway not that far away really
chris
 
the issues that haunt you on this type of job. post # 212.

Yes Jim to me there are two main types. The metal forming,-- which we can manipulate and try to master and secondly that extra pair of hands that are giving you help.

That second pair of hands must have some special qualities as well. Firstly that person have to work in a synchronized way with you who sets the tempo of work, the rate of feed that you dictate as the metal goes through the machine , power hammer, English wheel , band saw , set of rollers or where ever the metal needs support on the far side. He must have the right aptitude to gel with you.

What I found that does NOT work is the younger generation that grew up on a diet of computer games. To him every thing have to happen FAST and immediately, just like his games. As a helper to me he is useless.

The second person that does not work is the guy who helps you , but have to suddenly go to a special appointment he just remembered. There I am stuck with sheets half way tacked in.

Those two reliable guys that are helping you are worth their weight in gold.

Jim please excuse me for high jacking your thread .


Z.C.
 
I have personally Jim for approximately 8 years.I would say currently the only parts of RF 105 that remain original to RF/2 manufacture/supply would be the space frame chassis ,dash and rear uprights.Everything else on this car are totally Jims design and manufacture which now include a "superb" aluminium body near 60% complete to which I have seen and touched.
To Jim and his "helpers" the workmanship is outstanding.The eye to detail is impeccable with everything thought through.I am qualified in THREE x trades (Heavy Mechanical/Welding/Panel Beating) and have a "Diploma" in Business Management so consider myself both objective and constructive and know "good from not good".
It is a pity that not more O/S interest is shown in Jims work and is more of a reason why a number of us down under do not bother to post.Jim has often commented that I would have the most authentic looking replica GT40 in OZ complete with patina/offs/original IDAs etc.The webbers fire up every time 1st time/it is 347ci/rwp 396 hp and those who think more is best should think again.
Jim I know you do it for both the challenge and because "you can".It is also a "Warm up" for that P4 replica.Bloody excellent job mate.
 
Z

You are not hijacking at all,its all relavant to all projects

You have explained it perfectly.
And the younger generation thing ,have you met my son.

I blame all this on Mc Donalds drive through service.
They do not know life with out MD and getting their big mac in 3 min.
They think that this flows into everything else in life.
Instant graterfication.
I am very anti this attitude and I pull the handbrake on it real quick.

Cris Coote thanks for the kind words and yes the first time I layed eyes on your car it was special and it stood out for all the right reasons.
I remember the day, 10 x GT40s and yours was the magnet.

Jim
 
hello jim i was wondering with the inner panels that you put
under rear clip to stop flex and twist will they be welded in or
bonded and another thought with the rear vents on top and
at the back seeing how you are allready alluminium could you
press the nine holes into body as is that way you could give
your alloy vents away to a person in need like meeeeeee.
chris
 
Back
Top