
- Forums
- GT40 Replica Manufacturers' Corner
- RCR Forum - RCR40/SLC/917/Superlite Aero
- The SLC Clubhouse
You are using an out of date browser. It may not display this or other websites correctly.
You should upgrade or use an alternative browser.
You should upgrade or use an alternative browser.
SLC 001 Build
- Thread starter Mesa
- Start date
Hi Rob,
Just having another catch up on your progress which by the way is impressive. It must be so nice to have all those nicely finished parts all bolted together, the finish detail is superb and how much stuff you managed to get into this car, I'm so glad I'm building a relatively simple car, I have started the body work on mine now and I know you made the comment a long time back that that would make or break the finished item so please feel free to make suggessions as I go. I can't wait to see the body on this thing. The shot of it from behind on your short drive is so cool with those huge rear tyres as you say, almost a shame to cover it up.
Looking forward to the video. Cheers Leon
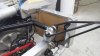
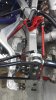
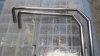
Understandably there was some concern over the copper heater lines. Well, a really good tube fab company was stumbled across and since it would have required me to remove the body or cut a whole in the side of the car if these things ever leaked .... Walla' seamless stainless tubes for the heater system.
Attachments
Last edited:
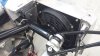
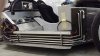
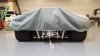
There was also a realization that the lower radiator mounting system was just too flimsy for comfort, so a complete overhaul including beefier materials was needed. Note the flapper doors added to the fan shrouds.
Attachments

Seems this series of posts deals with the a few items that were not quite up to snuff 
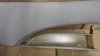
The original solution for the front trunk latch was based on a latch I had sitting around. It looked nice an clean, unfortunately once installed good looks didn't = works good. Even back then I knew it was going to need a complete rethink.
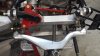
Here is the reworked version which includes a remote key fob actuated release. The safety catch handle was quite a challenge to get it to clear the closed lid yet still be tall enough for a finger to reach it.
The original solution for the front trunk latch was based on a latch I had sitting around. It looked nice an clean, unfortunately once installed good looks didn't = works good. Even back then I knew it was going to need a complete rethink.
Here is the reworked version which includes a remote key fob actuated release. The safety catch handle was quite a challenge to get it to clear the closed lid yet still be tall enough for a finger to reach it.
Attachments

Howard Jones
Supporter
Great job Batman
I did the same thing. Started with copper, but it really is kind of dicey to have in a car with all of the vibration and sweat joints, and no way to repair with body on. I redid mine in alum 5/8" fuel line material.
Looks good.
Looks good.
Another milestone. We have the engine/fuel system de-bugged and tuned well enough to move to final phases - paint and interior coverings. The finish tune will have to wait until this project is road going.
A 'minor' bit before moving to paint, once again I will be tossing out something finished early in the build in order to upgrade. In this case the stock door handles and linkages (work just fine) but, I have decided I don't like the outside door handles so much.
I want to have my stock 'bearclaw' door latches released directly (no inner door handle) with a solenoid. I have collected a few that will easily release the door latch. My only concern is that once I get door seal trim on the opening that the latch will require more torque to open it.
Has anyone done this (including a door seal), and if so what is your recommendation on torque rating?
Hey guys, I did just about the same. I put mechanical inside(Toyota door opener) and key fob for the outside. When the ignition switch goes to Off, the two door openers actuate automatically. If the fob dies I have an electrical button for each door in the fender wells of the front tires. Kinda covers the bases. My outside door openers are for looks only.
Bill
Bill
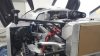
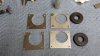
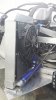
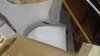
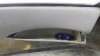
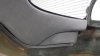
Along the way to finishing the removal of outer door handles I decided that all the Miata door handles had to go. Short version - removed both the inner and outer door handles from the equation. Built up this plate to hold all the electronics for the 'touchless' outside door releases. Press on a certain spot on the outside of the door and pop goes the door latch, no handle, no button.
Tested OK in the car, won't actually finish it and all the real linkages until after the body sees final installation.
Tested OK in the car, won't actually finish it and all the real linkages until after the body sees final installation.
Attachments
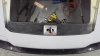
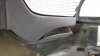
With the inner handles out of the way there was space available for creating tilt out door storage.
Attachments
Last edited:
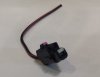
After years of (passively) chasing down leads today has seen the culmination of literally minutes upon minutes of research into the capture of this very elusive creature. The task required great risk and foolheartedly plunging oneself into the deepest darkest underbrush of automotive recycling yards.
I must admit it took some assistance from local tribesmen to complete the task as I had somehow not managed to pack a 10mm box end weapon of influence in my overstuffed mechanical adventure kit. How is it inevitable to take everything, yet still leave something behind?
Regardless, I have now returned to civilization with the prize few have sought, and fewer have yearned for.
- sound of trumpets-
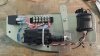
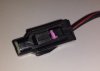
Behold the exclusive Ricardo Ford GT starter solenoid plug in all its glory!
I must admit it took some assistance from local tribesmen to complete the task as I had somehow not managed to pack a 10mm box end weapon of influence in my overstuffed mechanical adventure kit. How is it inevitable to take everything, yet still leave something behind?
Regardless, I have now returned to civilization with the prize few have sought, and fewer have yearned for.
- sound of trumpets-
Behold the exclusive Ricardo Ford GT starter solenoid plug in all its glory!
Attachments
Last edited:
After years of (passively) chasing down leads today has seen the culmination of literally minutes upon minutes of research into the capture of this very elusive creature. The task required great risk and foolheartedly plunging oneself into the deepest darkest underbrush of automotive recycling yards.
I must admit it took some assistance from local tribesmen to complete the task as I had somehow not managed to pack a 10mm box end weapon of influence in my overstuffed mechanical adventure kit. How is it inevitable to take everything, yet still leave something behind?
Regardless, I have now returned to civilization with the prize few have sought, and fewer have yearned for.
- sound of trumpets-
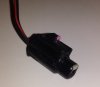
Behold the exclusive Ricardo Ford GT starter solenoid plug in all its glory!
I wasted like 8mths trying to find one several years ago! (and yet Cam was right - just stick on a spade connector and call it a day, LOL)
Ken Roberts
Supporter
Congrats on the find Mesa. What year Toyota Camry? I'll try and locate a new pigtail from this info.
Looks like it was used on Toyota and Lexus starters in the late 90s and early 2000s.
Looks like it was used on Toyota and Lexus starters in the late 90s and early 2000s.
Last edited:
Similar threads
- Replies
- 14
- Views
- 2K
- Replies
- 26
- Views
- 7K
- Replies
- 5
- Views
- 785