
You are using an out of date browser. It may not display this or other websites correctly.
You should upgrade or use an alternative browser.
You should upgrade or use an alternative browser.
SteveB MDA MKII Build Diary
- Thread starter SteveBarker
- Start date
Steve,
I'm in the process of finding mirrors for my MKII. I've been watching your log, nice work by the way, and I noticed that you've got a set to fit your car. Could you please let me know where you sourced them? Did you have to modify them to fit? And most importantly, are you able to see around the side well enough?
Many Thanks,
Michael
Michael
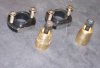
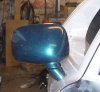
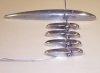
I had a MkI and the rear vision was very poor so I spent some time finding a mirror that would give a good view line as the MkII has more obstruction.
The one I have gone for is off a VW Corrado also used on the McLaren F1 and my TVR Tuscan. It is heated and electric operation. The controls are from the same car and the Canadian Corrado owners club have the wiring diagram on their website.
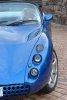
I have posted pix of the cars
The base of the mirror needed to be trimmed to the angle of the door profile
Hope this helps
Steve
I had a MkI and the rear vision was very poor so I spent some time finding a mirror that would give a good view line as the MkII has more obstruction.
The one I have gone for is off a VW Corrado also used on the McLaren F1 and my TVR Tuscan. It is heated and electric operation. The controls are from the same car and the Canadian Corrado owners club have the wiring diagram on their website.
I have posted pix of the cars
The base of the mirror needed to be trimmed to the angle of the door profile
Hope this helps
Steve
Attachments

Ron Earp
Admin
Steve, the seat pans look great! Do you have patterns for them or have some tips for those trying to replicate something like that? I'm starting to consider options for the Lola seats and need some aluminum pans my wife can cover. Those are the closest to what I'm thinking of using that I have seen.
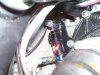
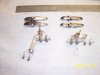
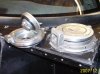
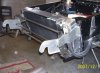
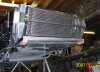
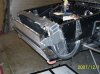
Steve, could you possibly shoot a few more pictures of your clutch and slave cylinder setup?Yours is the first puller type setup I have seen. Is it a Wilwood? I would like to see the mounting bracket if possible. Thanks; chuck
Ron
I have tried to attach a drawing, hope it helps
Chuck
I will try to get a better picture of the Willwood unit I had not seen a contracting cylinder before; it is the standard MDA fitment when using a ZF. It is very tight to get the camera in but will give it a go!
Steve
I have tried to attach a drawing, hope it helps
Chuck
I will try to get a better picture of the Willwood unit I had not seen a contracting cylinder before; it is the standard MDA fitment when using a ZF. It is very tight to get the camera in but will give it a go!
Steve
Attachments
Chuck
Here is a closeup of the bracket, it extends to a lower fixing out of sight behind the driveshaft. Hope this helps.
Ron
I could probably get a 'Solidworks' drawing if they can use it.
I have put an extra stiffener where the back and base joint meets. I expect the seat will always be hard against the bulkhead , however the extra strength would be needed if mounting on runners
Attachments
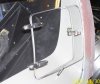
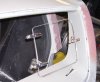
Hi, here are a few pics of the side windows I am fitting.
The rebates need to be increased in depth for the 4mm moulded side windows that MDA provide, they also provided some nice hinge hardware similar to original equipment in acrylic.
The set up was for the hinge to be on the inside however this needs a gap of 4+mm and possible beveling at the hinge edge to allow the window to open without binding on the main window edge; if the hinge is on the outside the gap conversly opens up as the window opens
The gap would let in quite a lot of Yorkshire rain in ( a very wet type), so I opted for the outside hinge.
I made some hinges to 'match' the hinges on the front vent. I have also made a clamp to lock the window open, also the heel of the mounting bracket for the stay to make it project past the edge of the window opening to act as a stop for the window when closed.
I will fit them then set aside till after SVA.
Steve
Attachments
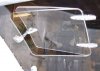
The windows need some tweeks to get the final fit to give a close fit in the opening these are the pictures.
The next jobs will be preparing for SVA . Some replacement fuel fillers suitable for the test are the first item then edges and light positions etc.
Steve
The next jobs will be preparing for SVA . Some replacement fuel fillers suitable for the test are the first item then edges and light positions etc.
Steve
Attachments
nice Steve and thanks for the pic of the slave cylinder
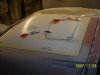
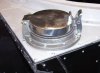
The original type fuel fillers are not suitable for SVA without covers or lots of radius work so I have made some exchange caps from a couple of motorcycle filler caps from the bike breakers. Just a little radius work and that should do it.
They just mount on the standard MDA filler base and the original caps can be just dropped back on after the test.
Before and after shots attached
Steve
They just mount on the standard MDA filler base and the original caps can be just dropped back on after the test.
Before and after shots attached
Steve
Attachments
Hi Steve,
Many thanks for posting the seat design, however I somehow doubt that I'll be able to make it to metric dimensions to 2 decimal places, as specced on the drawing - Oh the joys of CAD design!
Keep up the good work
Regards
Andy
Many thanks for posting the seat design, however I somehow doubt that I'll be able to make it to metric dimensions to 2 decimal places, as specced on the drawing - Oh the joys of CAD design!
Keep up the good work
Regards
Andy
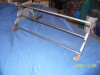
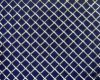
I need to have a mesh grille to protect the radiator but also for SVA to shield the interior parts. I also want the jacking / lifting brackets after SVA, so I have made a frame to carry the grille and brackets.
The frame fits on the hinge mounts for the front clip, I need to make a brace bracket to support the top back to the chassis at the side of the radiator.
I have found some stainless mesh and need to choose square or diamond effect. The bracket is off to powdercoat next before fitting the mesh.
I plan to use the same mesh for the rear of the MKII..
Steve
Attachments
Hi Steve
Thanks for the post, how 's your car progressing?
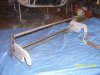
I've mocked up a rear vent from various pictures, there are versions of every size so this is mine.
The mesh is in and will be powdercoated, the photo shows the SVA version without the lift brackets. The gap under the radiator forward to the front clip has been filled in and a pair of skid blocks fitted that will save the front underside of the clip. I have a difficult drive access I hope these will ground first and save the clip.
Steve
Thanks for the post, how 's your car progressing?
I've mocked up a rear vent from various pictures, there are versions of every size so this is mine.
The mesh is in and will be powdercoated, the photo shows the SVA version without the lift brackets. The gap under the radiator forward to the front clip has been filled in and a pair of skid blocks fitted that will save the front underside of the clip. I have a difficult drive access I hope these will ground first and save the clip.
Steve
Attachments
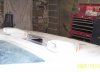
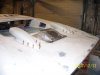
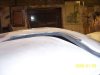
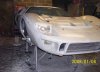
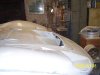
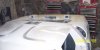
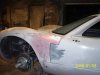
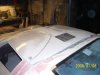
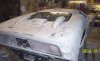
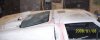
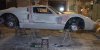
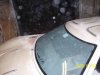
Here is a NewYear update, time to take stock of what's been done and whats still to do!.
When I started out the kit was the MDA MkII rear clip option on the normal body set; later MDA produced a more correct MkII front clip that Mark at MDA exchanged for the MkI front clip I had. There are subtle differences in the profiles of the ajoining panels due to me using non matching moulds.
It has taxed my glassing skills somewhat however the front clip has the air ducts and MkII slide on mounting and is without the vent in the center. The front wheel arch profile is more humped more correct for a MkII, and the has the propper shape to the rad opening fully glassed into the mould.
I have made up a pair of eyebrow trims for the doors, they will have to come off for the SVA but they can be painted with the car as the stripes will cross over them. Still aiming for Shelby Guardsman blue with white stripes and roundells.
The 16" wheels I had have also been exchanged for 15" , the small spinner nuts also will be exchanged for the long ear type, MDA have kindly offered a setof hex nuts to use for the SVA test; I've chosen the Avon tyres, these are expected soon so I can put it on the ground at last.
The gaps are coming together and the doors close with a nice clunk. I still can't get over how any slight adjustment to any panel etc seems to change something else, the way seems to be a continual roundabut of adjust,fill trim that get progressively less, untill it breaks your will to carry on!
Here are some dust photos of where I am at.
Steve
Attachments
-
 Body Jan 08 4.jpg13.3 KB · Views: 809
 -
 Body Jan 08 5.jpg18.6 KB · Views: 812
 -
 Body Jan 08 3.jpg15.5 KB · Views: 796
 -
 Body Jan 08 2.jpg17.6 KB · Views: 826
 -
 Body Jan 08 1.jpg12.7 KB · Views: 817
 -
 Body Jan 08 6.jpg16 KB · Views: 841
 -
 Body Jan 08 7.jpg16.9 KB · Views: 782
 -
 Body Jan 08 8.jpg18.1 KB · Views: 807
 -
 Body Jan 08 9.jpg10.3 KB · Views: 788
 -
 Body Jan 08 10.jpg14.3 KB · Views: 855
 -
 Body Jan 08 11.jpg16.2 KB · Views: 822
 -
 Body Jan 08 11.jpg16.2 KB · Views: 807
Similar threads
- Replies
- 23
- Views
- 6K