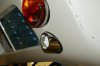
Tornado GT40 in Texas

Bob, that left sample does look like Guardsman Blue to me. I suppose you have Lynn Miner's wonderful reference .. if not, then:
http://www.gt40s.com/images/howto/LynnMiner/Reference/Paint.pdf

The last two pages show the SPF and CAV PPG codes, they are identical, except CAV uses smaller proportions for a 1 liter mix.

But you do what pleases you! For a darker blue there is LeMans Blue. Lots of 40s in that shade.

There are some photos of my Guardsman Blue car in my build thread. But computer monitors are notorious for poor color rendition, so ymmv.

Sam
 
Bob
It all depends on what you are going to use the car for. If like me you're going for quiet, cool, comfortable road use. Then I don't think you can over insulate and seal every nook and cranny. But if the raw power and a quick blat around the block is your thing, you can make it a lot lighter.....

One mistake I did was not allowing enough clearance between the edge of the door and the spider (where the eyebrows go). The first drives were done without the eyebrows fitted and around 100kph there was a little air noise / whistle coming from the front edge of door. Fitted the eyebrows and when for another drive, no more whistles, but panel squeak took over (door edge was rubbing against the mounting flange of the eyebrow :furious:
You live and learn.

As for cockpit temperature, nothing beats a large aircon.....
The centre two vents that pump air down from behind the dash onto the floor are fantastic. Not only does it cool the foot well down, but the water pipe cover is cold to touch.
The "build up" in the tropics is not a pleasant place to be, high humidity is the killer. The GT passed that test, so all the insulation work was worth the effort.

If you're planning on a lot of seat time, make sure you set up the driving position properly. Make sure the seats have the correct lumber support. The steering wheel is not too flat or low. The pedal box is the right distance etc etc.
I spent months getting the seats right, lifting the dash to get a higher steering wheel and a better angle, blah, blah.
But it was all worth it.

Clayton
 
Sam,

I had seen that reference a long time ago but it is good to see it again. He went to a lot of effort and is an amazing reference. Thanks.

Clayton,

Thanks for the insights. I do plan to drive it a lot in town and highways so I am going more for the comfort. I think I will have enough power that the weight won't be a concern if I want to take a quick blat.

-Bob Woods
 
Backup Lights

Some GT40s seem to have only one back up light (if any). I wanted two. I don’t know if I saw it somewhere on the forum or if I just thought it might fit, but I have installed the backup lights from a ’65 Mustang in the rear just below the brake light. Before I did it, I carefully mapped out the curvature of the rear end and found a match to the curvature of the Mustang lights and a place in which the lights were basically horizontal. They fit perfectly.

Somewhere I saw where the reverse switch on the UN1 transaxle couldn’t carry too much current, and since I wanted brighter lights, I switched to the LED aftermarket replacements for the Mustang.
http://www.mustangandfords.com/parts/mump-1009-mustang-projects-led-backup-lights-installation/
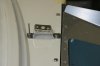
Dzus Fasteners

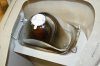
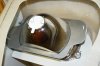
I know that they are not called Dzus fasteners anymore, they are now DFCI fasteners, but I can’t help to continue to call them Dzus. There are two places that the Dzus fasteners are used: the four corners of the nostril and the back side of the hood. The ones that came with my kit wouldn’t work for the nostril since the stud needed to go through the nostril and then through the hood. I needed a fastener with a 1.00” grip length but couldn’t find it, so I had to buy ones that were 0.80” grip length and then install the spring upside down on the other side of the hood. This way the retaining spring is on the opposite side of the fiberglass from the stud and will secure the nostril. They don’t have much spring effect now, but I have a rubber seal between the hood and the nostril to give some compliance.

The Dzus fasteners for the hood required a bracket to hold the retaining spring. I fabricated a pair but the bracket height had to be correct to let the hood sit at the right level. Thank you Clayton for posting your brackets.

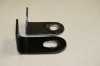
Retaining Pins for Rear Clip

I have the original style of pin to secure the rear clip. These came with a mounting bracket to hold the pin. However, I modified it for a better fit. The problem was that the pin was basically standing straight up but the rear clip rotated around the bottom of the car and the rear clip has a slope to it anyway. Therefore, the pin would hit the front of the hole initially and then hit the back side of the hole when the rear clip closed. When you adjust the angle, the pin is too far back. I fabricated a new bracket that makes a compromise between the angle that makes the pin tangent to the pivot point and the angle of the slope of the rear clip. Thus, the bracket is shorter than the original. In the photo, the bracket in the front is the original (with the hole elongated) and the one in the rear is the new bracket.
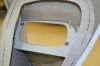
Front Headlights

I think I must have received the instructions for another type of headlight because that approach would not allow the lights to be adjusted. My lights already had two screws on the diagonal for adjustment. I made a hard surface for them to sit on and then used the long screws with springs between the light and the light plate on the back to adjust on the other diagonal.

It is amazing how long these little details take.

-Bob Woods
 

Attachments

  • backup lights.jpg
    backup lights.jpg
    95.9 KB · Views: 982
  • Dzus on back of front hood.jpg
    Dzus on back of front hood.jpg
    73.8 KB · Views: 870
  • rear pin bracket.jpg
    rear pin bracket.jpg
    57.4 KB · Views: 743
  • headlight opening.jpg
    headlight opening.jpg
    97.1 KB · Views: 832
  • headlight with light.jpg
    headlight with light.jpg
    117.6 KB · Views: 929
  • headlight with frame.jpg
    headlight with frame.jpg
    120.5 KB · Views: 815
Jac Mac,

I have tried just about everybody including the factory. The 0.80" grip length quotes an overall length of 0.92" (so don't be misled), but I really need a 1.00" grip length in order to actually use the retaining spring. However, what I have now is workable.

The factory said they could make it but it would be expensive. Anyone interested in a group buy?


-Bob Woods
 
Bob:
Great bit of investigation on the radiator fan installation. I have always said that mounting fans thru the radiator is a no no...the core is just not made to support weight and handle it along with vibration. I have seen many factory radiators ruined with those aftermarket coolers and fans mounted thusly.
Also a bit of something I have learned...we have used plenums on all the mountings when space permitted, and at slow speeds its the deal, at elevated speeds the plenum restricts flow because all air must exit thru the fan openings. Approx 40 mph seems to be the point where pressure starts to build from restriction..especially if the fans are still running. The solution was to put slots in the shroud next to the fans with thin rubber strips behind them...they stay closed when the fans are doing their job and relieve air at speed...I think Volkswagen uses this method on their shrouds.
Also one of those small micro switches with the spring wand on it in series with the fan relay set as normally closed mounted in the airflow path somewhere. At speed the switch opens and fans go off. Trim the wand for the speed desired.
Cheers
Phil
 
Ian,

Thank you for helping. The fasteners shown on that website were the D-Ring Bail Handle type. I need the flat-head self-extracting type. The ones that I need are the flat-head self-extracting size 5 (5/16" stud) with a "grip length" of 1.00".

I am going to use silver solder to attach the half wing handle as the originals had. I am having the wings laser cut right now. Therefore, I really need the flat-head type.

Dave,

I fully agree, but I do need to see when I have flashing red lights following me...

Phil,

Thank you for your comments and input on the radiator fans. The flow resistance with the fans installed on a shroud and the fans mounted directly on the radiator is basically the same (fans switched off). if there are no fans at all, then the flow increases by 8% (at the same pressure). In other words having fans present but switched off decreases the flow by 8% relative to a radiator without fans (which is not really an option). I plan to retest once I have fabricated my shroud and I will report the results. I liked both of your ideas for at-speed operation. I will try to test that (fans on and off) if my flow bench will go high enough. I'm going to consider implementing one of your suggestions.

-Bob Woods
 

Attachments

  • Dzus wing 2.jpg
    Dzus wing 2.jpg
    33.3 KB · Views: 735
Mufflers

I got my new mufflers from my friends at D&D Performance Exhaust today. If the trend holds for the car as it does for big bikes, then this will have a very mellow sound.

The new muffler has a carbon fiber shell and weights 4.2 lbs. as opposed to 6.8 lbs.

-Bob Woods
 

Attachments

  • New muffler.jpg
    New muffler.jpg
    105.3 KB · Views: 832
Nice looking muffler Bob. What outlet size is that though? Wondering if it might be a bit small for a high performance engine. I'd want at least a 2.5" in a dual exhaust for an engine making over 400 horsepower.
 
Darrin,

Thanks for your PM message on exhaust diameter sizing. I suspect that analysis is for exhaust pipes that run the length of the car. My "exhaust pipes" are about 8" long. I hope they will be ok; however, we can easily make another set with larger internals and exhaust tips. I will probably do that.

What I have might be a good tradeoff with torque, sound level, and sound quality.

-Bob Woods
 
You are very welcome Bob. I just emailed them asking what it would cost to make a set like yours but with a 2.75" pipe. Like the look of yours and really, really like the weight of the things.

Going to have to wait to calculate the total length of the things until the engine goes in and I get a set of headers made though so mine will probably be a bit different length wise than yours.
 
Darrin,

Let me help coordinate your muffler design with D&D. You need to come up with the inlet pipe diameter, the length of the silencer part, and the length and diameter of the outlet tips. Mine are stainless steel, but you could get mild steel chrome plated.

-Bob Woods
 
Darrin,

Let me help coordinate your muffler design with D&D. You need to come up with the inlet pipe diameter, the length of the silencer part, and the length and diameter of the outlet tips. Mine are stainless steel, but you could get mild steel chrome plated.

-Bob Woods

That will work.

My engine is "supposed" to be in late next month. I'll then need to get cracking on getting a set of headers. Thinking about hiring some local student to try to come up with a CAD drawing to get the pipes bent and then get someone local to weld the things. Once the CAD drawing is done, I'll know how long the mufflers need to be.
 
Darrin,

They make plastic mockup exhaust pieces that snap together with different lengths, bend radii, etc. You should try that instead of trying to go directly to a CAD model. For example: ICEngineWorks Exhaust Header Modeling Blocks – Make Custom Headers Like a Pro

I would consider stepping the header pipes for a little more power. I think the plastic mockups will also let you do that. My students might be willing to help with all of that.

Are you going to go for the "bundle of snakes"? I think that is one of the most appealing aspects of a GT40. I know that your intake manifold might interfere with that, but you could get the eight stack EFI setup which would really be cool to have both. I'm spending a lot of your money aren't I...

-Bob Woods
 
Thanks Bob. I know a company that does something similar but the things were mostly straight pieces with a few joints. These look much better.

Dylan on here is in the same boat and I have been talking to him about the CAD model since he was already planning to do just that. Will run this idea by him and ping Jason F about his design as he too is running a Coyote.

As for the "Bundle of snakes", if I keep my current intake layout I cannot do it (the intake interferes with the intersection of the primaries), but Dylan has an idea for a dual intake that might allow for it. It would be tough to do a bundle I think, but it would be great to have. Believe Jason found out that doing so does hinder horsepower a bit though (must be primary length given the wide engine).

The eight stack EFI is great BUT that thing costs over 7K the last time I contacted them. The unit itself is reasonable but you have to buy a custom computer to get it to work as the Ford PCM won't handle it.

So you have some students with some experience with the plastic mock up pieces?
 
Is This Progress?

Well, I had most of the systems and parts test fitted and then took it all apart. It took less than 2 hours and now it looks like it did a year ago. I think I'm going backwards.

However, the reason I took it apart was to paint all of the aluminum panels and the underside of the fiberglass. So, this really is progress even if it does look sparse. I am working against the clock to use my Lizard Skin acoustic and thermal coatings since they have a one-year shelf life.

While I had it naked, we took the opportunity to make accurate measurements of the suspension and steering components so I can do the suspension analysis.

-Bob Woods
 

Attachments

  • tear down for painting.jpg
    tear down for painting.jpg
    196.7 KB · Views: 1,322
Back
Top