Steve's GT-R Build Thread

Steven Lobel

Supporter
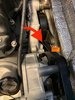
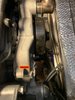
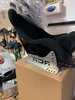
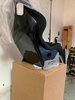
Lots of progress with custom work by H Craft Customs. Only 9 months since delivery. I feel ahead of expected 24 mo build schedule with part time effort. Blessed to have H Craft an hour away and excellent communication with Fran's team. Think I need to upsize my rear wheels and go even bigger with my tires.
IMG_20180825_150935_177.jpg
IMG_20180825_150935_143.jpg
IMG_20180825_150935_147.jpg
IMG_20180825_150935_150.jpg
IMG_20180825_150935_149.jpg
 

Kurtiss H.

Member
Supporter
Damn nice Steve. I wish H was close to me as this is exactly what I would like him to do for my car. Sweet build and look great!
 
The hood has been separated from the nose section, the fenders re supported.
IMG_0283.jpg

Made up a radiator exit duct.
IMG_0285.jpg

Radiator duct is down to the splitter to help direct the hot air out.
IMG_0286.jpg

Fule filler neck supported by the Radiator duct, this allows for access to parts bellow the hood.
IMG_0287.jpg

IMG_0288.jpg

New Superlite shift lever installed, its pitched over to bring it closer to the driver ergonomicaly

IMG_0290.jpg
 

Steven Lobel

Supporter
5FF50903-AD1D-434B-829C-4CA70765C6D5.jpeg


Posted upside down. Sanded glass so metal lays mostly flat. Drilled and bolted bezel plate down. Used dremel with reaming bits to slowly make holes. Much easier than anticipated.
 

Ron McCall

Supporter
Steve,

Make sure that the holes in your fiberglass are large enough to fit the retaining rings for the gauges. That way the gauges are removable along with the aluminum panel without disturbing the dash.
Ron
 

Steven Lobel

Supporter
Steve,

Make sure that the holes in your fiberglass are large enough to fit the retaining rings for the gauges. That way the gauges are removable along with the aluminum panel without disturbing the dash.
Ron
I’m planning on using 4 cap head screws to hold gauges to plate and this would allow all gauges to be removed without touching the dash.
 

Steven Lobel

Supporter
11/25/18 Mounted radiator and condenser. Rubber isolators for both. 1/4x20. Mounted drier. Lines run, ready to be crimped for AC. One of them needs to be crimped inside footwell or this end crimped then run through firewall. Cut and beaded almost all of the radiator tubes. Ordered remaining elbows and clamps. Will need metal strap hangers.

12/2/18
Finished radiator hoses and clamps for front end. Cut out aluminum for top driver side radiator petcock. Used heat sleeve over stainless for vibration protection. Need to make stand off clamps for radiator hoses out of 2” aluminum angle. Replaced tensioner pulley on motor with correct Holley part.

Ordered door edge trim, 45degree 2” filler neck hose, oil filter 13/16x16 thread, permatex motoseal for filler neck.

93LXlxyyTraPv3m9K7Devw.jpg

h+MfXECjRlei+aehwf7FXA.jpg
 

Steven Lobel

Supporter
Just doing a little bit every day. Today was finishing off oil cooler for Graziano. Cut and trimmed 2" aluminum angle for brackets. Drilled some 1/4x20 holes. Measured and cut -6 line and put on the fittings. Read Cam's blog for what size fittings for Graz (16x1.5 to -6AN). Ordered off Summit Racing last week. One of the easier things I've done so far.


MOR-41200 Fluid Cooler, Transmission, Tube and Fin, Aluminum, Natural, 3 1/4 in. x 12 1/2 in. x 3 in., (Mfr. #: 41200)
VPE-16619 Fitting, Adapter, Straight, -6 AN Male Threads, 16mm x 1.5 Male Threads, (Mfr. #: 16619) x2
VPE-21986 90 Degree Elbow Forged Hose End Fitting; Hose Size: -6AN (Mfr. #: 21986)


UNADJUSTEDNONRAW_thumb_1327.jpg
UNADJUSTEDNONRAW_thumb_1329.jpg
UNADJUSTEDNONRAW_thumb_1328.jpg
 

Neil

Supporter
Steven;

I suggest radiusing and smoothing those sharp corners on your oil cooler mounting bracket. Your skin will thank you in the future! ;)
 

Neil

Supporter
One more suggestion: can you mount your transaxle oil cooler longitudinally instead of laterally? The fins would be far more efficient in transferring their heat into the air stream.
 

Steven Lobel

Supporter
Steven;

I suggest radiusing and smoothing those sharp corners on your oil cooler mounting bracket. Your skin will thank you in the future! ;)

Z_13Fwfo5oy.JPG


I use this after every cut. No sharp edges.
And if transmission temps too high, will go to much larger cooler and mount in front of right wheel well.
 

Neil

Supporter
Z_13Fwfo5oy.JPG


I use this after every cut. No sharp edges.
And if transmission temps too high, will go to much larger cooler and mount in front of right wheel well.

Breaking the edges is a good idea and the tool you are using is a good one. This is what I meant about radiusing the corners- don't leave a sharp 90 degree corner.
 

Attachments

  • Rear Coil-Over Top Mount .JPG
    Rear Coil-Over Top Mount .JPG
    176.5 KB · Views: 619

Neil

Supporter
Steven;

I use a belt sander with 3M Cubitron II abrasive. It cuts steel quickly & easily. A file then can be used to break the edges.
 
Like what you are doing Steve.
I wont tell you how to suck an egg but on your bracket cut the side down on the side with the cut out for the hose.
If you cut back to the cutout then taper off to the outside to about 10mm it will trim the fat.
It will be plenty strong as it looks like 3mm thick, you could go half that thickness it would still be good if you wanted to.
Use the angle as a starting point and re profile from there.
If you do want to relieve the sides for hoses and the likes better to use a hole saw to give a rad as it has no chance of cracking through the corners with a square cut like the one in the pic.
Keep up the good work.

Jim
 

Steven Lobel

Supporter
1/6/19: Started by crimping AC lines. Two types of crimps, and the #8 reduced barrier is the 6 regular. Most of the lines could be done out of vehicle thanks to the bulkhead from Vintage Air, VA382600. It is important to test fit several times for hose length and clocking of fitting on hose before crimping. Need a crows foot 1” to get the fitting tightened on back of AC unit when mounted. Or can drop it and use regular wrench. Used rubber lined clamps x3 to get the shifter cables off the chassis. Attached with 1/4x20 using drill tap. Attached to one of the radiator hose clamps using an extra M6x1.0 nut and spaced out with washers. Used Pre-Cut Spiral Wrap Hose Protector, ¾”ID, Black by Safe-Spiral. Really snug, but just twists on. Installed axles. Driveshaft Shop supplies all hardware. I did get the linked washers, 9P1501375, but not enough space to install them and get thread engagement to start. Will go back and loosen bolts a little and add 1 at a time. Ran parking brake cables into tub. Secured with line clamps to chassis. Going to pick out seats and make sure they fit where I want them before installing parking brake bracket and lever.

UNADJUSTEDNONRAW_thumb_1366.jpg


UNADJUSTEDNONRAW_thumb_1362.jpg
UNADJUSTEDNONRAW_thumb_1369.jpg
UNADJUSTEDNONRAW_thumb_1368.jpg
UNADJUSTEDNONRAW_thumb_1364.jpg
UNADJUSTEDNONRAW_thumb_1363.jpg
UNADJUSTEDNONRAW_thumb_1365.jpg


Linked washers: Graz side, hub side, or both? Already have the lock washer on there. And grease side of CV goes to Graz side, correct? Does not look like it fits the other way. :)
 

Steven Lobel

Supporter
1/27/19: Spent a good bit of time clearancing the water pump bolt bosses so there would be no interference with the belt. Dremel and die grinder. Tedious, but better than pulling the motor. Test fit the Momo seats. 1071BLK Supercup. Regular size. The XL would fit but be a huge chore to get mounted. The regular size can fit with the RCR brackets facing out, so bolting in will be easy, and moving seat is simple to get it forward or back. Still not enough room for sliders. I did take a 4.5” cutoff wheel to the back half of the seat bracket to clearance for the lap belts. Took down the AC unit to get the face plate off. Going to drill 6 holes and fit vacuum cleaner reducers to go from 1-7/8 to 2-1/2 hose. Will JB weld them in. 2 vents to dash, 2 to defroster, and adding 2 to under dash.
 

Attachments

  • Waterpump1.jpeg
    Waterpump1.jpeg
    266.2 KB · Views: 436
  • Waterpump3.jpeg
    Waterpump3.jpeg
    344.1 KB · Views: 433
  • Waterpump2.jpeg
    Waterpump2.jpeg
    278.3 KB · Views: 421
  • Waterpump1.jpeg
    Waterpump1.jpeg
    266.2 KB · Views: 403
  • Waterpump2.jpeg
    Waterpump2.jpeg
    278.3 KB · Views: 442
  • Waterpump3.jpeg
    Waterpump3.jpeg
    344.1 KB · Views: 449
  • IMG_0442.jpeg
    IMG_0442.jpeg
    245.4 KB · Views: 446
  • IMG_0443.jpeg
    IMG_0443.jpeg
    184.6 KB · Views: 443

Ian Anderson

Lifetime Supporter
Hey Steven
On the seat - are yor brackets on the right side of the seats and a higher bracket could be to the rear.
Then locate the hole bracket an inch higher and you will manage to fit seat runners (possibly not motorised but manual should work. (needs 1 inch clearance)

Ian
 
Back
Top