1149 Mono Replica

Jim Rosenthal

Supporter
I think if I had set out to build a Gulf car- big rear wings, wide tires, canard fins, etc- then the vents with the round holes in them would be the right thing to put on my car. But what I set out to build was something rather different: what I am trying to do is to replicate the experience of what I would have been able to buy and drive in 1966 if I had been wealthy enough to order one of these cars. Although I have to admit that most street cars would not have come with Webers. But I have gone to some trouble to try to figure out what the car would have looked like, what would have been on it, and so forth and so on.
I've taken some poetic license here. For example, 1149 has the large round driving lamps that were fitted to cars like 1075 (leaving no place for the turn signals, I might add, which is creating other problems). The interior that I am going to try to copy is the one in 1043, which had a different type of upholstery arrangement and does not have the seating area grommets so beloved of GT40 enthusiasts (I may live to regret this but I hope I don't feel that way) I have left out the heater and demister, at least for now, although the grille is in there (courtesy of Brian Stewart, by the way) And the Weber rig that is on the engine is the 44IDF kit, which will I hope be more tractable than the 48IDA setup that was the default Weber option in the 60s. That is because the car will be driven by a person of 58, not someone of 18.

But the exterior look of the car- the BRM wheels, the louvered vents of bare aluminum, the external mirrors (see above), the single round tail lights- all that is as close as I can get to what would have been on the car I wanted when I was in junior high school in New York City.

At about that time, my family's car was a Ford- a 1962 Ford Falcon station wagon bought new for $2100. The car was purchased at Gotham Ford in mid-town Manhattan. If you look through the old articles in R&T and CD, there is a road test in about 1967 of the Mark III GT40; the testers picked up the car at Gotham Ford. Regrettably, by then my family had moved from NYC to eastern Massachusetts, secondary to my father changing jobs. We lived near Worcester, MA. The Ford dealer there was Harr Ford. If you look in the SAAC directory, and go through the Cobra section, there are some items having to do with Harr Ford and their drag-racing Cobras. It seems that no matter how hard we tried, we always ended up living in a part of the country where there were Ford dealers that were interested in performance cars.

What a pity. If it weren't for that youthful influence, I might have turned out better as a grownup.
 
This road test mentioned that Ford Dealer:
 

Attachments

  • Mk3_Road_TestA.jpg
    Mk3_Road_TestA.jpg
    42.1 KB · Views: 411

Charlie Farley

Supporter
Hmm, I never thought of the Gulf cars as cheap replicas ...

Ian

Too many members of the general public, when they see a car in gulf livery, assume it is a replica. That is what i meant.
Standing behind a couple at a show recently, i watched them looking at
P1085 ( Gulf Blue ) and a red replica. The bloke advised his wife that the blue car , was a fake and the red car real. Simples.
 

Jim Rosenthal

Supporter
Brief update: exhaust system in, with (finally) the right bolts. ARP make exhaust header bolts with 5/16" hexes on them for exactly this application- you can start the bolt by hand but you can't get a wrench on the bolt to snug it up. Remember that, guys, there's a quiz at the end...

Also, wiring starting to get sorted out, and front sway bar IS sorted out. I may have mentioned that. MSD box in. I have ordered a second set of plain blue original-style valve covers- the set comes with one with a breather tube and one with a PCV valve grommet. So for my engine, which does not have a PCV valve, I need two sets. Now- someone who needs a set of SBF valve covers and plans to modify them anyway (like for example weld the boxes on top) should contact me and for the cost of shipping I will give them the two leftover valve covers which have the holes for the PCV valves. Coming soon to a mailbox near you.....

We are getting closer to solving the problem of what to do for front turn signals. And Ron's friend with the machine and fab shop is closing in on drawings for tanks; once those are made, things are going to move along a bit faster even.

I would like to drive 1149 before we have snow on the ground here. It now seems possible that this might in fact occur...
 

Jim Rosenthal

Supporter
Latest news is as follows: exhaust system persuaded to fit and pipes stick out where they are supposed to, carburetor heat shield in place, tanks are begin fabbed up at this point, working on the fuel inlet pipes, wiring in process. I might get to see the car in the next several days if time permits driving up to Hampstead; vacation over and working again, would rather play with cars.

And if anyone is looking for a Pantera they should email Ron, a buddy of his has a nice one at what I think is a bargain price.

Photos to follow, as soon as I get a chance to drive up and snap some.
 

Jim Rosenthal

Supporter
A very enjoyable trip up to Ron's shop to look at 1149. Unfortunately the batteries in my camera were dead, which means no photos from today. However...

-I delivered some bits, including the beautiful outside mirrors I got from JP.
-turn signals are in, and Ron is beginning the wiring runs for the front and rear clips.
-rear support bracket and springs for exhaust system just about wrapped up.
-tanks in progress (yes I keep saying that but they really are)
-tried the shroud for the Avro fuel tap; this will need some modification but can be made to work without too much difficulty. The holes and spacing pattern are spot-on. The slope of the inner shelf doesn't match, but can be corrected to fit. This part was made on an original pattern, and my chassis deviates from original in that area, I suspect.
-photos to follow on next visit.
 

Jim Rosenthal

Supporter
Got some photos from Ron, of the trial fit of the fuel tanks. They are beautiful- a shame to cover up such work with the chassis. I may have to fit little windows...lights inside the sponsons.
 
Hi Jim, I totaly know what you mean, we also make C and D type Jags and some of the very cool parts we make just get hidden never to be seen again.
 

Jim Rosenthal

Supporter
Olivier....I have to drive back up there in the next day or two. Last time the batteries were dead in my digital camera- my fault. Ron's photos are part of emails and I don't know how to pull them out so that I can post them as jpgs. Plus he keeps finishing other bits so I am waiting until next week, I think. Unless I can get up there on a weekend evening this weekend; I have two day shifts I have to work, but they end at 5 and I might be able to get back up there if I am not too burned out. The ER has been very busy lately, something about the full moon or something.
 

Jim Rosenthal

Supporter
John, I have seen the photos of the work you guys do on the C and D Jaguars; it is amazing. Jaguar should have just moved their factory to Invercargill.
 

Jim Rosenthal

Supporter
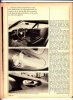
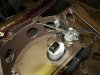
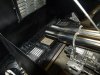
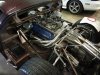
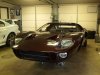
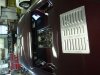
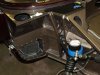
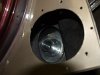
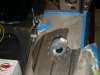
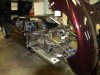
Two visits or so to Hampstead to look at 1149 since my last posting, and a few photos, but nothing major. However a lot has gotten done- we are still waiting for the tanks to be completed (welder was ill and missed time so delayed these) Much of the wiring is in, I got to see the lights tested (sort of startling; car is waking up!) and Ron has worked out placement of all the items such as coil, MSD box, fuel filter/pressure regulator, horn compressor, washer tank, wiper motor, voltage regulator, etc. Seems trivial but it isn't; all these things have to go someplace, be serviceable and removable for replacement, and look something like what they would have in 1966- which they do, thanks to his efforts. Once the tanks are in, we can figure out what the fuel system will be like. The SW pumps are ready to go in, I am just waiting on rebuilt fuel pump switches to arrive here. Ron also found small lamps for turn and running lights which will work nicely and hopefully keep the Maryland MVA off my case. They are inconspicuous and don't get in the way of the (large!) 1075-style driving lights.

I am still looking for the flasher switch/stalk unit which mounts to the steering column and flashes the driving lights; we can prewire for it but it would be nice to find one. I have asked several folks about them, but no one seems to know where one is. If you know of one, or a similar one which could substitute for it, as in one from a contemporary British car, please do let me know. So far, no luck. I think all this switch does is flash the driving beams, so it is just a SPST switch on a stalk, momentary on, with a spring to return it to off.

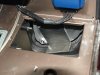
I am also waiting for a detailed file of photos on GT40 interiors, as in how the fiberglass parts of the seats mount, etc. I have some pretty good photos from Colin Comer (1043) of what the trim should look like, but I need more information about how this all went together, what the brackets looked like, where they mounted to the chassis, etc. All this is more than likely going to occur through the winter- the initial trials of the car will take place with some big pieces of foam stuffed in place for the driver and passenger to sit on; I want to have the interior done after we finish sorting the car out, not before, so we don't mess up all that custom leatherwork.

Joke for the day: if you look at 300SLs and vintage Mercedes, Rolls, Bentley, etc, and also Ferraris, they have custom fitted luggage that is made from the same leather as the car's upholstery. So, since I ordered more leather than we are likely to need (three hides worth) the extra will go towards a set of custom fitted GT40 luggage. I am likely to have the only set of GT40 custom fitted luggage on the planet, because......


.....there's nowhere to put it!!! :) (I won't count those boxes back in the engine room which are suitable only for pizza delivery, to keep it hot)
 
Last edited:

Jim Rosenthal

Supporter
Some fairly recent photos, I'll try to put up a representative group.
 

Attachments

  • 20101001_07.jpg
    20101001_07.jpg
    43.6 KB · Views: 407
  • 20101001_09.jpg
    20101001_09.jpg
    47.8 KB · Views: 407
  • 20101007_25.jpg
    20101007_25.jpg
    63.9 KB · Views: 443
  • 20101007_23.jpg
    20101007_23.jpg
    43 KB · Views: 414
  • 20101007_21.jpg
    20101007_21.jpg
    47.3 KB · Views: 381

Jim Rosenthal

Supporter
Photos from today, showing trial fit of fuel tanks, made by John Shriver's shop in Westminster, MD, and very nice they are. Today they measured for the mounting tabs for the tanks and then removed them to bring them back to weld the tabs on; then they will go in and get mounted with rubber isolators. The workmanship on them is really beautiful.

Also spent some time discussing what the exhaust shield ought to look like, the cover for the shift rod and shifter, the front sheet metal that closes off the lower part of the subframe that holds the radiator and front bodywork, and some other odds and ends. Heavier wiring such as battery cables is in. The shroud for the fuel selector valve has been modified to fit, and once the tanks are in, which will be by next week, the fuel system plumbing will follow. And the front wheels can go back on :)
 

Attachments

  • 20101011_21.jpg
    20101011_21.jpg
    46.5 KB · Views: 379
  • 20101011_19.jpg
    20101011_19.jpg
    34.8 KB · Views: 391
  • 20101011_15.jpg
    20101011_15.jpg
    24.3 KB · Views: 391
  • 20101011_14.jpg
    20101011_14.jpg
    37.3 KB · Views: 401
  • 20101011_12.jpg
    20101011_12.jpg
    49.6 KB · Views: 397

Jim Rosenthal

Supporter
John built the tanks so that they are full height for their entire length. To do that, the inlet spigot is removable and bolts to the tank with several hex head bolts, secured with a rubber gasket between the spigot and the tank top. So the tank is slid into place, bolted to its shock mounts, and then the spigot is secured, after which the tank inlet pipes will be put into place and the fuel fill hoses secured as well with clamps. Other tanks have a step-down at the front to permit the tank to slide into the sponson without the spigot snagging on the inside of the sponson rib.

The photos also show the mounting for the Isspro fuel level senders, which I can now order, knowing the height of the tank, and the mounting for the MSD box, which goes into the rear of the drivers' side sponson (right side of car). To order the senders I have to measure the resistance curve of the existing Smiths senders, which we are not going to use. I would rather have the vertical senders than the swinging-arm type, which I think are more prone to trouble, especially in an application where the car sits for long periods and they get gummed up.

Also ordered today was a Smiths voltmeter; I thought I had one, but I don't. The remainder of this week Ron will spend on wiring and getting ready to put the tanks in. By next week, if things go as hoped, we will be making decisions about where the fuel hoses and pipes go, figuring out the hardware we need to assemble the fuel system, reinstalling the SW pumps, and cleaning up some of the areas that need to be further painted to make things look shipshape.

I enjoyed meeting John and also Howard, who drove over from Arlington, VA, to hang out and talk cars and Ford performance cars in particular. I have posted these photos in order to avoid being scooped by Howard on photos of my own car, as was threatened. When pushed, I can (sort of) deliver the goods...
 
Last edited:
what a long shaped tank, never saw that this way ;-)
are there also baffles or how do you call that....in the tank otherwise under hard braking of pulling all petrol goes one way...how do they fix that in such car?
 

Randy V

Moderator-Admin
Staff member
Admin
Lifetime Supporter
Jim - Looking really great!!!!

Looking forward to those outdoors pictures and more information on the color and color codes chosen! :)
 
Back
Top