
You are using an out of date browser. It may not display this or other websites correctly.
You should upgrade or use an alternative browser.
You should upgrade or use an alternative browser.
Andrew's GT Forte build.
- Thread starter rockhoppers1964
- Start date
Progress, a whole day in the garage with a mate, no distractions !
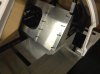
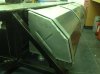
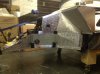
Turned car back over to have a look at the panels under the front clip before i got too much further with the other panels as i needs to make some extra returns to support the internal panels.
Elected to recut a couple of the panels that came with the kit and very happy i did.
So, all but one of the wheel well panels in place, but waiting on the anti roll bars to come so i can work around them.

Recut the top access panel so it folds down over the front and side and ties it all together.


Got all the internal cockpit panels put back in place and the sill tops, also sat the other panels on to get a feel for it.

Sat spider back on top, and put the dash in to see where things sit.
Just had to sit in it again now it looks more like a car.
Andrew
Turned car back over to have a look at the panels under the front clip before i got too much further with the other panels as i needs to make some extra returns to support the internal panels.
Elected to recut a couple of the panels that came with the kit and very happy i did.
So, all but one of the wheel well panels in place, but waiting on the anti roll bars to come so i can work around them.
Recut the top access panel so it folds down over the front and side and ties it all together.
Got all the internal cockpit panels put back in place and the sill tops, also sat the other panels on to get a feel for it.
Sat spider back on top, and put the dash in to see where things sit.
Just had to sit in it again now it looks more like a car.
Andrew
Last edited:
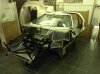
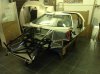
Been a while since my last post but that does not mean I have not been busy.
I have spent a lot of time thinking about how all the bits go together and how they impact on each other. I don't want to go and finish the panels to find out in need to take some back off to modify for the services. Been ordering a lot of parts to trial fit and see what particular issues they have.
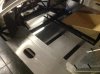
Had to make some changes to the pedal box, actually fitted a Wilwood one now with master cylinders that go through the front bulkhead, due mainly to my long legs and big feet. Also had to make some mods to the steering. The mounting bracket for the power steering motor was about 50mm out of place and not lining up in the middle of the dash, so that came off and got re welded in a better position that also helped with the steering column location.
I did complete panels on one side of the car, and then temporarily fitted the suspension to check there was no interference. I also did the panels in the cockpit.
The sill panels are done and the brackets for holding in the fuel tanks so I could set the location and plan the fuel connections.
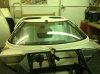
I was also unclear about how the body fitted so took some time to fit the spider at the weekend and the front body mounts so I could check the alignment. That was a challenge and took quite a bit of finessing to get it right (I think).
Getting rol bar into place and bolting it down was a bit of a challange too, but with the help of a mate and the measure four times, have a cuppa, think about it a bit more, and measure again, then drill principle, we got it done.
Rested the windscreen in place and it is not far away, but had to pull and push the front of the spider a little to get it to line up with the chassis. I think it maybe twisted while sitting unsupported on the floor. Heading of on holiday for about three weeks so hope the spider will have relaxed into its new shape by the time I get back.
Starting to look like a car now.
I have spent a lot of time thinking about how all the bits go together and how they impact on each other. I don't want to go and finish the panels to find out in need to take some back off to modify for the services. Been ordering a lot of parts to trial fit and see what particular issues they have.
Had to make some changes to the pedal box, actually fitted a Wilwood one now with master cylinders that go through the front bulkhead, due mainly to my long legs and big feet. Also had to make some mods to the steering. The mounting bracket for the power steering motor was about 50mm out of place and not lining up in the middle of the dash, so that came off and got re welded in a better position that also helped with the steering column location.
I did complete panels on one side of the car, and then temporarily fitted the suspension to check there was no interference. I also did the panels in the cockpit.
The sill panels are done and the brackets for holding in the fuel tanks so I could set the location and plan the fuel connections.
I was also unclear about how the body fitted so took some time to fit the spider at the weekend and the front body mounts so I could check the alignment. That was a challenge and took quite a bit of finessing to get it right (I think).
Getting rol bar into place and bolting it down was a bit of a challange too, but with the help of a mate and the measure four times, have a cuppa, think about it a bit more, and measure again, then drill principle, we got it done.
Rested the windscreen in place and it is not far away, but had to pull and push the front of the spider a little to get it to line up with the chassis. I think it maybe twisted while sitting unsupported on the floor. Heading of on holiday for about three weeks so hope the spider will have relaxed into its new shape by the time I get back.
Starting to look like a car now.
Attachments
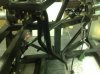
Been a long time since my last post.... silver wedding celebrations, second honeymoon, business trips, and a new kitchen that apparently took priority meant little time on the car. but i did get quite a bit of planning done.
Made a few changes to the footwell of the car to accommodate my 6' 2" frame and large feet. Also to take the Wilwood pedal box.
Seemed I was cutting bits off the car for a while but it all started to go back on now for the final time I hope.
Fuel tanks are in now, that was a major milestone and meant the car could be turned right way up (with help from 3 mates) for some other parts to get fitted.
Steering rack in today with pedal box, steering column and power steering motor.
Rack position is slightly higher and further back than designed, but only by about 8mm, did this to stop the rubber gatting rubbing on the chassis and the raise the steering column a little to help with my feet. It has also been rotated slightly to help split the angle between the two UJ's and again raise the column.
Seats put in place and I could actually put the steering wheel on and get a feel for how the car would actually fit me. Felt good.
Can now get on with a bit more paneling now I understand the services needs a bit better.
Andrew
Attachments
Hi Andrew
Great work.. Thanks for posting the pictures and the story behind them
Cheers Craig Young
Great work.. Thanks for posting the pictures and the story behind them
Cheers Craig Young
Keith Stafford
Supporter
Looks good Andrew, FWIW, I'd recommend not riveting just yet the triangular panels just under the filler caps, you may want access when you connect up all the filler lines and vents.
Yes good point, maybe for future access it needs to be screwed on.
Or maybe have a removable panel under dash.
Andrew
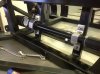
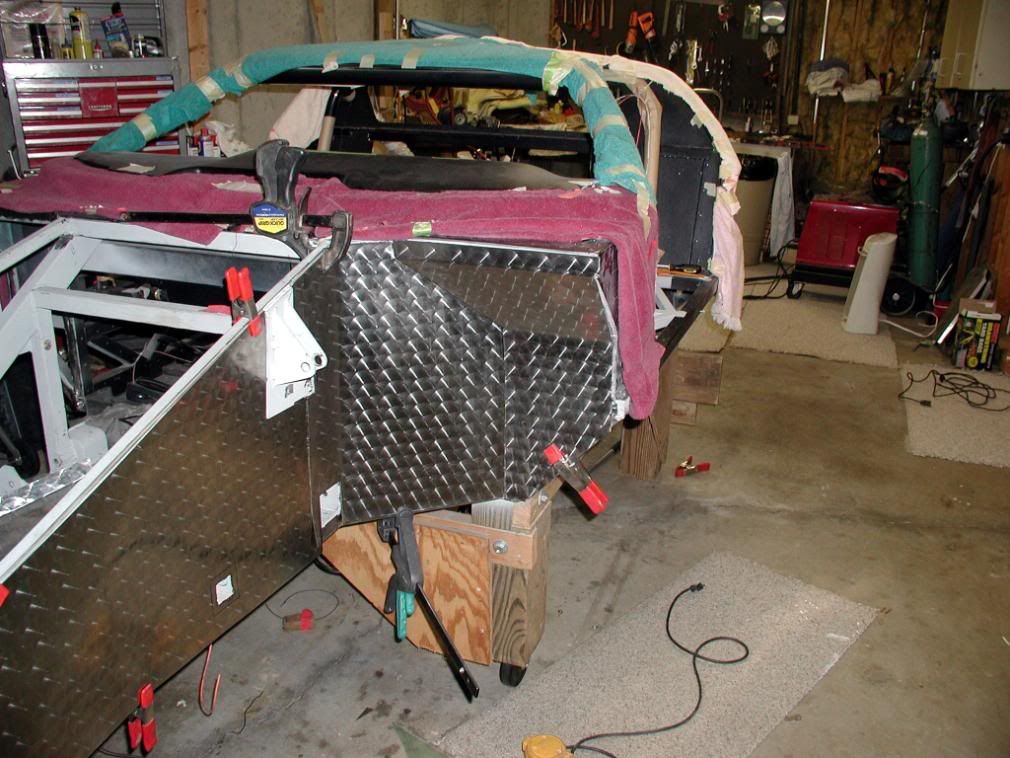
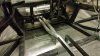
Good progress yesterday, despite it being 3 or 4 degrees in the garage, but being dragged of to look at pandas as the zoo today !!!
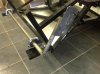
Replaced lower steering UJ as the pressed steel one had a 5mm run out in it, now got a nice forged one in place. Steering is now nice and smooth lock to lock.
Remade some of the panels as I was not happy with my first attempt, learnt a lot for the first dry install.
My mate kept polishing my handling marks out of the aluminium before we fitted them, hence the swirls effect are a by product.
I am liking the bare aluminium look but fear it will not stay like that for long once the car hits the road.
Was looking at getting the panels and the entire chassis power-coated wrinkle black, but not so sure now.
Think at least the wheel arches need to be done or at least protected, but then would the rest look stupid ?
Incidentally, since moving the steering rack 8 mm up and back, and getting it mounted, the hole in Darren's panel lines up perfectly !
Andrew
Attachments
Andrew,
I think unless you have a really hard grade of alu. it will become dinged and scratched from road debris. If it is of sufficient strength you might look at some of the sealers for alu. There are polishing compounds out there that will give you a smooth and shiny finish. Some of the race cars have used sealers for years and they are shiny as new. There is to be some expectation of oxidation over time but the polishers and sealers should keep it bright enough. If you want to hide the scratches and dings, you can add designs such as "Engine turning" to the panels.
There are many designs and patterns that can be used. Engine turnings go way back to the 20s -30s where they showed up on dash plaques of some of the finer cars of the day. They were also used in pea sized designs on some of the higher priced rifles and shot gun barrels.
It is something different for sure, but it keeps the panels looking new, and hides the scratches that will come with time. A high grade aluminium polish keeps them looking new.
Bill
Last edited:
Keith Stafford
Supporter
Yes good point, maybe for future access it needs to be screwed on.
Or maybe have a removable panel under dash.
Andrew
Andrew, yes I'll be replacing my drilled-out rivets on those panels with nutserts/rivnuts. K
Work has been a bit hectic in the run up to Xmas, but bar one small meeting on Monday i am done now till the 5th Jan.
Intend to spend a good amount of time on the car and get the panels finished, and get most of the body mounted if i can.
Tidied up the garage today to clear my feet in preperation, and fitted a couple of panels. Car starting to look more like a car now, still a long way to go but getting there slowly !
More posts to follow over the next couple of weeks.
Anyway, Merry Christmas and i hope Santa is good to you all.
Andrew
Attachments
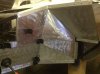
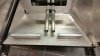
A little more progress today.
Working on one of the inner panels at the front, wanted it to be in one piece which was a bit of a challenge. took a bit of time and messing about with a cardboard template.
Needs a tidy up, and a couple more trim bits to go in, but quite happy with the way the front end is comming together now.
Andrew
Attachments
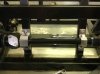
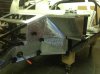
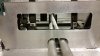
Santa came early.
The cooling pipes arrived today, so could not resist fitting them.
With the small adjustment in the position of the steering rack (8mm from where it was planned and rotated slightly) i was able to run both pipes under the rack and avoid joints that i would not be able to check easily.
I drew the pipes in CAD then got someone to bend them for me to suit.
Brackets to support them are on the 3D printer now and that will make them sit better.
They may get bent again to take them off at 45 degrees towards the rad, after they go through the fire wall. That was a bit too much to draw at the first attempt
Merry xmas all.
Andrew
Attachments
Similar threads
- Replies
- 214
- Views
- 69K
- Replies
- 9
- Views
- 13K