Brett's RS GTD

Randy V

Moderator-Admin
Staff member
Admin
Lifetime Supporter
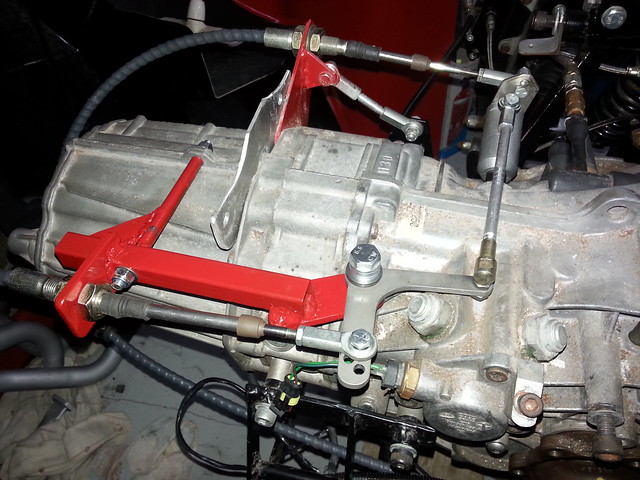
Brett, if your cable is too tight coming in from there rear whereas it was not too tight coming in from the side, you might want to reconsider the bellcrank strategy.
You could modify the bellcrank as shown in my modification below and achieve the same leverage/ratio. It would also greatly reduce the loading of the fulcrum bolt. I do agree that a bearing would be good, but a bushing of some sort would be sufficient if kept lubricated.
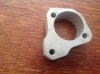
 

Attachments

  • image.jpg
    image.jpg
    159.9 KB · Views: 356
Randy - you are going to have to explain the modification to the class dunce over here :) Though I think you are saying cut off where the X is and place in a new hole further down.

The reason it was designed that way was to utilise the bolt hole that was already in the top of the gearbox. The arm runs on a set of thrust needle bearings that sit under and over it. It runs on a shanked bolt rather than a set screw bolt, so it is running against the smooth part.

I should add, that coming in the side, I had to loop the cable in the pontoon slightly, now trying to run it round to the back it is a bit tight, but it may be down to where the current exit hole is in the bodywork. I'll have a think about Randy's idea this weekend if I get the chance... To tell you the truth whatever is going to be the quickest now wins as I just want to get over this hump and get back towards starting the engine for the first time

Frank my friend you are going to have to tell me what that is!!!
 

Randy V

Moderator-Admin
Staff member
Admin
Lifetime Supporter
Randy - you are going to have to explain the modification to the class dunce over here :) Though I think you are saying cut off where the X is and place in a new hole further down.

The reason it was designed that way was to utilise the bolt hole that was already in the top of the gearbox. The arm runs on a set of thrust needle bearings that sit under and over it. It runs on a shanked bolt rather than a set screw bolt, so it is running against the smooth part.

I should add, that coming in the side, I had to loop the cable in the pontoon slightly, now trying to run it round to the back it is a bit tight, but it may be down to where the current exit hole is in the bodywork. I'll have a think about Randy's idea this weekend if I get the chance... To tell you the truth whatever is going to be the quickest now wins as I just want to get over this hump and get back towards starting the engine for the first time

Frank my friend you are going to have to tell me what that is!!!

Right.. You would cut off the part of the bellcrank with the X on it and your cable would then replace the green line thus connecting where the red dot is on that lever. You will still use that bolt hole in the top of the gearbox as you have it implemented right now..

Another thing too about your cable. You should secure the jacket in a few places along its route. Any movement in the cable (while shifting) is movement that is lost to the shift mechanism on the transmission.
 
Well, we (when I say we, I have a friend that comes round now every Thursday evening to give me a kick) looked at Randy's idea and it would have meant interference and routing issues over the offside suspension area, so we have gone with routing and looping round.

OK, I am not the best/neatest welder in the world, but this is good enough for this bracket that we have made up. Some rerouting for a smoother line through the sill and exit in the bodywork and got it back together last night. Result a better cross gate shift. So now the work starts to put everything back together to get me back to the point we were just before Christmas.

And with today's announcement, looks like I am definitely T minus 364 days to be on the road and ready to go down to La Sarthe...

18552260999_30fdac0065_z.jpg


18550666468_f8b470fca3_z.jpg
 

Randy V

Moderator-Admin
Staff member
Admin
Lifetime Supporter
Looks good Brett!
Just make sure that the cable jacket is not moving anywhere whilst shifting.. Any movement in the jacket is movement lost at the cable end... It's harder than you think to get those buggers tied down too! LOL
 
Thanks for all the encouragement and advice! It's pretty tight and it is clipped as it travels :)

Now I get to put everything back and then in theory all I need to do for engine start is...
- HT Leads
- Dipstick (I can't get the hardline one to fit so am having to order a Canton flexi one from the US)
- Final wiring check on engine circuits etc
- Coolant Fill
- Oil Fill

It's so easy when I write it like that haha

Getting a LOT of pressure in work from friends/colleagues after today's very badly kept secret got finally announced
 

NickD

Supporter
Thanks for all the encouragement and advice! It's pretty tight and it is clipped as it travels :)

Now I get to put everything back and then in theory all I need to do for engine start is...
- HT Leads
- Dipstick (I can't get the hardline one to fit so am having to order a Canton flexi one from the US)
- Final wiring check on engine circuits etc
- Coolant Fill
- Oil Fill

It's so easy when I write it like that haha

Getting a LOT of pressure in work from friends/colleagues after today's very badly kept secret got finally announced

Brett, Ive been on and of line recently with the old folks prob's again, what anouncement ?
 
I got some garage time this weekend, yay. Mainly down to not riding my bike.

So things are back to where they were a long time ago finally. Spent the weekend getting the back, back together with a few extra bits done here and there, such as making a small bracket to route the throttle cable and fixing the rear brake pipes back on the N/S, N/S fuel tank back in.

I'd forgotten what a PITA it is to do the bundle of snakes LOL

18644262380_0cc6e1941c_z.jpg


18211314753_3492da2d0e_z.jpg
 
Little bit more work done getting the HT leads done (now just need to get some protectors). Started to run the rear bleed for the fuel tank and hopefully have wired the alternator up right. Slowly, slowly

19053740179_90438dd99f_c.jpg


19234101182_5ba3d64be1_c.jpg


19233674772_0154971bfc_c.jpg
 
Brett,
That vent line to the rollover valve looks to be at the rear of the tank. Be sure to run a vent line from the front as well. A bubble at the front from up hill parking will either push the fuel out the vent or build up pressure in the tank. Or did I miss something?? I joined my front and rear so I use only one ROV per side.

Bill
 
OK, so I'll come back to my build thread rather than other threads...

I picked up this crank from Frank Catt Thursday evening; thanks to Frank for offering for free :)

22057996290_406333d64c_c.jpg


Now, moving forward I'm probably going to ask LOTS of stupid questions, as I don't want to mess up this time (older, maybe wiser - still able to make the same mistakes though).

I assume that this should have 2.248 main and 2.1232 rod journals for a standard 302. I've measured them multiple times with 3 different types of verniers (2 digital and 1 manual) and they come put as 2.228 for the mains and 2.113-4 for the rods. This means that they they'll need +0.02 bearings for the mains and +0.01 for the rods - correct?
 

NickD

Supporter
Brett,

Nice one bud, expect to see pics of your lump ready to drop back in shortly.

"Can you measure that driveshaft with CV's end to end for me, just like the pic I sent. ?

I reckon I'm going to make great progress before years end. My build is finally looking like a car, so when I show people into the garage now, the first answer is not, "No, help me a little, Speed boat" ? ! "

Nick.
 
Nominal/New sizes are 2.2486" for mains & 2.1232" for rods.
So you are correct at 0.020" UNDERSIZE mains and 0.010" UNDERSIZE at the rods... but can you please use three decimal places and imperial inch when ordering or referring to them, as using the +0.02 & +0.01 like you posted could be interpreted as a metric measurement by a Gen Y freckle face at the parts counter!!
 
Bearings arrived on Wednesday from the US (very happy with the eBay International Shipping programme :thumbsup: ). So let's start on engine attempt v2...

So it was all checked to make sure it was right regarding clearances yesterday; then a small matter of the real World Cup getting in the way so waited until today

22653343016_a26f358033_c.jpg


22058204403_3d51009a5b_c.jpg
[/url]

Pistons back in and checked and I am measuring it at 0.035 deck height, which probably equates to the 0.034 for the 73-76 blocks. So what would people advise regarding decking and cleaning up the deck? Take 0.018"/0.46mm off?

This would take the deck down to 0.016 as per the earlier blocks. Then with is I use a Cometic MLS 5514-040 it would give me a compression ratio of 9.44 according to the tool on Summit (but other online tools have said higher) - that's using pistons @ 4.03 with +2.7cc; stroke @ 3; deck height @ 0.016; combustion chamber @ 60cc; and gasket thickness @ 0.04
 
http://www.beckracing.com/page05.htm

It would take me a week to write this in my own words! First three paragraphs are of concern to your engine build
 
Last edited:

NickD

Supporter
Hi Brett,

Glad your making progress. (also good to see your family looking well on FB).

Hope your engine build goes smoothly this time. Its looking good thus far. I think I have said with my engine skills, Mine will probably go bang during the first 5 mins ;-)

Hence, if this is your V2, and the previous was a V1, remember the V2's when they did go up, were a much bigger bang :thumbsup:

See you soon Bud !
 
Back
Top