J. Salmon RCR-40 Build

Randy V

Moderator-Admin
Staff member
Admin
Lifetime Supporter
I also do not advise that any sealant be used on *anything* other than Pipe Threads.

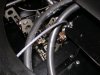
On brake line fittings I typically put one drop of light oil on the threads (being careful to not get any on the inside of the fitting where the brake fluid will come in contact). That little bit of oil will give you more clamping force per given amount of torque on the fitting.
 
Pipe thread fittings should be avoided in brake systems. AP does not use pipe thread in any calipers or fittings because of leakage.
 
Pipe thread fittings should be avoided in brake systems. AP does not use pipe thread in any calipers or fittings because of leakage.

Wilwoods stuff is NPT ..... I have 0 problems with leaks in my cobra using npt aeroquip fittings and teflon tape.
 
Wilwoods stuff is NPT ..... I have 0 problems with leaks in my cobra using npt aeroquip fittings and teflon tape.

Depending how far it is threaded and the adaptor screws in i stll would try to put in a aluminium washer inbetween the adaptor flange and the caliper.
TOM
 
OK, I have a firm pedal and leak free system! At least for now...

For the record: sealant or tape should NOT be used on a flare fitting ever. If you use tape for instance on the fitting and there is a slight leak, you may not see it. But the tape on a straight thread is not going to hold diddly. Thread lube is good to prevent damaging the threads.

But you should absolutely use teflon tape on NPT fittings. There are 5 such fittings on the RCR kit: there is an adapter at each bulkhead fitting (one at each corner) and the brake pressure switch is also an NPT.

I carefully built these all with Russell's sealant, which is specifially said to replace and be superior to teflon tape. All 5 fittings leaked to some degree. I replaced all with tape and no leaks anywhere.

To bleed the system, I use a pressure bleeder first, then go to the old fashion way to purge the master cylinder, then back to the pressure bleeder to clear anything remaining. I then leave the pressure bleeder on the circuit with about 10 psi and let it sit a few minutes. Then check every fitting for even the smallest hint of fluid. Finally, several full pressure stand-on-the-pedals to be sure. Followed by another check. And then I consider it a good start. You can't be too careful with brakes!
 
More pictures of the progress. Obviously the pedal box is in. I got my throttle cable from Control Cables (Control Cables, Inc.). I needed to redrill holes in the bracket, and let me warn you, the stuff is HARD. Required very good bits, resharpened with each cut. My throttle pull is right at 2.5 inches, and I added stops for both ends of the pedal travel.

Next to the pedal box is the bracket I made to support the Mastercell for the Isis system. Actually, I used the bracket that was with the parking brake system. Since it was steel and a bit of a boat anchor (and now it doesn't have to support the parking brake handle) I cut squares out of the sides to save a few ounces. Painted black, it looks pretty good.

BTW, that line-lock I put in the front circuit works great!!! Good thing too, since I cut up the hand brake bracket.
 

Attachments

  • DSCN6061.jpg
    DSCN6061.jpg
    37.6 KB · Views: 481
  • DSCN6060.jpg
    DSCN6060.jpg
    41.9 KB · Views: 460
  • DSCN6064.jpg
    DSCN6064.jpg
    38.5 KB · Views: 469
  • DSCN6066.jpg
    DSCN6066.jpg
    27.2 KB · Views: 472
Since the bracket for the Mastercell weighs 80 pounds, I decided to use a minimalist approach on the front Powercell bracket. I built it up out of pieces of 1/4 inch thick aluminum. Nylon spacers let it clear the bolts for the sway bar.
 

Attachments

  • DSCN6056.jpg
    DSCN6056.jpg
    53.8 KB · Views: 505
  • DSCN6059.jpg
    DSCN6059.jpg
    43 KB · Views: 482
With springs installed, the suspension is ready to be set up and aligned. I need to move the car to the lift and get under it to do a few things. So I put on the wheels and set it down. Seeing the car sitting there was a huge boost. It also meant I had to sit in the driver's seat and make motor noises. Progress is good!
 

Attachments

  • DSCN6071.jpg
    DSCN6071.jpg
    48.6 KB · Views: 746
  • DSCN6072.jpg
    DSCN6072.jpg
    38.6 KB · Views: 776
  • DSCN6073.jpg
    DSCN6073.jpg
    53.2 KB · Views: 775
  • DSCN6074.jpg
    DSCN6074.jpg
    46.6 KB · Views: 862
Depending how far it is threaded and the adaptor screws in i stll would try to put in a aluminium washer inbetween the adaptor flange and the caliper.
TOM

I don't think that would ever work - if I recall, you never bottom out the fitting.

besides, there's nothing wrong (atleast from my experiences) with just using teflon tape on the aeroquip fittings - paste gave me nothing but problems, so I stopped using it.
 
Depending how far it is threaded and the adaptor screws in i stll would try to put in a aluminium washer inbetween the adaptor flange and the caliper.
TOM

Tom,
There is no seat for a crush washer to mate to. My Wilwood calipers also have 90 degree fittings on them. They are NPT. The directions from Wilwood tell you to use tape. Our Cobra is the same way. No leaks in several years. The master cylinder fittings are designed for crush washers, and that is working great. It sounds like you are not using any sealant on your taper-thread adapters, the ones with the threads you are referring to as self-sealing cone. I believe these are NPT. You might be able to get a seal without it, but I have never heard anyone NOT recommend using teflon tape on NPT threads. Some say it works more as a thread lube than sealant, but I think it does both.

jac mac,
I agree the lifts would reduce unsprung mass by being at the top, but there is no room. The lift is significantly wider than the spring and will not clear the chassis. The SLC is setup the same way, and it goes unnoticed. I would not use it on a race car where every ounce counted, but for me, no worries.

Rechecked this am.... still no trace of leaks. I am a getting optimistic.
 

Randy V

Moderator-Admin
Staff member
Admin
Lifetime Supporter
Looking good J!
:thumbsup::thumbsup:

How are you mounting your muffler heat shield? I looked for all sorts of examples when I made mine and found very little out there...
 
J,
This thing looks like its ALL motor and grearbox, nice and meaty. Coming along nicely, will be a sweet ride when done.
 

Rob

Lifetime Supporter
J,
Looking fanstastic man!
Just thought I'd chime in and let you know that I too believe in teflon for NPT. I used tape in the joint in question (90º elbow into cal) on my Wilwoods. No leaks.
 
Prepping for delivery

I am reaching the end of my part. What needs to be done now primarily includes fiberglass work (final dash prep and body fitting) and fabrication (rear transaxle subframe). I have gotten done what I need: the driving position is set, the gauge layout is done, and I understand all of the workings of the car, both mechanical and electrical.

On Friday I plan to haul the car to Val Burd Racing at VIR. Val and Charlie are going to take it from here, although I will still be heavily involved (of course). In the meantime, I have finished designing the ISIS electrical wiring and dissected the FAST system.

The ISIS is great. Once you get the hang of it, it is really easy and very flexible. I sorted all of the wires out and marked them as to exactly where it goes. I then taped it all up. Now I am getting it ready for transportation.
 

Attachments

  • DSCN6081.jpg
    DSCN6081.jpg
    56.7 KB · Views: 462
  • DSCN6082.jpg
    DSCN6082.jpg
    48.1 KB · Views: 443
  • DSCN6083.jpg
    DSCN6083.jpg
    57.2 KB · Views: 493
  • DSCN6084.jpg
    DSCN6084.jpg
    42.1 KB · Views: 482
  • DSCN6085.jpg
    DSCN6085.jpg
    47.2 KB · Views: 490
Delivery prep continued...

I got a bunch of friends to help me set the rear clip. It does not fit like it did when I got it, but it all needs to be aligned. And not by me :)

The rear view mirror is not going to be very helpful, but the view will be nice.

Wiring is marked and secured.

I think one of my favorite views is the completely flush undertray.
 

Attachments

  • DSCN6086.jpg
    DSCN6086.jpg
    45.2 KB · Views: 542
  • DSCN6087.jpg
    DSCN6087.jpg
    39.5 KB · Views: 500
  • DSCN6088.jpg
    DSCN6088.jpg
    40.7 KB · Views: 524
  • DSCN6089.jpg
    DSCN6089.jpg
    62 KB · Views: 565
  • DSCN6096.jpg
    DSCN6096.jpg
    30.4 KB · Views: 505
Seat install

It's almost impossible to reach the inboard seat bolts alone, so I drafted some help. It's nice to have help that argues over who GETS to do stuff, not who HAS to do something. Both of them seem to have the righty-tighty-lefty-loosey thing down, so that's a milestone I am proud of!
 

Attachments

  • DSCN6091.jpg
    DSCN6091.jpg
    49.6 KB · Views: 705
  • DSCN6092.jpg
    DSCN6092.jpg
    35.2 KB · Views: 511
  • DSCN6093.jpg
    DSCN6093.jpg
    26.4 KB · Views: 431
  • DSCN6095.jpg
    DSCN6095.jpg
    45 KB · Views: 525

Chuck

Supporter
Great pics! You will always have two cheer leaders begging for a ride. Adds to the fun.

And the GT is looking good too . . . .
 

Jim Rosenthal

Supporter
That last photo is awesome..little kids turning wrenches are always a hoot. Watch out, they'll be asking for the keys before you know it.
 
Back
Top