
You are using an out of date browser. It may not display this or other websites correctly.
You should upgrade or use an alternative browser.
You should upgrade or use an alternative browser.
Kiwi scratchbuilt
- Thread starter Russ Noble
- Start date
Ross Nicol
GT40s Supporter
MMmmm is that a jet engine in your car Iain?
Ross
Ross
Good advice on the camera Iain!:idea:
Leaf blowers!? I might just use a bit of kiwi ingenuity and open the rear clip! :idea: Sorry, I'm just a poor low tech country boy.......
5 litre garden spray is good for afterwards to cool things down by misting water over the heat exchangers and radatiors, increases the efficency significantly. (idea stolen from the stock cars)
Leaf blowers!? I might just use a bit of kiwi ingenuity and open the rear clip! :idea: Sorry, I'm just a poor low tech country boy.......
With the rear clip open the exhaust blows directly onto a section of the clip and would probably melt it !
I knew that.....
 I guess the brain fade was caused by too many late nights. Not tonight though, I'm getting an early night so I'm fresh to finish assembling the motor tomorrow. Don't want any stuffups there.....
Well, the engine assembly never happened today, too many other things encroaching on my time. Plus there were some other items with greater priority that needed to be attended to in order to keep the build progressing satisfactorily.
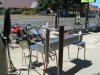
A start was made on skinning the chassis and some of the panels have been formed. The skinning is the first step, then fit the fuel tank, and then the sills. The next time the sills are fitted up, they won't be coming off again so it was necessary to paint them now. Obviously the fuel tank has to go in before the sills so I had to pressure test that and make up the fuel tank straps.
All the other vessels that I have built have been pressure tested using mains pressure water. That sort of pressure in the fuel tank would destroy it, so I decided to test it with compressed air at about 1 psi. 1 psi is approximately equivalent to a 2 ft head of water so I mounted an open header for the water about 2 ft above the tank and blew air into the tank. A connecting hose from the header tank to the fuel tank was looped higher than the header to stop water drainback to the fuel tank. At 1 psi the tank creaked and groaned a bit but was OK. Soapy water was painted on the outside of the welds and any slight leaks show up as a stream of bubbles. There were two pin holes that needed attention. Now rectified and all set to go.
Great to have the final colour on at least some of the body!!
Attachments
NICE :thumbsup:
Now get off the computer and get some sleep!
Best,
S
Now get off the computer and get some sleep!
Best,
S
Russ.
I was wondering if you annealed the chassis. If you did how did you do it? My guys here say clamp it to a heavey frame and bake at 700 Deg. for 20 minutes. Or the tooly friend I have said you can also do it sonicly(High Frequency Sound Waves) with a device that they use for structural steel. It would clamp to your heavy frame table set the frequency and a timer and let it do it's thing. I haven't reached that stage yet Just wondering.
Dave
P.S. Try to go easy on Ross.
Ah Scott. Sage advice indeed! I am sure if I stayed off the computer I could have had this thing finished 18 months ago......
Dave, I've done my calculations and the frequency of a small journal, all forged, 351w @ 8629 rpm will be perfect for the annealing. So the annealing will take place trackside and the chassis will become fully annealed half way through the second race!! :devil:
Sorry Dave, this is just a low tech, low cost build using ERW tube for the chassis. Annealing is not something I have looked into. Why don't you start a thread in the Chassis Section and see what comes up? It's been a long time since we've had any gritty tech. Your sentiments re Ross are touching, however he has a great car that has had considerable development and he is a big boy now who can look after himself. I think perhaps you should ask him to go easy on me!")
Dave, I've done my calculations and the frequency of a small journal, all forged, 351w @ 8629 rpm will be perfect for the annealing. So the annealing will take place trackside and the chassis will become fully annealed half way through the second race!! :devil:
Sorry Dave, this is just a low tech, low cost build using ERW tube for the chassis. Annealing is not something I have looked into. Why don't you start a thread in the Chassis Section and see what comes up? It's been a long time since we've had any gritty tech. Your sentiments re Ross are touching, however he has a great car that has had considerable development and he is a big boy now who can look after himself. I think perhaps you should ask him to go easy on me!
Hi Russ, your project is coming along well.
I noticed your comment on the axles.
I have a pair of Summers Brothers axles that 16 1/2 inches long that will hold up to anything you might have.
Dave
I noticed your comment on the axles.
I have a pair of Summers Brothers axles that 16 1/2 inches long that will hold up to anything you might have.
Dave
Thanks Dave, the axles actually look good, time will tell...
Russell, it causes me constant consternation that I have to dilute my pleasure with work! Never mind, that's what puts the bread on the table. The pressure IS on though....
I had a whole group of helpers today and everything was progressing well, but the alloy panelling is a major headache and I haven't allocated enough time for that! And tonight to cap it all off, after fixing only three panels in place I had used all three mixing nozzles that I had for the Plexus 432. I had expected the glue in the nozzle to remain usable long enough to be able to move on to the next panel after riveting the current one. Not so. This has put me back a full day just when I didn't need it.
The deadline is really tight now, but I have a whole group of helpers rallying around to help me get there.
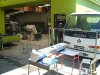
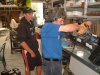
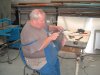
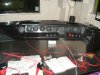
Pic1 Ross Nicol and nephew Sam sabotaging my dash! Ross has volunteered to do most of the wiring for me.
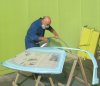
Pic 2 Paul cleaning up some paneling.
Pic 3 Lim constantly helping. More paneling
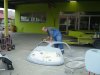
Pic 4 Mike getting close to the end on the spider.
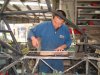
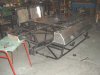
Pic 5 Leon drilling that third panel while I placed the rivets.
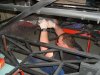
Pic 6 Ash putting the finishing touches on the single nostril conversion.
A great bunch of guys who have pitched in and I am extremely fortunate to have such a willing band of helpers.
Russell, it causes me constant consternation that I have to dilute my pleasure with work! Never mind, that's what puts the bread on the table. The pressure IS on though....
I had a whole group of helpers today and everything was progressing well, but the alloy panelling is a major headache and I haven't allocated enough time for that! And tonight to cap it all off, after fixing only three panels in place I had used all three mixing nozzles that I had for the Plexus 432. I had expected the glue in the nozzle to remain usable long enough to be able to move on to the next panel after riveting the current one. Not so. This has put me back a full day just when I didn't need it.
The deadline is really tight now, but I have a whole group of helpers rallying around to help me get there.
Pic1 Ross Nicol and nephew Sam sabotaging my dash! Ross has volunteered to do most of the wiring for me.
Pic 2 Paul cleaning up some paneling.
Pic 3 Lim constantly helping. More paneling
Pic 4 Mike getting close to the end on the spider.
Pic 5 Leon drilling that third panel while I placed the rivets.
Pic 6 Ash putting the finishing touches on the single nostril conversion.
A great bunch of guys who have pitched in and I am extremely fortunate to have such a willing band of helpers.
Attachments
Keith mate, I'm lying in a deck chair on the beach in the sun, sipping on tequila and fighting off scantily clad nymphos. It's a bugger of a task, but someones got to do it, and I can't delegate everything... :shrug:
Keith mate, I'm lying in a deck chair on the beach in the sun, sipping on tequila and fighting off scantily clad nymphos. It's a bugger of a task, but someones got to do it, and I can't delegate everything... :shrug:
"""""""" Fighting off scantily clad nymphos"""""""" That would never happen- with or without Tequila.
Keith leave the boys alone, they have a deadline to meet!
")
Russ,
fantastic job and great to see all the hard work coming together.
I wanted to ask about Pic 5, are those seat belt anchor points in the round tube? Reason I ask is I am thinking how to mount my new seat belts, (replacing lap and diag with 6 point harness) and will have to weld in some tube to do so. That seems to be a neat way of doing it.
regards
Dave
That is correct Dave. Those shoulder harness mounts are as specified by MSNZ for any harness attachment points on the rollcage structure.
Hello Russ,
I'm following your build for a moment now,and must say very impressive
next month I will be visiting NZ for a motorcycle journey and will start my visit from Christchurch
would/could it be possible to have a look at your project and invite you round for a beer
Cheers
JP
I'm following your build for a moment now,and must say very impressive
next month I will be visiting NZ for a motorcycle journey and will start my visit from Christchurch
would/could it be possible to have a look at your project and invite you round for a beer
Cheers
JP
JP, you are most welcome. I look forward to seeing you.
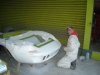
Progress has been good the last couple of days. The roof section and one door have had their final top coats. The weather has been kind to our fairly basic “spraybooth”. Some rain in the morning has dampened down the dust then a nice day with no wind has resulted in an excellent finish.
Good to his promise, Ross has been going great guns on the wiring, and the dash is looking good. His car has just arrived at my place having been finally cleared by Ministry of Ag & Fish (Wouldn’t want any Oz undesirables running loose in Godzone, though some may say “Too late”) A lovely car and a source of inspiration. Good luck with the racing Ross.
The panelling is progressing well at long last and I am just about to mount up the fuel tank and sills before turning it up the right way to mount the spider.
Actually the fuel tank straps have turned into a bit of a mission. First attempt and the material choice was wrong. Second attempt and I cocked up some critical dimensions. Silly mistakes like this just prove that I don’t work well under pressure and do nothing for my state of mind nor the build time. Third attempt, later today, I hope will be OK.
Attachments
Last edited: