
You are using an out of date browser. It may not display this or other websites correctly.
You should upgrade or use an alternative browser.
You should upgrade or use an alternative browser.
RF #12 "Race" Chassis
- Thread starter superflyte
- Start date
![image[1].jpeg](/data/attachments/48/48577-d14fff4af4bbb0b7dc803ec5a95cfa7c.jpg?hash=0U__SvS7sL)
Ian Anderson
Lifetime Supporter
re: RF #12 "Race" Chassis
Have a look what Paul did
http://www.gt40s.com/forum/gt40-build-logs/13216-pw-tornado-build-pics-14.html
About post 278
Ian
Have a look what Paul did
http://www.gt40s.com/forum/gt40-build-logs/13216-pw-tornado-build-pics-14.html
About post 278
Ian
re: RF #12 "Race" Chassis
I looked at doing the rear clip mod , yours and Jim C's all looked fantastic but for some reason I wanted to put the chassis back to how it left the factory in the end. I will just fold up an alloy panel get it powder coated satin black and fit that.
I need to fibreglass the missing bit out of the lower rear clip as well.
Wheels are next......I want 15 or 16 inch wine glass style wheels. I have the Vintage 17inch BRM knock on type wheels which will have to go.

re: RF #12 "Race" Chassis
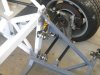
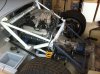
Making progress on the unkown rear end.....Kind of wish I put it back to a standard Rf set up with reverse A arm now. The rodends are 5/8 that join to the uprights but they are sleeved down to 3/8 bolts. Yes 5/8 sleeved down to 3/8........
I am wondering if I should drill the uprights lower mounting bolt holes from 3/8 to 1/2 inch. These rodends are mounted in single shear so am a bit worried the the little 3/8 bolts may bend.
I was also thinking that I might drop the 5/8 rodends and buy 1/2 inch rodends with a 5/8 thread so I dont have to modify the suspension links and I wouldn't need reducer bushings if I drilled out the lower mounting holes???
Any thoughts appreciated.
Attachments
Clayton
Supporter
re: RF #12 "Race" Chassis
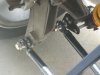
Dave
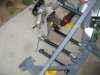
I had the same thoughts and drilled the uprights out to 1/2" (using a mill), no problems at all. Don't have a close up of it, but you get the idea from below.
Mark
The rear link acts purely as a toe link. The forward set of uppers and lowers are effectively 'A' arms. This set up reduces roll steer as opposed to the reverse 'A' arm setup.
Clayton
Dave
I had the same thoughts and drilled the uprights out to 1/2" (using a mill), no problems at all. Don't have a close up of it, but you get the idea from below.
Mark
The rear link acts purely as a toe link. The forward set of uppers and lowers are effectively 'A' arms. This set up reduces roll steer as opposed to the reverse 'A' arm setup.
Clayton
Attachments
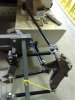
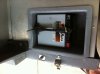
Finally got the rear suspension completed and working. I drilled out the rear uprights lower bolt holes to 1/2 inch bore and got some 5/8 thread 1/2 inch bore rodends so i could use the current arms. All works nice and smooth and a big thanks to Jim C for all his advice.
Body alignment next.........Oh the pain......
Body alignment next.........Oh the pain......
Attachments
Got some good progress this break.
Nose panel Dzused on.
Panels aligned....need plenty of filler to fix bad gaps.
Door handles inner and outer working
AU Falcon ADR37/01 compliant engine fitted with new gearbox mounts made. Gearbox has to come out again for painting and fitting of flywheel and so on.
Will swap to 8 Stack after rego.
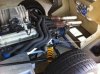
Next job brakes. Swapping the brakes down to smaller items so I can fit 15 inch Wheels.
Nose panel Dzused on.
Panels aligned....need plenty of filler to fix bad gaps.
Door handles inner and outer working
AU Falcon ADR37/01 compliant engine fitted with new gearbox mounts made. Gearbox has to come out again for painting and fitting of flywheel and so on.
Will swap to 8 Stack after rego.
Next job brakes. Swapping the brakes down to smaller items so I can fit 15 inch Wheels.
Attachments
Got some good progress this break.
Will swap to 8 Stack after rego.
What Dave really ment was I wish I could have an 8 stack, but due to the laws it will never happen.
Sounds like you are getting their Dave.
Jim
We have certified 8 stack 302s in both Vic and SA recently following an emissions test - has something changed in WA ?
Dave
As you are doing the body ,have you , do you have a colour sceam worked out
Jim
As you are doing the body ,have you , do you have a colour sceam worked out
Jim
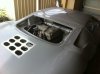
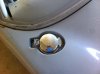
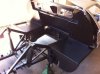
Been chipping away at the 40 as time allows......Got some fuel caps...always liked the Cobra caps better so on they went.
Frame is now Satin black
Exhaust is done just needs welds smoothed
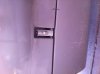
Battery fits like a glove.....
Engine wiring harness is seperated from the AU falcon harness, fitted with chip. Engine starts.....
Frame is now Satin black
Exhaust is done just needs welds smoothed
Battery fits like a glove.....
Engine wiring harness is seperated from the AU falcon harness, fitted with chip. Engine starts.....
Attachments
Hopefully this works.....The Missus had to hold the ignition power on and I fogot to tell her there are no pipes on the motor......She got out of the way quick.
Here's the link if you're bored......
start up - YouTube
Here's the link if you're bored......
start up - YouTube