Roaring Forties 105

Thanks Ian.
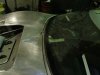
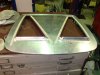
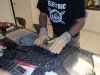
Yes they all function ,all the ducting that was on the glass swaps straight over.
They will just be bonded on with urethane or something similar.

Jim
 
Today was a mile stone for me, I have been waiting for weeks to get this bloody thing on and gap it up.
The panel on the clip have excess material and overlap the doors and sill.
Hard to explain this on paper but you need to determine the gaps so you first need to find the edge of the door, the edge is under the overlap so you cant see it or get to it to mark.
I run 50mm tape on the edge of the doors and sill, with the clip in position I run another strip of tape on top of the lower strip and it will be half on the clip and half on the panel under it.
you then mark a line on the front edge of the tape and that is the edge of the door.
You then lay a strip of tape the width of your gap next to that and that is your fold line.
You run another strip the width of the cut line.
You use tape because you are often going around corners or over curves.

That's all I have .

Jim
 

Attachments

  • P4190056.JPG
    P4190056.JPG
    438.7 KB · Views: 423
  • P4190053.JPG
    P4190053.JPG
    444.8 KB · Views: 507
  • P4190054.JPG
    P4190054.JPG
    456.2 KB · Views: 497
  • P4190058.JPG
    P4190058.JPG
    468.2 KB · Views: 576

Brian Stewart
Supporter
Brilliant work Jim. I reckon you don't need to paint it - just polish it.
 

Randy V

Moderator-Admin
Staff member
Admin
Lifetime Supporter
What fabulous craftsmanship here... Jim, thank you for taking the time to photo document and share here..
 
Thanks Jim, Chris, Brian ,Randy and Ron.

It does take time to document Randy but I think most would find it interesting.

I think it maybe finished in about 6 weeks.
The next post maybe the last for this car I am thinking.

Jim
 
Thanks Dave

Yes its coming to an end.
I am a builder,But I need to enjoy it.

Long term
After doing the alloy body I think I would struggle to sell this car.
The family all enjoy it, we take it to the track and all drive it ,they are really fantastic days ,and that is what I like about this car.

Most cars you get used to and you know what to expect but it dosnt seem to be the case with this one.

Jim
 

Keith

Moderator
Thanks Dave

Yes its coming to an end.
I am a builder,But I need to enjoy it.

Long term
After doing the alloy body I think I would struggle to sell this car.
The family all enjoy it, we take it to the track and all drive it ,they are really fantastic days ,and that is what I like about this car.

Most cars you get used to and you know what to expect but it dosnt seem to be the case with this one.

Jim

Is it unique?
 
Thanks Dave

After doing the alloy body I think I would struggle to sell this car.
Jim

Jim, I'm assuming you mean "struggle" as in "part with" because I can assure you, if you put this car up for sale it would certainly not struggle to sell!

Anybody knowing anything about GT40's would know your car is one of a kind and would throw down some serious cash for it.
 
Thank you ,sorry I never replied to you guys.

The next part was the center bonnet /hood if you are from the USA.
It was not a difficult parts, I wheeled some shape into it, the lines drawn are a guide.
Once I had the correct shape I marked out the outer fold and folded it over to give strength to the panel.
 

Attachments

  • P5140046.JPG
    P5140046.JPG
    439 KB · Views: 292
  • P5160054.JPG
    P5160054.JPG
    456.5 KB · Views: 292
  • P5170056.JPG
    P5170056.JPG
    442.5 KB · Views: 299
Next was cut the center out to match the original.
All the edges falling into the ducts where folded over and the front turn up was tapped over a T dollie while the corners of the turn up I used a hammer and smacked it into a sand bag to get the radius and blend.

I relieved these areas with a cut and after I wish I had not because It would have worked with out it, it happens you just have to fix your errors.
 

Attachments

  • P5170057.JPG
    P5170057.JPG
    444 KB · Views: 352
  • P5170062.JPG
    P5170062.JPG
    455.3 KB · Views: 299
  • P5170063.JPG
    P5170063.JPG
    454.5 KB · Views: 297
Next was to make the ducts, starting with the floor, set it up with some simple brackets then pattern the side panels.

Weld the sides on then repeat on the other side.

This is to the 85% stage, you clean edges and just generally tune it up, you would spend a few more hours to get to the finish stage.
 

Attachments

  • P5170066.JPG
    P5170066.JPG
    457.5 KB · Views: 276
  • P5170067.JPG
    P5170067.JPG
    439.5 KB · Views: 267
  • P5170065.JPG
    P5170065.JPG
    465.4 KB · Views: 264
  • P5240072.JPG
    P5240072.JPG
    478.4 KB · Views: 287
  • P5280079.JPG
    P5280079.JPG
    476.3 KB · Views: 287
Made all the light brackets with adjusters.
Beat out some cups to fit the rear of the lamps to give an old school look to it.
 

Attachments

  • P5090028.JPG
    P5090028.JPG
    467.1 KB · Views: 315
  • P5120040.JPG
    P5120040.JPG
    458.5 KB · Views: 289
Headlamp covers I formed the covers in alloy then used the oven to heat the plastic sheets.
Then with clean gloves I applied a small amount of pressure .

I trim the outer to size by using the belt linisher.
 

Attachments

  • P5310080.JPG
    P5310080.JPG
    476.5 KB · Views: 246
  • P5310081.JPG
    P5310081.JPG
    457.2 KB · Views: 283
  • P5310086.JPG
    P5310086.JPG
    407.6 KB · Views: 260
  • P5310087.JPG
    P5310087.JPG
    435.9 KB · Views: 280
I always needed more leg room on the passengers side so the battery had to go.
I was given a lithium iron battery by on of the reps that buy of.
It is 400cca so its plenty, the weight of this thing is amazing it feels like an empty box.

I made a new foot rest but incorporated the battery into it.
 

Attachments

  • P6070001.JPG
    P6070001.JPG
    489.9 KB · Views: 308
  • P6070002.JPG
    P6070002.JPG
    488.1 KB · Views: 291
Back
Top