
- Forums
- GT40 Replica Manufacturers' Corner
- RCR Forum - RCR40/SLC/917/Superlite Aero
- The SLC Clubhouse
You are using an out of date browser. It may not display this or other websites correctly.
You should upgrade or use an alternative browser.
You should upgrade or use an alternative browser.
Rumbles SLC Build
- Thread starter rumbles
- Start date
-
- Tags
- g50 gear ls3 powernation rumbles slc superlight yellow
")
Al,
Wow, You have done some major reshaping of the dash!
I reshaped just the driver's pod to accommodate a different gauge cluster. I shaved as much as I could from the underside if the dash to give clearance for the steering column.
Wow, You have done some major reshaping of the dash!
I reshaped just the driver's pod to accommodate a different gauge cluster. I shaved as much as I could from the underside if the dash to give clearance for the steering column.
Attachments
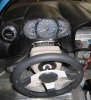

I reshaped the opening to work with the tilt.
ooo, daddy likes, really need to see it in the car to see how well the hot rod look blends in. Really clean work!
ooo, daddy likes, really need to see it in the car to see how well the hot rod look blends in. Really clean work!
The gages are Classic Instrument Auto Cross. I was going for a nice clean European look.
ooo, daddy likes, really need to see it in the car to see how well the hot rod look blends in. Really clean work!
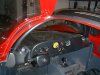
Dash dusty but in the car.
Attachments
Attention:
Bill,
Don't want to side track your tread… but I had to comment on Al's dash… looks awesome!
Now.. back to regular programming
Bill,
Don't want to side track your tread… but I had to comment on Al's dash… looks awesome!
Now.. back to regular programming
Attention:
Bill,
Don't want to side track your tread… but I had to comment on Al's dash… looks awesome!
Now.. back to regular programming
Thanks.
To keep the interior tidy, I decided to add some inside storage for maps, garage door openers, forgotten panties, etc. So I fabricated enclosed storage compartments that fit in the unused space between the seats and the side pods.
I started my modeling the compartments in paper and then transferring it to aluminum sheet metal. The driver's compartment was a bit more challenging since it had to fit around the E-brake handle. The compartments will be covered inside and out by the upholsterer.
Together, the driver's and passenger's compartments have as much storage volume as most passenger cars.
Attachments
Nice work Bill- the SLC does have a lot of opportunity for hidden storage in unused spots.
One of the things I did to get my interior ready for upholstery was change the way the speakers were mounted. They were surface mounted on the firewall and frankly looked like an after thought. I embed the speakers behind the panel and reworked the grills for a more finished flush look.
Attachments

I'm using the gentleman seats and will reupholster them. The front and rear of the seats are exposed, so both sides need to upholstered. That means that the material on the front must be pulled around the sides and then hidden, and like wise for the material on the rear. To provide a clean way of hiding all that excess material, I molded a back panel for each of the seats.
- I started by taping the back of the seat to ensure the fiberglass would release. Then I used clay to mold some additional clearance for the fasteners that would hold the seat back in place. I dug a small well for each fastener and lined the well with fiberglass cloth.
- I then laid fiberglass over the back side of the seat and trimmed the edges after the cure. The bottom of the seat is not exposed so it was trimmed away.
- Using the fastener wells as a guide, I epoxied the click-bond #6 threaded fasteners to the back of the seat.
- Then securely attached the seat back and covered the fasteners with countersunk covers that are flush with the surface.
- The seat backs will be covered with 1/8" foam and upholstery material, so I did not spend a lot of effort getting the fiberglass surface perfect.
Attachments
I'm using the gentleman seats and will reupholster them. The front and rear of the seats are exposed, so both sides need to upholstered. That means that the material on the front must be pulled around the sides and then hidden, and like wise for the material on the rear. To provide a clean way of hiding all that excess material, I molded a back panel for each of the seats.
- I started by taping the back of the seat to ensure the fiberglass would release. Then I used clay to mold some additional clearance for the fasteners that would hold the seat back in place. I dug a small well for each fastener and lined the well with fiberglass cloth.
- I then laid fiberglass over the back side of the seat and trimmed the edges after the cure. The bottom of the seat is not exposed so it was trimmed away.
- Using the fastener wells as a guide, I epoxied the click-bond #6 threaded fasteners to the back of the seat.
- Then securely attached the seat back and covered the fasteners with countersunk covers that are flush with the surface.
- The seat backs will be covered with 1/8" foam and upholstery material, so I did not spend a lot of effort getting the fiberglass surface perfect.
Very interesting and creative!
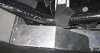
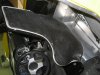
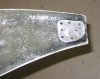
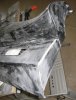
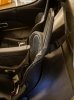
In preparation for upholstery, the door panels needed several modification to fit properly and to hide as many fasteners as possible.
- The front of both door panels are too long and interfere with the dash and kick panel. I cut the front of the door panels off, and moved them back about 3/8”.
- The top rear corner of driver’s door panel sticks out into the channel where the weather stripping goes. I simply did a long pie cut and epoxied it back together.
- I want the door to have a clean OEM look, so I tried to hide as many door panel fasteners as possible.
- The bottom of the door panel had more fastener holes than needed, so I filled in about half of them.
- I counter-sunk all the remaining holes, so the fastener heads will be flush with the panel surface.
- I used a system of #8 button head screws with a snap on plastic cover that matches my black upholstery.
- The bottom of the driver door panel contacts the door sill and leaves no room for upholstery. I used a belt sander to grind down the fiberglass to gain some clearance.
- There is no fastener hole at the top rear corner of door panels, so you need to make one. The fiberglass isn't thick enough for a counter sunk hole, so an aluminum backer plate was glued onto the backside.
Attachments
-
 IMG_4785.JPG229.7 KB · Views: 506
 -
 IMG_4776.JPG475.6 KB · Views: 496
 -
 IMG_4793.jpg56.5 KB · Views: 457
 -
 IMG_4788.jpg109.1 KB · Views: 512
 -
 IMG_4795.JPG15.8 KB · Views: 487
 -
 IMG_3884.jpg78.7 KB · Views: 567
 -
 IMG_3881.JPG120.5 KB · Views: 444
 -
 IMG_3879.JPG135.2 KB · Views: 506
 -
 IMG_3688.JPG46.3 KB · Views: 484
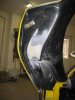
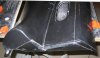
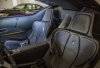
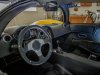
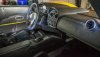
Custom Stitching Co finished my SLC interior on Thursday! I picked up the car and spent the next 3 days tearing it completely apart, so I could get it into the paint shop on Monday.
I prepped the interior as much as I could for the upholstery:
Note: The exposed yellow body under the door panel will be painted black.
I prepped the interior as much as I could for the upholstery:
- I used the RCR gentleman seats with a few modifications. I trimmed off the shoulder ears and fabricated covers for the mounting base, the seat back, and the seat front.
- To keep the interior tidy, I fabricated storage compartments that fit in the unused space between the seats and the side pods (both sides). Together, the driver's and passenger's compartments have as much storage volume as most passenger cars.
- Fabricated a flat floor around the seat
- I recessed the speakers into the waterfall panel.
- They embellished the console for a much more finished look.
- Built a visor for my gauge pod.
- Integrated the firewall panel in with the seat backs
- Worked with me on my seat pad design
- They also upholstered my trunk (Sorry, no PIC).
Note: The exposed yellow body under the door panel will be painted black.
Attachments


Last edited:
Custom Stitching Co finished my SLC interior on Thursday! I picked up the car and spent the next 3 days tearing it completely apart, so I could get it into the paint shop on Monday.
I prepped the interior as much as I could for the upholstery:
The upholstery was mostly a "wrap job", but they did some very creative fabrication as well:
- I used the RCR gentleman seats with a few modifications. I trimmed off the shoulder ears and fabricated covers for the mounting base, the seat back, and the seat front.
- To keep the interior tidy, I fabricated storage compartments that fit in the unused space between the seats and the side pods (both sides). Together, the driver's and passenger's compartments have as much storage volume as most passenger cars.
- Fabricated a flat floor around the seat
- I recessed the speakers into the waterfall panel.
Overall, I think the Custom Stitching Co gave me a high end look.
- They embellished the console for a much more finished look.
- Built a visor for my gauge pod.
- Integrated the firewall panel in with the seat backs
- Worked with me on my seat pad design
- They also upholstered my trunk (Sorry, no PIC).
Note: The exposed yellow body under the door panel will be painted black.
Bill, very classy, very clean euro look; nice job! :chug:
From the pictures, the seats don’t appear to have much padding….how comfortable are they?
Jim<?xml:namespace prefix = "o" ns = "urn:schemas-microsoft-com<img src=" /><o
 ></o>
></o>Similar threads
- Replies
- 26
- Views
- 8K
- Replies
- 7
- Views
- 6K
- Replies
- 4
- Views
- 10K