
- Forums
- GT40 Replica Manufacturers' Corner
- RCR Forum - RCR40/SLC/917/Superlite Aero
- The SLC Clubhouse
You are using an out of date browser. It may not display this or other websites correctly.
You should upgrade or use an alternative browser.
You should upgrade or use an alternative browser.
S2's Build Thread
- Thread starter sswartz
- Start date
BTW are you sharing any of your CAD and or STL files for your SLC build? I thought I was going to pioneer a build with custom onyx bits and bobs but you have beaten me to it!!
Do you have a build thread? I'd love to see more people using 3D printing for their builds. I have a cheap printer and hope to use it for random stuff on my build, though I'll have to send mine off to get made out of something better than PLA or ABS. It'd be cool if we had a 3D printing thread for anyone that is using it for their build. It may be alot to ask for people to share their designs, but it'd be cool to get ideas for our own stuff.
Scott
Lifetime Supporter
Mason, I’ve noticed that the Mark 2 is slower than my MakerBot Replicator 2X. That said, the MakerBot and four spools of ABS have been gathering dust since I bought the Mark 2. The primary reason for this is that, so far, it’s been completely drama free; no failed prints, no forced reboots, no tweaking and I have only needed to level the table once. I also love being able to print directly from my laptop and not having to transfer to a memory card, walk it over to the printer and select the file via the panel. I got into the habit of always replacing the build plate after each build which allows me to print something that I design when traveling… when I get home it’s waiting for me.
I agree that I could save some print time and material cost using the MakerBot. I guess that I’m just a lazy ass LOL. That said, I was using the unit test approach on the MakerBot and there are certain tests that the Mark 2 is better. For example, parts with a friction/snap fit or ones with tapered holes for heat-set threaded inserts. With the latter, Onyx’s higher heat rejection affects things a bit. I’m slowly making Block files for different heat-set inserts so that once I’ve got them tested, I can simply drop them into a part and do a revolved cut.
Mark Forged should add a “draft” option which sacrifices accuracy and finish quality for speed. You’re correct that their HQ is close to me. I visited their facility when they launched the Mark X and met the founder/CEO – a car guy!
I’ve learned a lot from the community and I’m willing to share the STLs. I’m also willing to share the CAD files with someone who is committed to an open source approach where all improvements are made available to the community, no commercial use, etc. There are several software open source licenses that could be adopted, but I haven’t had time to think about it much… Ohhh, and the designers must be attributed – you know, something like a bumper sticker LOL
S2, my first printer was a rep 2x and it was a bit of a dog for getting reliable prints, so I can understand why the markforged is your go to workhorse. I've had great reliability from the Taz printers and also the Fusion F360 which has been printing non stop without drama for the past two years.
Amen on the "draft" option for fast prints. At least the Mark 2 update is a bit faster than the original.
Glad to hear you are open to sharing, I'll hit you up when I get my roller, you have some beautiful parts!
Amen on the "draft" option for fast prints. At least the Mark 2 update is a bit faster than the original.
Glad to hear you are open to sharing, I'll hit you up when I get my roller, you have some beautiful parts!
Scott
Lifetime Supporter
The Dailey pan doesn’t come with any instructions. I think most of their customers know what they’re doing LOL. They were very helpful helping me get it straight and validated that my diagram is correct.

Note that all of the female ports on the Peterson tank are -12. However, Peterson’s -12 o-ring boss fittings are ported to a larger ¾” hole. So, if Peterson’s ports are used, a -16 hose into a -12 female port makes sense. I asked if the scavenge filter should have a bypass and the response was “If you have to rely on a bypass because the filter is so plugged up you should just give up.”
There’s an interesting video on the pan here: Dailey Engineering: Revolutionizing Dry Sump Oiling - YouTube
Scott
Lifetime Supporter
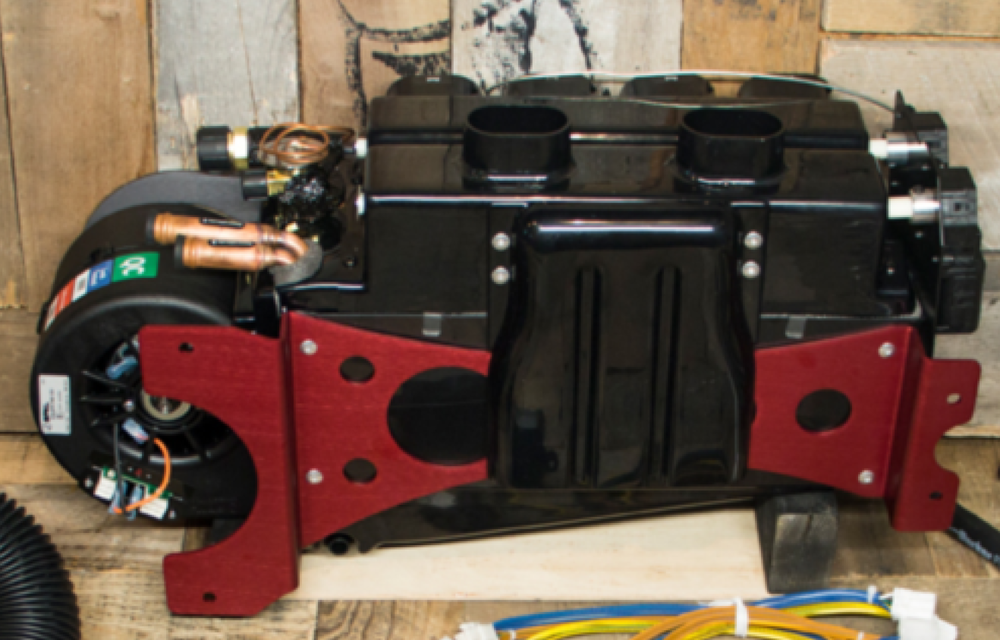
Does anyone have any experience with RestoMod Air? I’m thinking about replacing the Vintage Air Slimline unit. The primary reason for this is that I want electronic control, infinite fan speed adjustment etc. I looked at the Vintage Air GenIV, but it’s too big. I was looking at using a MoTeC PDU to PWM the fan, but that only gets me part way there.
Since I have the removeable side impact bars I need to rotate the Slimline 90 degrees and cut it into the top of the foot box. I was resisting making the cut, but I’m now convinced that’s the best approach in my situation.
There is a fair amount of room between the top of the foot box and the and the bottom of the dash which means that a taller unit could be used. The RestoMod Bantam is ½” longer, 4-1/2” inches narrower and 4-1/4” taller. It appears to have a lot of advantages:
*Smaller cut in foot box
*Serviceable box (not all glued together)
*Electronic controls; mode, temp, dash/defrost/heat
*Really nice billet control options, including a single button one (see picture below)
*SPAL fan with infinite speed control
*Separate heating and cooling coils
*Bluetooth control via iOS or Android app
*Better quality – at least according to them LOL
Downsides are that it’s pricy, it’s taller and the outlets point up (requiring them to be reworked).

Scott
Lifetime Supporter
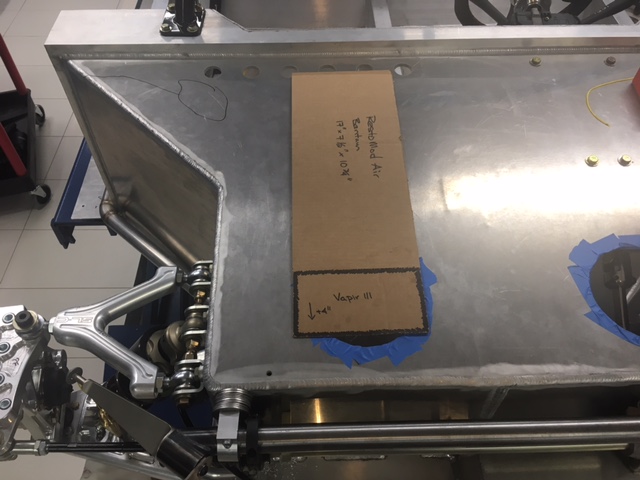
I going to see if I can get a RestMod to fit. My primary concern is height. I called them and they offer a mocking case which includes a plastic motor house for $125. It's refundable so long as you pay shipping both ways. I ordered a Bantam II and a Vapir III. The picture below shows the actual size (hole will need to be a little larger). The longitudinal orientation is due to the removable side impact bars which prevent it from being installed transversely. The outlined rectangle on the front represents the increased length of the Vapir.
Scott
If I followed correctly, this unit is taller than the Vintage. You mentioned cutting a hole. Are you thinking about the top of the footwell?
If so, I presume you have to redesign the air distribution anchor....yes? Will the instrument panel still fit if the unit invades the space on top of the footwell?
Scott
Lifetime Supporter
Dan, the hole will be in the top of the foot well where the cardboard is. The big piece is the size of their smallest unit and the rectangle with black border shows the additional length of their second smallest Bluetooth-enabled unit. As you point out, I won't be able to use the distribution "anchor", but I don't think that's much of a loss.
The challenge is height and that the heater control doesn't have a bypass. The actuator is from the same Chinese supplier as the one that I made a 3D bracket in an earlier post, but the profile of the output shafts are different, the mounting holes are different and the ECU is integrated rather than being standalone. So, I either need to machine a shaft adapter to and print a new 3D bracket to mate the valve that I have to their actuator OR maybe the control protocol is exactly the same and it's pretty much plug-and-play... I doubt that I'm that lucky.
The challenge is height and that the heater control doesn't have a bypass. The actuator is from the same Chinese supplier as the one that I made a 3D bracket in an earlier post, but the profile of the output shafts are different, the mounting holes are different and the ECU is integrated rather than being standalone. So, I either need to machine a shaft adapter to and print a new 3D bracket to mate the valve that I have to their actuator OR maybe the control protocol is exactly the same and it's pretty much plug-and-play... I doubt that I'm that lucky.
Scott
Lifetime Supporter
I installed the pillow blocks for the front sway bar this week. The best way to mark the center of a hole is using a hole transfer punch. Simply find the largest one that fits, insert it and wack it with a hammer. If the material with the hole is thinner that length of the point they won't help, but otherwise they work great. You can pick up decent set here on Amazon for around $20.
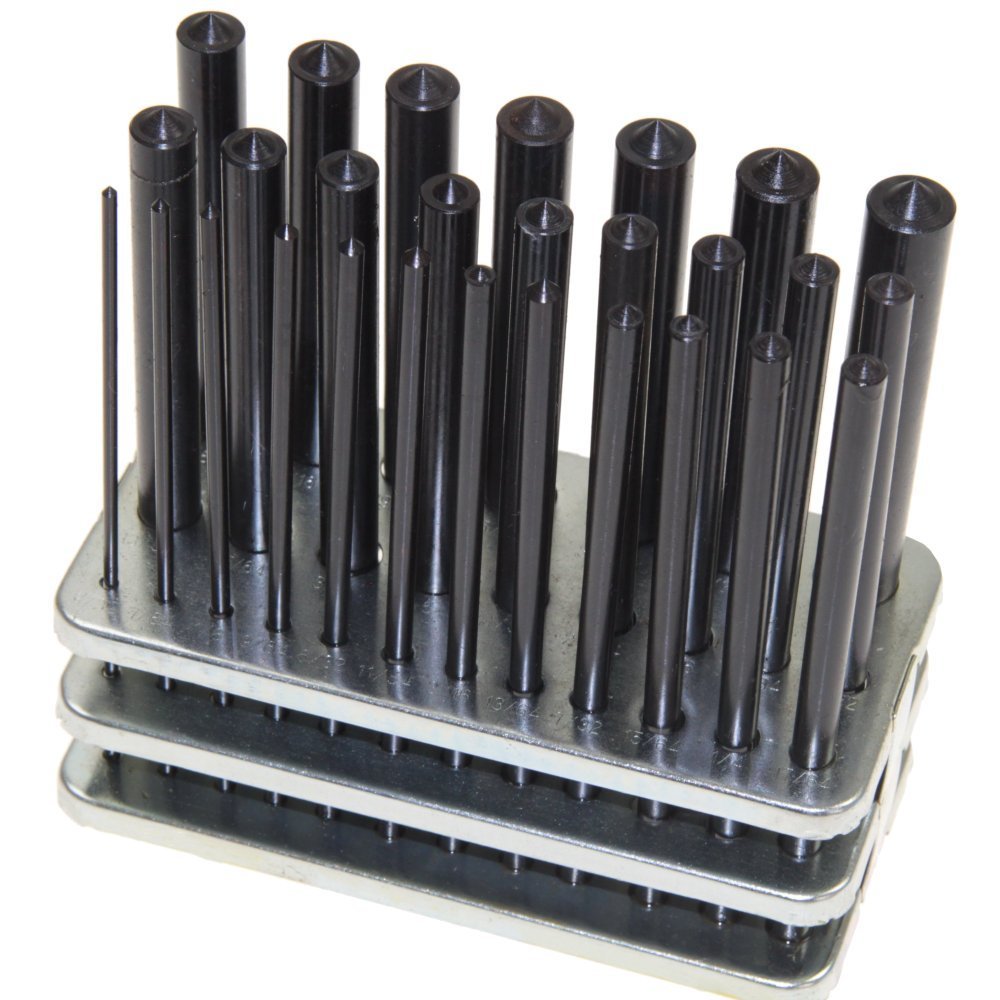
A trick I use with transfer punchs is if you are doing a hole that is larger than the biggest one (typ 1/2") find a socket 3/8 or 1/2 that fits the hole then use 3/8 or 1/2 punch through the socket.That way you can do very large holes up to the outside diameter of your largest socket.
Scott
Lifetime Supporter
Earl, that’s a great tip.
I received the Bantam II and Vapir III mockup cases last week. I think that I’m going try and make the Vapir III work. It’s ½” wider and 4” longer than the Bantam, but it has the following advantages:
I tried to compare the A/C capacity to the Slimline. Neither publishes numbers, but the RestoMod Air (RMA) uses a high-output, OEM-style whereas Vintage Air doesn’t. The Vapir III has a high-quality, 20” 4-row A/C coil. I haven’t taken the Slimline apart, but RMA claims that their smallest unit, the Batam II, which has an 18% smaller A/C coil that the Vapir III has more cooling capacity that Vintage Air’s largest GenIV system… who knows, but I think that it’s clear that the Vapir III should have a lot more capacity than the Slimline, which you’d expect given the price point.
I received the Bantam II and Vapir III mockup cases last week. I think that I’m going try and make the Vapir III work. It’s ½” wider and 4” longer than the Bantam, but it has the following advantages:
- 18% larger A/C coil
- Dash vents come out side vs. top
- 4 vs. 3 dash outlets
I tried to compare the A/C capacity to the Slimline. Neither publishes numbers, but the RestoMod Air (RMA) uses a high-output, OEM-style whereas Vintage Air doesn’t. The Vapir III has a high-quality, 20” 4-row A/C coil. I haven’t taken the Slimline apart, but RMA claims that their smallest unit, the Batam II, which has an 18% smaller A/C coil that the Vapir III has more cooling capacity that Vintage Air’s largest GenIV system… who knows, but I think that it’s clear that the Vapir III should have a lot more capacity than the Slimline, which you’d expect given the price point.
I do like the controls available for the unit, much better looking options than what has come before. Where are the AC / Heater hookups for the units? Can you post pictures from various sides? Is the idea to just poke the ducting connector section up through the footbox or will it have to be the whole top of the unit?
Would have been nice to have had this option back in the good old days (5 years ago)
Would have been nice to have had this option back in the good old days (5 years ago)
Scott
Lifetime Supporter
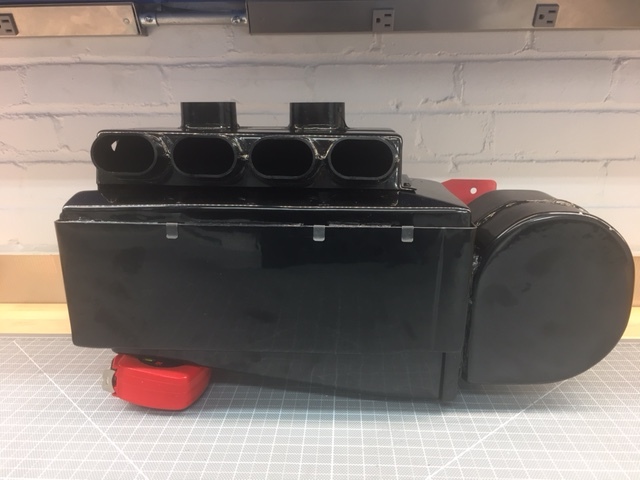
Mesa, I’m pretty sure that I’m going to have to cut a hole for the whole thing through the top of the footbox. Unfortunately, the mocking case doesn’t come with heating and A/C connections. Below is a picture from their website. Note at all four of the connections exit the case above the motor which should work pretty well. I need to get the dash installed and the center body section back on to check how much room I have. above the foot box.
Scott
Lifetime Supporter
Ken,
I know you did a lot of research on intercooler pumps. My engine came with a GM 22901367. Do you have any thoughts on it?
I know you did a lot of research on intercooler pumps. My engine came with a GM 22901367. Do you have any thoughts on it?
Ken Roberts
Supporter
That pump is not too bad (middle of the road). It is the stock intercooler pump on the ZL1 Camaro and C7 Z06 Corvette. The ZL1 uses a 10amp fuse with it while the C7 Z06 Corvette uses a 15amp fuse. When connecting it up.....pin #1 and #5 get ignition voltage and pin #4 is the ground. A pigtail can be purchased from GM as part #19300589. If you want to build your own mating connector like I do then here are the part numbers purchased from Mouser Electronics:
Housing-478-9408621 (1 required)
pin-478-32125734120000 (3 required)
Seal-571-967067-1 (3 required)
Plug-571-967056-1 (2 required).
Here is a schematic for it:
http://www.revbase.com/BBBMotor/Wd/DownloadPdf?id=1113501
The one to stay away from is the most popular pump typically known as the Bosch pump. It's cheap and average in performance. Adequate for up to 500hp or so. It was used by Ford on earlier Mustangs and trucks with superchargers and some supercharged GM vehicles.
The one that I use is the most sought after. The ZR1 pump flows really well but unfortunately is north of $1000 if purchased new. Used ones get scooped up quickly on the corvette forum for $275 to $350. It's highly sought after by the Cadillac tuning crowd. It is made by Pierburg.
Pierburg has some newer pumps that are used in the top of the line Mustangs and Audi, BMW and Mercedes line called a CWA 50. The Ford model of this is the one that has the best clocking. #DR3Z-8501-A. These pumps perform better than the ZL1 pump but slighly less than the ZR1 model. These are quickly becoming the most popular. They offer a higher flowing model too known as the CWA 100.2
If you are considering mounting the intercooler rad in the nose than you will want one that flows very well. Also if you are in the 700 to 800hp range a high flow pump is desirable and the largest reservoir tank you can fit. All the "Big Boys" go with the EMP Stewart pump sold by Lingenfelter. Just be aware when wiring it up that it draws up to 25amps.
Stewart EMP High Volume Intercooler Pump 25 Amp: Lingenfelter Performance Engineering
Use the largest reservoir tank you can fit and keep all hose sizing to a minimum 3/4" with as little bends as possible for the best flow and coolant temperature recovery.
Here is a great write up done by Lingenfelter comparing pumps. Very informative!
Intercooler pump flow testing results - Lingenfelter Performance Engineering Forum
Last edited:
Scott
Lifetime Supporter
Ken, that's very helpful. Looks like I'm going to upgrade my pump. You mentioned that I should get the biggest reservoir that I could fit. I know that I'll need some form of reservoir/expansion tank, but I would think that a big aluminum tank in most places in the SL-C would just get heat soaked. The supercharger doesn't come with any instructions with regards to sizing so I'm wondering want you think the minimum and biggest reasonable sizes are.
Ken Roberts
Supporter
As a minimum Scott I would use a 1 1/2gal tank. The larger the tank the longer it takes to get heat soaked. A faster recovery is the benefit .The tank can be any shape. Just don't mount it higher than the fill port. It can be mounted down low. Just use the Cadillac remote fill port like this one.....


Last edited:
Similar threads
- Replies
- 10
- Views
- 10K
- Replies
- 4
- Views
- 5K