Oh. I have an RCR. Not sure about yours.

You are using an out of date browser. It may not display this or other websites correctly.
You should upgrade or use an alternative browser.
You should upgrade or use an alternative browser.
Sean Starkey
Lifetime Supporter
Hello
Now for the age old question, what are you going to do for fuel pumps? I'm also interesting in what sort of padding if any you will be using around the tanks.
Gale
Hi Gale,
I was going to wait to post until I finished the fuel pump installation, I am using Aeromotive Low pressure pumps to a surge tank. From the surge tank is TBD, but likely a 044 type with return style regulator back to surge tank.
I don't have any plans for foam around the fuel tanks. The seem very secure the way I have them bolted in.
Sean
Attachments
Hi Sean I just ordered an RCR gt40 about a week ago I am a body man by trade. I was following your thread to get some ideas on how to go forward with my build. I will be using a 351/427 set up as well. I ordered a G96/01 transaxle from RCR but may change my mind after doing a bit of research. I have been admiring your fabrication skills and attention to details. I learned quite a bit more as to what is involved in these builds. RCR estimates 7-8 months for delivery of my GT40. Did it take about a year before your GT40 was delivered? I chose to have them set up the hinges and latches as I am not getting any younger and wanted to save a few hours on my build. I am looking into a new ZF transmission from RBT to also save some fabrication work. I wish you all the best on your build, it's looking really good so far I will be following your progress.Hi Gale,
I was going to wait to post until I finished the fuel pump installation, I am using Aeromotive Low pressure pumps to a surge tank. From the surge tank is TBD, but likely a 044 type with return style regulator back to surge tank.
I don't have any plans for foam around the fuel tanks. The seem very secure the way I have them bolted in.
Sean
Sean Starkey
Lifetime Supporter
PM Sent.Hi Sean I just ordered an RCR gt40 about a week ago I am a body man by trade. I was following your thread to get some ideas on how to go forward with my build. I will be using a 351/427 set up as well. I ordered a G96/01 transaxle from RCR but may change my mind after doing a bit of research. I have been admiring your fabrication skills and attention to details. I learned quite a bit more as to what is involved in these builds. RCR estimates 7-8 months for delivery of my GT40. Did it take about a year before your GT40 was delivered? I chose to have them set up the hinges and latches as I am not getting any younger and wanted to save a few hours on my build. I am looking into a new ZF transmission from RBT to also save some fabrication work. I wish you all the best on your build, it's looking really good so far I will be following your progress.
Hi Sean, I am in the process of purchasing or having a lift built and was wondering if the size of the lift platform that you built worked out well and according to your build plans I think the lift platform was 40" x 92". If I were to find a lift already built is there a size range I need to look for? I remember reading that you had trouble finding one already built. Thanks, VinnyLift is looking and working great. Still need to put the dark blue stripes and maybe get some Gulf stickers for it. Just got to wait for the car to put on it now.
Sean Starkey
Lifetime Supporter
Hi Sean, I am in the process of purchasing or having a lift built and was wondering if the size of the lift platform that you built worked out well and according to your build plans I think the lift platform was 40" x 92". If I were to find a lift already built is there a size range I need to look for? I remember reading that you had trouble finding one already built. Thanks, Vinny
Hi Vinny,
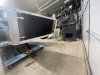
The lift did work out well. If I were to change anything, it would be to shorten it to around 80". There are 2 reasons for this.
1. This is my biggest reason to want it shorter. It would allow you to have the car off centered more on the lift. As it is now you have to align it pretty close to keep the lower control arms off of it front and back. Making it 2" narrower would work for this too.
2. With the engine installed it sets slightly uneven due to the weight. Its not skewed enough to have me worried, but I would like it to sit level. I think if it were shorter there would be less flex allowing the back to drop a bit.
I did find several lifts available, but the lowest profile one that I found were around 5" which wouldn't allow me to set it all the way on the ground to quickly adjust the suspension. The lifts I found with the low profile didn't have casters on the either, the casters were a must for me as i want to be able to push the car out of the way if I need to work on something else in the garage.
Hope this helps,
Sean
Hi Sean, I appreciate the information it's a great help. I see your build is coming out quite well, great job on the headers and fabrication work.Hi Vinny,
The lift did work out well. If I were to change anything, it would be to shorten it to around 80". There are 2 reasons for this.
1. This is my biggest reason to want it shorter. It would allow you to have the car off centered more on the lift. As it is now you have to align it pretty close to keep the lower control arms off of it front and back. Making it 2" narrower would work for this too.
2. With the engine installed it sets slightly uneven due to the weight. Its not skewed enough to have me worried, but I would like it to sit level. I think if it were shorter there would be less flex allowing the back to drop a bit.
I did find several lifts available, but the lowest profile one that I found were around 5" which wouldn't allow me to set it all the way on the ground to quickly adjust the suspension. The lifts I found with the low profile didn't have casters on the either, the casters were a must for me as i want to be able to push the car out of the way if I need to work on something else in the garage.
Hope this helps,
Sean
Thanks,
Vinny
Sean Starkey
Lifetime Supporter
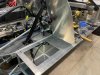
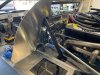
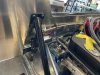
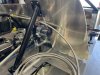
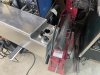
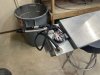
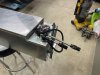
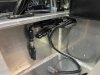
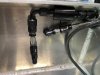
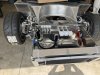
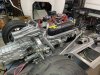
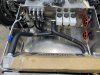
After a lot of trial and error, The fuel system is complete minus a couple hose supports to keep the top hoses in order.
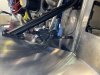
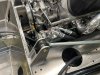
I decided to use the passenger tank to feed the surge tank and then return fuel back to the passenger tank. I welded a bung in the tank to accept the returning fuel. I have the pump from the driver side tank run into the surge tank as well to allow fuel to transfer from that tank to the passenger tank. I will set up a switch to run one or the other to allow me to fill the passenger tank when it begins to run low. Both pumps have check valves and 100 micron filters mounted on the suction side between the tank and the pump.
I just realized I didnt plumb in the 10 micron filter after the 044 pump. m-) At least that on should be easy to fix.
Attachments
-
 IMG_6722.jpg423.8 KB · Views: 678
 -
 IMG_6723.jpg346.3 KB · Views: 679
 -
 IMG_6724.jpg321.3 KB · Views: 646
 -
 IMG_6726.jpg446.6 KB · Views: 634
 -
 IMG_6756.jpg580.9 KB · Views: 641
 -
 IMG_6757.jpg569.4 KB · Views: 660
 -
 IMG_6758.jpg487 KB · Views: 640
 -
 IMG_6760.jpg411.4 KB · Views: 649
 -
 IMG_6762.jpg486 KB · Views: 700
Sean Starkey
Lifetime Supporter
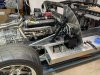
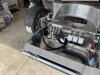
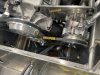
I finalized the installation of the condenser. I was having trouble finding fasteners to secure it in an easy way that I liked. I decided to weld 1/2" aluminum bar in the mounts and tap them, this made for a much easier installation.
Just a heads up to anyone that plans to use a single and duel snorkel for the front. running the A/C lines require a lot of patience. The 2 require very different routing of the lines. The single snorkel is much wider, hence I made my fitment for it and found the dual snorkel set further back. After several A/C lines later, I found a setup that will work for both.
Just a heads up to anyone that plans to use a single and duel snorkel for the front. running the A/C lines require a lot of patience. The 2 require very different routing of the lines. The single snorkel is much wider, hence I made my fitment for it and found the dual snorkel set further back. After several A/C lines later, I found a setup that will work for both.
Attachments

Sean Starkey
Lifetime Supporter
Hi Paul,
Yes mine clears as of now. I am going to try to either move the radiator up a bit or modify the single snorkel so the fans fit in the opening a bit better. That hose will determine which route I take.
Sean
Yes mine clears as of now. I am going to try to either move the radiator up a bit or modify the single snorkel so the fans fit in the opening a bit better. That hose will determine which route I take.
Sean
Looks great.. these photos helped me. I see the threaded block that you welded to the back side of the gas tank. I didn‘t think about going 90 degrees from the top. I cut some of the panel above the tank to get access later. How are you fastening the front of the tank? SAfter a lot of trial and error, The fuel system is complete minus a couple hose supports to keep the top hoses in order.
I decided to use the passenger tank to feed the surge tank and then return fuel back to the passenger tank. I welded a bung in the tank to accept the returning fuel. I have the pump from the driver side tank run into the surge tank as well to allow fuel to transfer from that tank to the passenger tank. I will set up a switch to run one or the other to allow me to fill the passenger tank when it begins to run low. Both pumps have check valves and 100 micron filters mounted on the suction side between the tank and the pump.
I just realized I didnt plumb in the 10 micron filter after the 044 pump. m-) At least that on should be easy to fix.
Sean Starkey
Lifetime Supporter
Looks great.. these photos helped me. I see the threaded block that you welded to the back side of the gas tank. I didn‘t think about going 90 degrees from the top. I cut some of the panel above the tank to get access later. How are you fastening the front of the tank? S
PM Sent
Sean Starkey
Lifetime Supporter
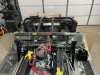
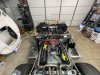
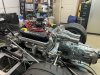
Got the headers back from ceramic coating today.
I am very happy with the job. I definitely recommend Jet-Hot High Performance Coatings
I am very happy with the job. I definitely recommend Jet-Hot High Performance Coatings
Attachments
Sean Starkey
Lifetime Supporter
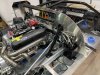
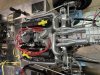
I have been working on plumbing the last couple weeks. I found a setup I like for the thermostat housing. I was also able to run the lines for the heater core through the spinal column.
Attachments

Looks awesome! Beautiful job on the snakes!Got the headers back from ceramic coating today.
I am very happy with the job. I definitely recommend Jet-Hot High Performance Coatings
Sean Starkey
Lifetime Supporter
Looks awesome! Beautiful job on the snakes!
Thanks Vinny,
I couldn't be happier with the way they turned out.
Sean
Similar threads
- Replies
- 0
- Views
- 439
- Replies
- 46
- Views
- 8K