McLaren M20#73

Back now...I caught a virus that stuffed me for 6 weeks, hence very little was done in that period, but into it again.

A long block Dart 427 SHP LS Pro next power adder engine was ordered a couple of months back, I wanted 1/2” head studs and Dart won’t be manufacturing any till mid May, so I’ve had to wait. (nearly there :) and if you jokers in the States think prices are a bit steep.....to get the parts down here to NZ, we basically double the US price. A crap NZ dollar (thanks Labour Govt). Extortion for freight, then 15% GST on the lot plus a bit more cause they can. I’m better now...

A change in tack on the Power adder. Was going to do turbos, but I'm just impressed with Prochargers due to their simplicity and power. A forward facing Procharger F1A94 with no intercooler, on a 10 rib belt. Plenty.

An Aviaid LS-D 4 stage dry sump kit was also ordered and is currently jetting it’s way to me...

I’ve just completed tacking all the front a-arms, springs and brackets and is ready to get professionally welded. I would normally do the A-Arms but welcome to the the modern NZ where Regulation rules. The Fuel tank and Roll Hoop will also follow suite when ready.

Just working out the dimensions for the Titan steering rack, should be able to order that next week.

That’s all for now.
Andrew.
 

Attachments

  • 20190509_160418_resized.jpg
    20190509_160418_resized.jpg
    219.2 KB · Views: 915
  • 20190509_160110_resized.jpg
    20190509_160110_resized.jpg
    210.9 KB · Views: 998
Last edited:
...A change in tack on the Power adder. Was going to do turbos, but I'm just impressed with Prochargers due to their simplicity and power. A forward facing Procharger F1A94 with no intercooler, on a 10 rib belt. Plenty.

It'll be more progressive in its torque delivery with that set-up too - probably a significant benefit when trying to harness that much power in a road racing application. Looking awesome. Cheers, Andrew
 
One step forward, one back..
The LS427 is on its way from NY -> CA. Then will be shipped to Wellington. I'm betting a month at least.
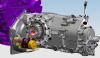
The Aviaid LS-D Dry sump has turned up, nice..

Having a few issues with the engine flywheel. I got the dry sump bellhousing from Albins which is designed for the 104T 10.44" flywheel and 7.25" clutch. This drops engine and Transaxle down low which is what I wanted. Only problem is Tilton don't make a 104T 10.44" flywheel and starter for a 8 bolt LSX style crank bolt pattern. The Tilton flywheel#51-4479 153T 12.75" and Super starter #54-40012 is the smallest diameter setup that might work. (looks like the setup in Wolfgangs M1) Might be contacting Albins for a replacement bellhousing but I will wait till the motor gets here and confirm. If anyone can put me onto a 104T 10.44"flywheel, 7.25" clutch and starter that will fit, I'm all ears. I can't believe I'm the first to fit this Albins ST6M setup to an LS.

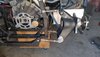
Good news, after few more conversations, it wouId appear I can weld my A-Arms, Tank and Roll hoop. As long as the MSNZ build principles are adhered to, for a track only car I should be ok. I'm happy with that.

Titan steering rack is also ordered. 5-7 weeks......
 
Got a week off now, so hopefully should get some bits done. Finish the welding on the A-arms and set that up. A digital inclamometer and laser level should be able to get the suspension pretty close.
The motors in LA waiting for the slow boat to Welly town. Looking forward to hooking that up to the transaxle.
Tyres turn up very soon, going to run Hoosiers.
Just need the Procharger and ECU/]wiring harness and that’s the major items gathered.
I do like the Fuel Tech FT550 or FT600 but once you include all sensors and harnesses it does add up. Holley Dominator EFI kit’s also in the running.... still deciding whether to run Cable or DBW Throttle body.
Andrew.
 
Last edited:
Got a week off now, so hopefully should get some bits done. Finish the welding on the A-arms and set that up. A digital inclamometer and laser level should be able to get the suspension pretty close. Might even get to rivet the front foot well cover on.
The motors in LA waiting for the slow boat to Welly town. Looking forward to hooking that up to the transaxle.
Tyres turn up very soon, going to run Hoosiers.
Just need the Procharger and ECU/]wiring harness and that’s the major items gathered.
I do like the Fuel Tech FT550 or FT600 but once you include all sensors and harnesses it does add up. Holley Dominator EFI kit’s also in the running.... still deciding whether to run Cable or DBW Throttle body.
Andrew.
Have you looked at life racing for your fuel injection?
 
if you want to go down to a 5 and a half inch i have a Tilton reverse bell housing and starter to suit the Ls, bell housing is Ls to chev 4 bolt trans pattern, this one , only changed it because the Sadev box we wound up using was slightly longer than what was there, so had to have a bell housing made a bit shorter.
cheers john
 

Attachments

  • 20161115_142811.jpg
    20161115_142811.jpg
    315.9 KB · Views: 804
Thanks for the offer John, looks nice, I already have a Tilton 7.25” 3 plate Clutch. The Albins STM6 is a 7 bolt BH to Trans design.
What diameter/Tooth flywheel does your setup use with the trans side starter. Also is it the LS 6 bolt crank pattern
What part number is the Tilton starter.
Tilton make a button flywheel for the LSX 8 bolt crank, but they don’t make a 10.25” flex plate or a engine side starter for a 10.25” 104T ring gear. I don’t want to yet go down that fabrication path just yet.
Albins make a Trans side starter bell housing but I was trying to have inboard discs’s which would get in the way of the starter. Might be the best option to have outboard disc’s and trans side starter.

Hi Rod ..I hadn’t but have now...Will send them an inquiry.

Back to the garage.. Front A-Arms nearly all welded.
 

Attachments

  • 20190529_093053_resized.jpg
    20190529_093053_resized.jpg
    179 KB · Views: 703
  • 20190529_093435_resized.jpg
    20190529_093435_resized.jpg
    201.5 KB · Views: 693
Hi Andy, the flywheel used is a 6 bolt 102 tooth part no. SKU 51-659, cant remember the part no. for the starter but its a reverse mount super starter.
An option you can use, is a 7. 25 button flywheel SKU 190-40, with a stock ring gear and starter, i have used that combo and its fine.
cheers John
 
The front A-Arms are all done. Just waiting for the Steering Rack to arrive so the front foot wheel cover can finally get some rivets smashed.
Work continues on the fuel tanks. Baffles and trap doors, getting closer to putting the tops on the side pods.
Hoosiers are here. 26/16.2/15 Rears, 23/10.5/15 Fronts. R35B. Looking forward to mount on rims.
Randy meet the 427 that will exhaust a twin 255 lph pump. Hoping it will be bullet proof.
Went with Shafiroff LS 427 power adder Stage III.
Deleted the oil pump and sump as I’ve got the Aviaid LS-D 4 stage dry sump.
Exciting times, keeping at it. Hoping to be close by the end of the year. Andrew.
 

Attachments

  • 20190621_154439_resized_2.jpg
    20190621_154439_resized_2.jpg
    212.3 KB · Views: 689
  • 20190621_154516_resized_1.jpg
    20190621_154516_resized_1.jpg
    214.3 KB · Views: 669
  • 20190701_160953_resized.jpg
    20190701_160953_resized.jpg
    203 KB · Views: 677
  • 20190701_161154_resized.jpg
    20190701_161154_resized.jpg
    205 KB · Views: 678
  • 20190701_161319_resized.jpg
    20190701_161319_resized.jpg
    201.5 KB · Views: 721
Andy, have to say your level of workmanship is right up there, a fantastic build that you must be proud of.
Cheers
Russell
 
Finished 1 tank, it has 4 - one way hinges and baffling to trap fuel at the rear of tank. All welded, pressure leak tested and ready for the side pod to be riveted on.
The Steering rack arrived, less the rubber gaiters and mount brackets, so that took another 10 days for them to arrive.
Still a bit more trimming needed to get the rack in the position it needs to be.
Starting to get the steering wheel, gear shifter and foot controls in a position I like. Feels comfortable sitting in it.
Have been in contact with Albins re the Bell housing. We’ll see were that takes us...
 

Attachments

  • 20190708_143902_resized_1.jpg
    20190708_143902_resized_1.jpg
    164.4 KB · Views: 559
  • 20190709_170236_resized_1.jpg
    20190709_170236_resized_1.jpg
    147.3 KB · Views: 546
  • 20190729_155928_resized.jpg
    20190729_155928_resized.jpg
    137.7 KB · Views: 564
  • 20190719_113640_resized_2.jpg
    20190719_113640_resized_2.jpg
    176.6 KB · Views: 512
  • 20190729_172133_resized.jpg
    20190729_172133_resized.jpg
    212 KB · Views: 611
  • 20190729_171637_resized.jpg
    20190729_171637_resized.jpg
    242.6 KB · Views: 647
Finally got the left tank in and sidepod cover all riveted up. I coated the inside panels with a clear marine coating called Nyalic to seal the aluminium.
A Holley Fuel cell EFI Pump Dual 450lph is installed. (gasps... yes I will use the smaller 250 dual on the other side. I bought the bigger pump as who knows if E85 is in the future) Pumps can be sequentially run with EFI system. Will mainly run on 98 octane pump gas.
Waiting for the Woodward steering column and universal to connect to the rack.
Now onto the right side tank, the second one is always quicker...hopefully.
 

Attachments

  • M20-41 Sidepod left.jpg
    M20-41 Sidepod left.jpg
    220 KB · Views: 639

Terry Oxandale

Skinny Man
Question: Hard to tell from the photos, but curious on how the tank is assembled in respect to the sidepod/sidepod cover? Are there two flanges, one for the tank/black item, and then another for tank/sidepod cover? Wondering what/where the seals/sealant is used for future disassembly and/or access to inside of the tank, or for tank removal.

Great job on this project!

Terry
 
Hi Terry,
The intank pump and inspection flange all unbolt easily.
The Holley intank pump flange housing(black) sandwiches a cork gasket and the tank inspection flange
between a solid steel base flange. Bolted in with 12 cap screws and nylon sealing washers.
All in the Holley intank kit.
The side pod cover oval hole is cut exactly the same as the tank hole and drum sanded so when
bolted together they looks like 1 piece.
The Tank inspection flange is 4mm aluminum 5086, this slides in the tank and sandwiches a paper gasket
to the inside of the tank and is bolted with 14 x M8 domed SS316 bolts with nylok nuts and
nylon washers so it wont leak through the threads. There's no sealant needed.
As for taking the tank out again.....I think it can just stay were it is for some time.
It would require drilling out 150 odd rivets softening the glue with some thinners(MEK) and removing the lid.
I'll add some more pics later
 
Left fuel tank (Main fuel supply) has high pressure 12AN feed and 10AN return. Also has the Jazz 12AN breather/rollover and 12AN feed from reserve tank.
I wont need a swirl tank, just a filter on the feed and pressure regulator on the return.
Steering shaft and universal has also shown up.
 

Attachments

  • M20-44 Tank.jpg
    M20-44 Tank.jpg
    201.1 KB · Views: 550
  • M20-43 Steering.jpg
    M20-43 Steering.jpg
    178 KB · Views: 583
The right side pod is all done, tank and pump installed, all riveted up.
The steering rack and foot pedals are next, then finally the front foot well cover can be riveted in, then dash.
I couldn’t resist putting the motor on the table and bolting up the transaxle.
There’s 300mm in front of the motor to play with, the bellhousing is only 100mm long, original had 200mm housing, to much dicking about, and cost to extend the same with minimal benefit, More room to mount Centrifugal super charger and pipe work.
The ProCharger is on its merry way, be here in a couple of weeks via the freight forwarder.
Chipping away. Andrew
 

Attachments

  • 20190829_152146_resized_1.jpg
    20190829_152146_resized_1.jpg
    213.6 KB · Views: 526
  • 20190829_152348_resized_1.jpg
    20190829_152348_resized_1.jpg
    209.8 KB · Views: 568
  • 20190829_152031_resized_1.jpg
    20190829_152031_resized_1.jpg
    214.9 KB · Views: 543
Well I'm a year plus now, things have progressed slowly but steadily. The Steering geometry took sometime to get where I am happy with, but is done.
The front footwell cover is ready for the final rivet. The dash has a couple more folds and brackets to complete.
The super charger, tensioner, idler pulley, race valve and a couple of different sized blower pulleys are all here. I will make a custom front engine plate from 20mm aluminium to mount super charger and accessories to.
Holley 120lb fuel injectors are inplace and the 105mm mono blade Throttle Body is mounted via a custom mount plate. I foolishly thought the Holley 105mm TB would just fit Holley 105mm Hi Ram manifold....not so. Fuel reg and filter also turned up.
Albins have designed a new bellhousing that uses Tilton 52 series flywheel. 7.25" clutch. Stepped 3 plate and trans side starter, they have been great. Which will mean wheel mounted discs, not inboard. Keeping at it and all the other things.
Andrew.
 

Attachments

  • 20191029_174506.jpg
    20191029_174506.jpg
    329.6 KB · Views: 484
  • 20191029_174319.jpg
    20191029_174319.jpg
    304.1 KB · Views: 526
  • image001(1).png
    image001(1).png
    366.4 KB · Views: 550
Back
Top