Keith Baker's Southern gt on the build

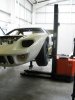
SGT are in the process of manuafcturing body catches which will take a few weeks to complete, so I have decided to wait for them.
You ideally need all the catches,rubbers,locks etc to be fitted at the same time so it all comes together so I need to forget the body and carry on with something else.There's plenty to do.
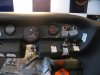
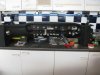
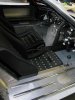
I now have to alter the dashboard to comply with IVA.
All this 127 mm radius around the steering wheel lark.
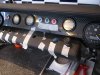
Originally I was going to use modern IVA compliant switches and buttons but have since decided to use original style Lucas switches.
I will keep the SPA dual digital gauges as there compact and smart looking.
I will have to make a panel nearer to the steering wheel to accept the switches and of course these will stay on the car after IVA. ????
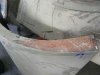
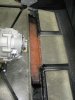
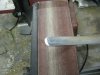
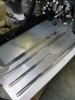
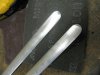
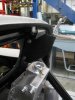
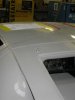
I fitted the IVA compliant rear seat belt bracket that puts the anchor points in the right places also fitted the front deck Zeus fasteners although they will need to removed at a later date for polishing.
 
Keith,
PM me and I'll take you through another 'period' option you might want to consider for the washers etc

Also, I am going to fiddle with the loom slightly, and go all Volvo on the lights and have the side lights on permanent - that way I can eliminate 1 switch as well...


Brett
 
I was thinking of ditching the Big mother V8 and fitting a Toyota Prickarse hybrid
that way I can eliminate fuel

You shouldn't fiddle with your loom Brett, it will make you go blind

What about the battery, with everyday motoring do you think it will keep a good charge ?
Keith
 
Keith,

Just wanted to say reading this thread is a pleasure, Mick at Southern GT really does have a nice package ...i have one or two of his bits on my build + your attention to detail is bringing th GT together real nice.

If you could just slow the build down by a few years tho , I think Brett and I would be much happier ....give us a chance to catch up !

PS ....post more pics !

Cheers

karl
 
Keith,
longer term the sidelights will be run using LED bulbs, so it will take miminal charge.

I enjoy fiddling (damn done the double entendre again), and is a necessity. See my PM on the wiper bit as to why. Also, I am fitting electric mirrors, and will only have one fuel guauge, so a slight bit of modification is required - don't worry, I will be checking everyhting with Adam first though!
 
Good to hear from you Karl
I wouldn't know if Mick has a good package I have never looked and dont wish too !
Can't slow down, I'm getting older by the day and dont want to be dead before it gets finished.


Brett, you just keep fiddling
 
Tommorrow I intend to repair some of the digs and dents in the body, Originally the body was pre fitted on a GTD chassis so a few bits were chopped and cut about. Also at the bottom of the rear deck I had removed a small piece of fibreglass to clear the gearbox which was to be a G50 porker.
Having changed a bit I need to replace the section.
As you can see in earlier pictures the passenger cill is about 20mm longer and this will be cut and made to fit correctly.Some small blow holes in the gel coat will be made good.
Pictures to follow.
 
Well today I did repair the cill and a few bits as well.
The cill was actually 12mm longer than the other cill and now it aligns with the car just so.
 

Attachments

  • web aug 20 (3).jpg
    web aug 20 (3).jpg
    61.5 KB · Views: 646
  • web aug 20 (6).jpg
    web aug 20 (6).jpg
    118.3 KB · Views: 615
  • web aug 20 (9).jpg
    web aug 20 (9).jpg
    125 KB · Views: 613
  • web aug 20 (13).jpg
    web aug 20 (13).jpg
    240.1 KB · Views: 672
Next stage after fully set was to cut the 12mm oversized section out.
The final shape and finish will be later.
The lower section of the rear deck was also repaired and the incorrectly drilled holes filled.
 

Attachments

  • web aug 20 (21).jpg
    web aug 20 (21).jpg
    87 KB · Views: 632
  • web aug 20 (23).jpg
    web aug 20 (23).jpg
    160.6 KB · Views: 642
  • web aug 20 (31).jpg
    web aug 20 (31).jpg
    101 KB · Views: 661
By the way, If your lucky enough to have a fork lift you can use it to lift the car to a suitable working height.
Saves the back a bit.
 

Attachments

  • web aug 20 (26).jpg
    web aug 20 (26).jpg
    83.2 KB · Views: 578
I first saw these cill strips on an Glenn Masons 40 down at SGT and wanted to fit them. I know there stick on but they add that little extra bit to the final look.
You buy the ally strips, cut to size, shape the ends and stick them down with something like sikafex 227 and there down for good.
At this point in time I have only done the drivers side and wont stick them down until I'm happy with the position of the cills.
I shaped them with a belt sander, finished them of with 240 grade wet and dry then 600 grade, then a rub down with scotchbrite fine and ultrafine. Finally Autosol and on the buff machine.
They will get a final buffing before I stick um but the result is super.
 

Attachments

  • web aug 20 (38).jpg
    web aug 20 (38).jpg
    214.3 KB · Views: 658
  • web aug 20 (42).jpg
    web aug 20 (42).jpg
    232.7 KB · Views: 634
  • web aug 20 (51).jpg
    web aug 20 (51).jpg
    99 KB · Views: 751
  • web aug 20 (55).jpg
    web aug 20 (55).jpg
    98.2 KB · Views: 735
I have decided to fit rear body pins as I feel safer on the circuit with these.
Of course there not acceptable for IVA test but I when I make the outer body pin covers I will make a set of blanking cover plates for the holes, this will sought the IVA.
Had to alter the plate from SGT to miss the inner section by putting a small offset in the plate, this was on both sides.
Fixing through the ally plate and directly into the steel structure of the chassis with 8mm bolts.
You can set the pins up so that there centrally positioned in the body making it cosmetically correct.
New ally plates will be made to smarten it after paint stage.
May get the black plates chromed.

Plates and pins available from Mick @ SGT
 

Attachments

  • web aug 20 b .jpg
    web aug 20 b .jpg
    80.1 KB · Views: 778
  • web aug 20 a .jpg
    web aug 20 a .jpg
    57.4 KB · Views: 700
I first saw these cill strips on an Glenn Masons 40 down at SGT and wanted to fit them. I know there stick on but they add that little extra bit to the final look.
You buy the ally strips, cut to size, shape the ends and stick them down with something like sikafex 227 and there down for good.
At this point in time I have only done the drivers side and wont stick them down until I'm happy with the position of the cills.
I shaped them with a belt sander, finished them of with 240 grade wet and dry then 600 grade, then a rub down with scotchbrite fine and ultrafine. Finally Autosol and on the buff machine.
They will get a final buffing before I stick um but the result is super.
nice to see that Keith, I also saw such stuf on this website, but they pressed it into the alu sheet I think? see picture 35 and more when painted some pictures further>> it looks nice.

Gelscoe Motorsport - CHASSIS 4 GEL 004
 
Hello Keith. Long time no see. Excellent work rate. And eye for detail too. Just to add, i now make that sill shorter on the passenger side :)
 
Hi lee,
Thanks for that info, too late for me though i'm afraid, the cill has been butchered... In a nice way.
Good to hear from you though, Considering a carbon rear section, and probably will go for that next year.
Maybe I'll build another 40 I have a couple of months free next year !
Keep up the good work.
 
Hi Rene, It would be nice to have the recesses pressed into the sheet, it would be more authentic and of course add some strength.
But cosmetically nobody will know difference as the strips will eventually be blended in with the sheet.
 
Told the wife I wasn't working on the car on Sunday, so we went shopping "briefly" and then enjoyed the sun in the garden. Later in the day she went for a snooze and I slipped into the garage where I just happened to have the dashboard which needs work on it.
Well rather than being bored I set to it and modified switch holes, added a few more and pondered over the IVA.
God rested on the 7th days but he was a pussy !
 

Attachments

  • web aug 21 (4).jpg
    web aug 21 (4).jpg
    169 KB · Views: 795
  • web aug 21 (17).jpg
    web aug 21 (17).jpg
    146.6 KB · Views: 747
  • web aug 21.jpg
    web aug 21.jpg
    219.4 KB · Views: 789
Hi Keith, are you keeping any sort of record as to how many hours you have spent so far, judging by the timing of some of your posts you never sleep ! Superb job - keep it up, Frank
 
Hi Frank, Honestly only Saturdays 8 am ish to about 7 pm ish
and one evening a week for about 4 hours.
And of course 3 hours this Sunday.
The post times are wierd sometimes it tells me it's the middle of the night and it cant be as I'm asleep !!!

I dont stop during the day only to take breath
 
Keith, no offence meant but I don't find it logical to replicate the originals to the point of totally fake stick-on strips on the sills, then upgrade to a modern dashboard detail with carbon-fibre panel and digital gauges.
Why not just stick quiet, comfortable (insulating) and attractive carpet on the sills? Notwithstanding, your build and workmanship are inspirational; please keep posting.
 
Back
Top