M20 Dreaming

Terry Oxandale

Skinny Man
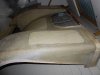
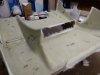
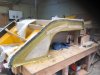
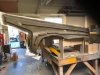
Thanks Terry, Heat hasn't been an issue so far but I will put a frame around the molds so they can sit on the floor and stay square when I lay up the body panels. I have put strengtheners the length of the fin and through the length of the fender so that should keep that stiff I'll put some photos up and you guys can tell me if I'm on the right track.
More interested to know how thick the mold needs to be, I only have 225g shopped strand and 12 layers thick at this point, How much more do I need to go???

We go by ounce (e.g. 2 ounce mat), so 225g would seem to be some pretty heavy stuff, and at 12 layers, I would think you've got a pretty rigid mold. Guessing your somewhere in the 10-12mm range on thickness, which would be pretty rigid, especially with the proper bracing/reinforcement.
 
IIRC its not that simple, apparently 2oz might be per sq foot for csm & per yard for weave in USA whereas 225g is per sq meter everywhere else.
 
Last edited:
Leon
As per my phone call, I use scales and weigh out my resin in yoghurt containers....eat lotsa yoghurt. That way you know exactly what you are dealing with and I always weigh out the same amount, often have a row of pre weighed amounts and then I use a syringe to measure out the hardner exactly. The mold is constructed mainly with 3 layers of 450gram chopped strand mat and I put on a fourth layer with the white 2 or 3mm filler matt that really holds its shape. Yes outside edges are tricky so always pre wet them and tear up some cloth, you can even fold it as encouragment, do these tight spots first when you start molding so that by the time you get there with the bulk sheeting, those corners have really gone jelly like and you will have whacked them into submission a few times. When you are doing tight corners on the final mold, using the very thin tissue cloth first, even chuck a few layers of that in because it will go into impossibly tight corners. Roll your first laminate with the grooved roller and then use a 100mm fluffy roller for the resin application and cloth placement as it melds the cloth together. Tear the cloth sheets when making the final body patterns and the joins will also be invisable. I have put small returns on most of the mold to add a little strength to the shape along with strengthening gussets and a steel tube across the top of the gaurds. There is also quite a lot of fuss in doing gel coat, and waiting for the correct cure before laminating. The idea of the gel coat is to prevent print thru of the cloth. I feel that as we are going to epoxy under coat before we do any paint work, why not just use thin tissue cloth first and then lay in the chopped strand matt. My first car was done this way and the surface is perfect with no print thru...certainly a lot less hassle.
When the temp is lower, correct hardener ratio is very important, along with only mixing smaller quantities 3 to 400 grams as there is less heat build up in the bulk mixed. If it starts to gel up whilst laminating, just spread it out on you laminating area and you can still work it for a lot longer. Do not crank up the heat until you have completed your laminating.
Hope that`s some help.
 

Attachments

  • DSCN3740.JPG
    DSCN3740.JPG
    190.8 KB · Views: 412
  • DSCN3742.JPG
    DSCN3742.JPG
    192.2 KB · Views: 422
  • DSCN3739.JPG
    DSCN3739.JPG
    185.8 KB · Views: 375
  • DSCN3607.JPG
    DSCN3607.JPG
    189.8 KB · Views: 364
Leon
As per my phone call, I use scales and weigh out my resin in yoghurt containers....eat lotsa yoghurt. That way you know exactly what you are dealing with and I always weigh out the same amount, often have a row of pre weighed amounts and the I use a syringe to measure out the hardner exactly. The mold is constructed mainly with 3 layers of 450gram chopped strand mat and put on a fourth layer with the white 2 or 3mm filler matt that really holds its shape. Yes outside edges are tricky so always pre wet and tear up some cloth and you can even fold it as encouragment, do these tight spots first when you start molding so that by the time you get there with the bulk sheeting, those corners have really gone jelly like and you will have whacked them into submission a few times. When you are doing tight corners on the final mold, using the very thin tissue cloth first, even chuck a few layers of that in because it will go into impossibly tight corners. Roll you first with the grooved roller and then use a 100mm fluffy roller for the resin application as it melds the cloth together. Tear the cloth sheets when making the final body and the joins will also be invisable. I have put small returns on most of the mold to add a little strength to the shape along with strengthening gussets and a steel tube across the top of the gaurds. There is also quite a lot of fuss in doing gel coat, and waiting for the correct cure before laminating. The idea of the gel coat is to prevent print thru of the cloth. I feel that as we are going to epoxy under coat before we do any paint work, why not just use thin tissue cloth first and the lay in the chopped strand matt. My first car was done this way and the surface is perfect with no print thru...certainly a lot less hassle.
When the temp is lower, correct hardener ration is very important, along with only mixing smaller quantities 3 to 400 grams as there is less heat build up in the bulk mixed. If it starts to gel up whilst laminating, just spread it out on you laminating area and you can still work it for a lot longer. Do not crank up the heat until you have completed your laminating.
Hope that`s some help.
 
Hi Russell,

I have received my new resin and continued laying up today with much improved results, i have ordered some of the mat which should be here tomorrow so it will be full steam ahead. I have tacked up my 180 deg exhaust system which I will refit and final weld hopefully tomorrow. I'll get some photos up asap.

thanks for all your help. Cheers Leon.
 
Well guys i have removed the 2 rear fender molds and to say they popped off would be a real stretch, I beat the crap out of them and levered them off with a crow bar at which point they did come off with most of the plug attached so after a couple of hours with a hammer and a scraper I got them cleaned up and to my absolute amazement they are undamaged!! that gel coat is hard stuff. So i'm just guessing but we may have had a waxing issue, that said the front fenders appear at this stage like they will play the game much better, we will see in a few days. the headers are looking good they did pull a bit so some adjustment is required but they are going to be very cool I think. Here are some pics. Cheers Leon
 

Attachments

  • 31306798_1703148809777342_7087265078617047040_n.jpg
    31306798_1703148809777342_7087265078617047040_n.jpg
    139.3 KB · Views: 507
  • 31369444_1703148799777343_5594500013221740544_n.jpg
    31369444_1703148799777343_5594500013221740544_n.jpg
    131.8 KB · Views: 407
  • 31369580_1703149593110597_5817676233432891392_n.jpg
    31369580_1703149593110597_5817676233432891392_n.jpg
    153.5 KB · Views: 495
  • 31381276_1703149456443944_6804132579537584128_n.jpg
    31381276_1703149456443944_6804132579537584128_n.jpg
    169.7 KB · Views: 439
  • 31416780_1703149096443980_1360674583157407744_n.jpg
    31416780_1703149096443980_1360674583157407744_n.jpg
    173 KB · Views: 466
  • 31430055_1703149273110629_4451198213155717120_n.jpg
    31430055_1703149273110629_4451198213155717120_n.jpg
    166.8 KB · Views: 464
  • 31484889_1703149173110639_5263490147894165504_n.jpg
    31484889_1703149173110639_5263490147894165504_n.jpg
    156 KB · Views: 454
Amazing work so far, separating bodywork from the molds can be a real fight, lots of wedges, pry bars, sore hands, sweat a few choice words. I have some Lucas injection metering units and Chevy drives if your looking for some to organize your fuel delivery with. Good luck with more great progress, Bryan.
 
The mold release that I have had 100% success with is the Mcguire 8 step wax in a gold tin, apply it by rubbing it on the surface, leave until dry, polish to gloss then reapply wax. Complete this process until the correct number of coats are applied. When I molded the next body, I only applied 3 coats onto what was left and again 100% release. For the larger areas I seperated the moldings with a blast of compressed air and they almost jumped apart.
Cheers
 
Its actually called..Mcguires maximum release mold wax and its about $ 34.00 a tin and it does have an 8 on the lid of the tin.
Cheers
 
Thanks Russell, good to see you today and I hope the rest of your trip goes well. Is that wax available from Super Cheap/Repco or do you have to get it from a auto paint supplier

Cheers Leon
 
Leon, yes great to see your progress, very impressed.
I purchased it from Smits group but would think any serious car paint shop would stock it.
I am sure you will be pleased with the results.
Cheers
 
I agree using air to 'pop' the mold off is very useful, in some cases I've incorporated in fittings to attach air lines to. Probably works better than any other release method IMO.

Are you using PVA as well as wax? I hardly ever use wax so my data is a little thin in that area.

I take it those 180s will be above the rear bodywork?
 
Leon, also remember to strip your molded product with a grease and wax removing solvent before you do any repair work...you will be surprised how much wax transfers in the molding process.
Russell
 
Its actually called..Mcguires maximum release mold wax and its about $ 34.00 a tin and it does have an 8 on the lid of the tin.
Cheers
This is what I used, it is important to let the polished wax coat fully harden off before applying your next coat, so take your time building the layers up. I would leave it 6-12hrs before I gave it the next coat (but I wasn't in a hurry!)
I, like you, had parts of the buck come away with the mould. I use tooling gel (green) for my moulds.
Some say you can use the "masking tape" test to see if you have enough wax on, if it will stick to the surface you need more, if it won't then lay up.
Wax release is very dependent on surface finish, it needs to be as perfect as you can get it, flatted and polished up (if painted) I have in the past with poor quality parts just flatted them down with 1500 grit wet, let dry and waxed onto that, the wax has something to "key" too but of course the mould then produced and parts from it will have a 1500 grit finish.
PVA, I hate, never seem to get such a good finish with it and I have always had issue when using it. Once you get the hang of using wax you'll never use PVA again, I am a total wax convert, it is so rewarding just to put a small wedge in and hear a reassuring "crack" and a large parts just pops out of the mould with a lovely perfectly smooth and polished surface, you just can't beat it!!!
 

Randy V

Moderator-Admin
Staff member
Admin
Lifetime Supporter
Some really good tips in here...
It would be great if we had a thread dedicated to mold making since 98% of the cars here are replicas and may someday need body panels not readily available or exceedingly expensive...
 
Hey guys some great tips and I will take note as I'm ready now to do the top surface of the rear clip so that is the biggest single part so lots of waxing to do. the front fender sides came off much better than the rear ones so that is a good sign. we started to frame up the rear side molds so we can lay them down and know the shape won't distort, we will do the same with the fronts and I will then lay more F/G over the frames.

Rob: the exhausts will be under the body work but I will have to heat shield them.

Udo: No mufflers to start but there is a guy making them for sprint cars and he can make them as small as 4"dia, so you could put them on and it would look like straight pipes. we still have a few tracks that don't have noise restrictions.
 
I have now framed up the 4 x side fender molds so they will keep the shape when they are off the plug and being layed up for the actual body, they can sit flat on the floor which will make them easy to work and solid when bolted together.

Bryan: you have a PM.

Russell: I have purchased release wax from the guys at The Fibreglass Shop and it should be here on Tuesday so I can get the rest of the molds done. It was $34.00. some places I tried were wanting over $60 for their products.

Cheers Leon
 
Back
Top