
You are using an out of date browser. It may not display this or other websites correctly.
You should upgrade or use an alternative browser.
You should upgrade or use an alternative browser.
Rcr 40-31
- Thread starter ckouba
- Start date
Chris Kouba
Supporter
A pictoral of the other half of the bumpsteer work.
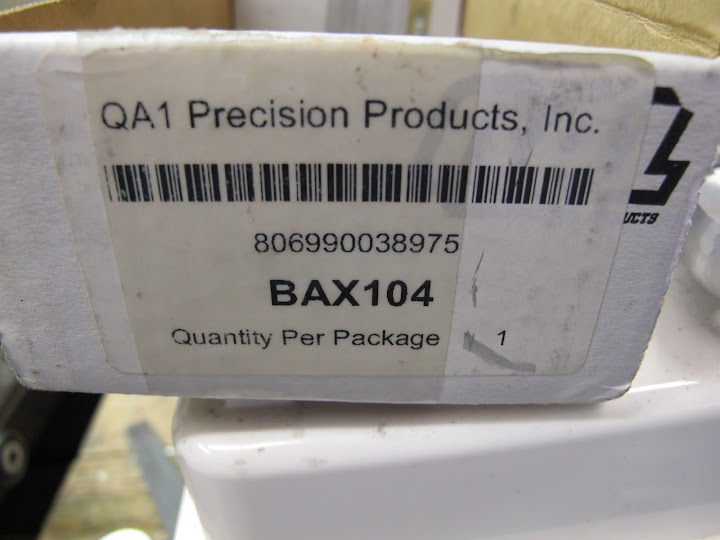
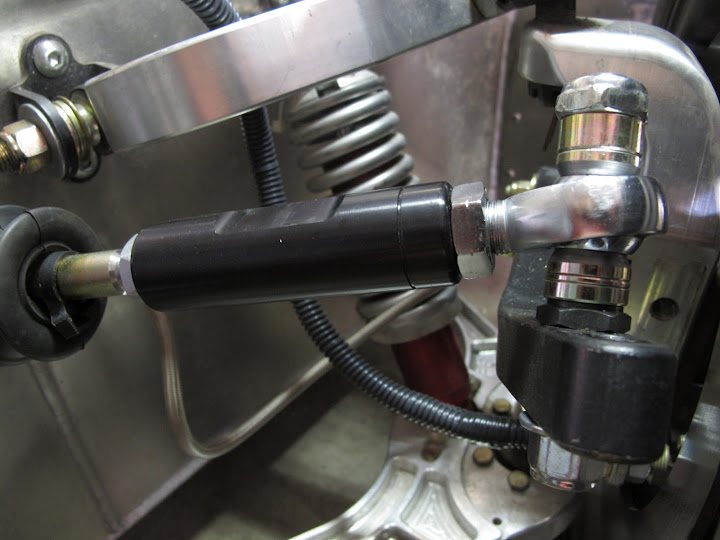
The kit:
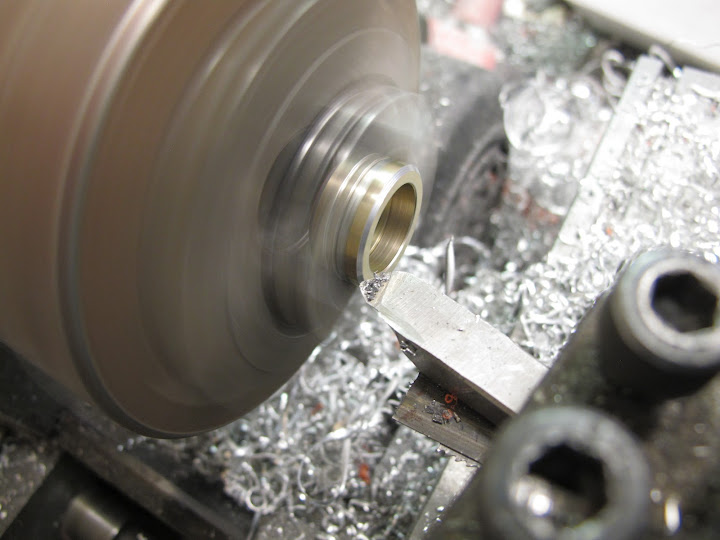
I installed the kit and noticed that it I couldn't get the compression travel out of it that I wanted with the heim at the top of the stack. I lowered it down and got it usable, but wanted to get a little more travel out of it. I threw the smallest spacers I could manage into the lathe and tapered two pairs of the them to improve their range of motion:
In the lathe:
The finished stack:

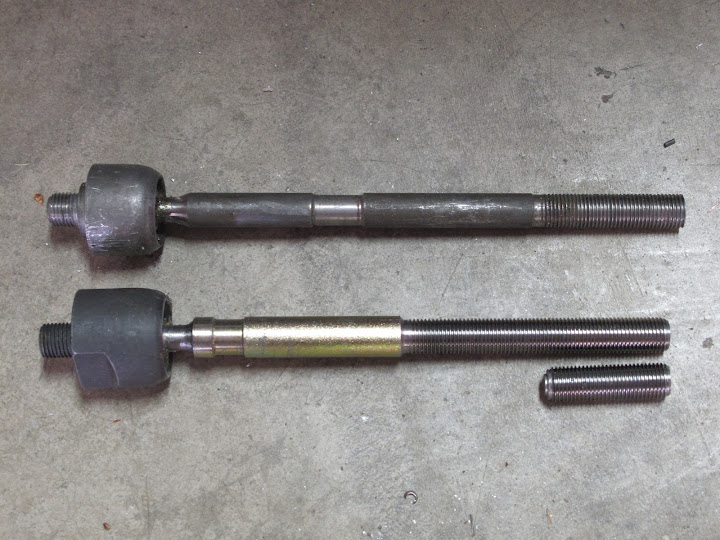
In addition, the tie rods favored shortening to work optimally with the bumpsteer kit, but shortening them reduced available thread length. The solution? New tie rods threaded up as far as the manufacturer could manage. Then cut 2" off them...
Old vs New, the difference is clear:
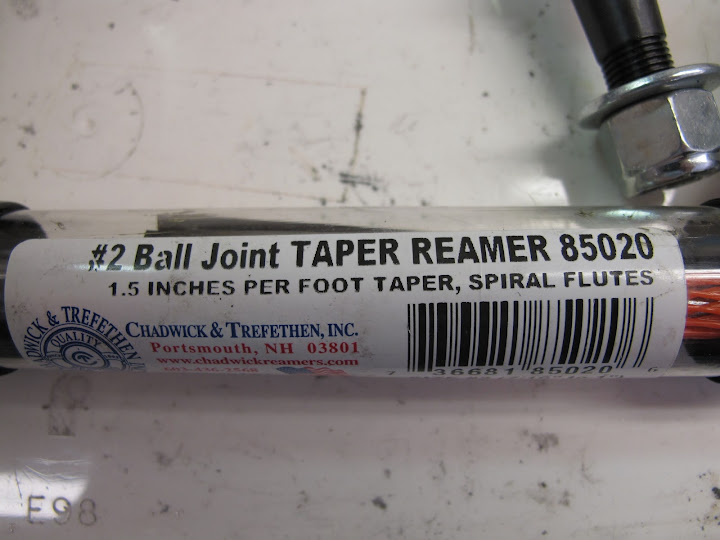
Next step was to taper the steering arm to accept the bumpsteer kit tapered stud. Not knowing anyone who had already owned one of these (tapered reamer), I bit the bullet and bought one. I will happily accept donations if you're interested in borrowing it. I chose the hole closer to the spindle and am quite happy with the resulting ratio. Not too fast, not too slow- feels just about right. Steering effort is fine.
So after all that, it looks like this:

I haven't measured bumpsteer post-mod but the steering is so much crisper now. The car had always tracked straight but lacked precision in transition- once weight had been transferred from two front wheels going straight to the wheel directing the cornering, things were good, but getting there was vague. Since the mod, the car has come to life in the transition. It's been well worth the effort and time. If you're thinking about it, I'd definitely recommend it. If you're not, you should.
Chris
The kit:
I installed the kit and noticed that it I couldn't get the compression travel out of it that I wanted with the heim at the top of the stack. I lowered it down and got it usable, but wanted to get a little more travel out of it. I threw the smallest spacers I could manage into the lathe and tapered two pairs of the them to improve their range of motion:
In the lathe:
The finished stack:
In addition, the tie rods favored shortening to work optimally with the bumpsteer kit, but shortening them reduced available thread length. The solution? New tie rods threaded up as far as the manufacturer could manage. Then cut 2" off them...
Old vs New, the difference is clear:
Next step was to taper the steering arm to accept the bumpsteer kit tapered stud. Not knowing anyone who had already owned one of these (tapered reamer), I bit the bullet and bought one. I will happily accept donations if you're interested in borrowing it. I chose the hole closer to the spindle and am quite happy with the resulting ratio. Not too fast, not too slow- feels just about right. Steering effort is fine.
So after all that, it looks like this:
I haven't measured bumpsteer post-mod but the steering is so much crisper now. The car had always tracked straight but lacked precision in transition- once weight had been transferred from two front wheels going straight to the wheel directing the cornering, things were good, but getting there was vague. Since the mod, the car has come to life in the transition. It's been well worth the effort and time. If you're thinking about it, I'd definitely recommend it. If you're not, you should.
Chris
It's been well worth the effort and time. If you're thinking about it, I'd definitely recommend it. If you're not, you should.
Chris
Or you talk to Fran before and order the new designed steering arms, install them and be done.
Thanks
TOM
Or you talk to Fran before and order the new designed steering arms, install them and be done.
Thanks
TOM
Looks good Chris! Tom, what is different with the new ones compared to Chris' setup? Is the rack lowered or do the spindles have a different geometry?
Chris,
Nice job! That is the next step on my chassis as well. I had to lower my car down pretty far and run 2 degrees of negative camber in the front before it cornered well. Would you mind posting the part numbers/manufacturer of the inner tie-rods? Thanks for the info and write-up, Scott
Nice job! That is the next step on my chassis as well. I had to lower my car down pretty far and run 2 degrees of negative camber in the front before it cornered well. Would you mind posting the part numbers/manufacturer of the inner tie-rods? Thanks for the info and write-up, Scott
Chris, the pictures appear to show the toe link with insufficient thread length past the end of the nylocs- on both ends. Are there actually threads extending past, or is that an artifact of the camera angle?
As you probably know, the design for these nuts is to have a couple of threads extending through the nut, as most bolts are tapered at the very tip for ease of starting, and that makes it imperative to have those threads outside the locking portion of the nut.
As you probably know, the design for these nuts is to have a couple of threads extending through the nut, as most bolts are tapered at the very tip for ease of starting, and that makes it imperative to have those threads outside the locking portion of the nut.
Chris Kouba
Supporter
If anyone is interested in doing this mod to their own cars, I have a full set of parts (spacers, tie rods and QA1 bump steer kit) available.
Chris
Chris
Chris Kouba
Supporter
Chris, the pictures appear to show the toe link with insufficient thread length past the end of the nylocs- on both ends. Are there actually threads extending past, or is that an artifact of the camera angle?
As you probably know, the design for these nuts is to have a couple of threads extending through the nut, as most bolts are tapered at the very tip for ease of starting, and that makes it imperative to have those threads outside the locking portion of the nut.
Thanks for the note Will. It is a product of camera angle. I did take a spacer out when assembling the stack to make sure the threads poke out the top but I will go back and check how many. It'd be easy enough to pull another spacer out.
Chris
Chris,
Replied to your pm. This is an important facet of any performance vehicle! As an aside, at ride-height, are your front and rear control arms level? Ron mentioned this in his build thread, but when I looked at the set-up used for tracking by another member he noted they were not level....... Curious, Scott
Replied to your pm. This is an important facet of any performance vehicle! As an aside, at ride-height, are your front and rear control arms level? Ron mentioned this in his build thread, but when I looked at the set-up used for tracking by another member he noted they were not level....... Curious, Scott
Chris Kouba
Supporter
Would you mind posting the part numbers/manufacturer of the inner tie-rods?
For those interested, it's the manufacturer of the rack RCR uses:
Maval/UniSteer
1555 Enterprise Parkway
Twinsburg OH 44087
800 338 9080
They made these custom for me as they don't make this as a standard part- there's no reference part number. They have made these for others on the forum and I was able to reference prior orders to get them made. I have a scan of the order sheet used to get them made which I will happily share if anyone needs it.
Chris
Chris Kouba
Supporter
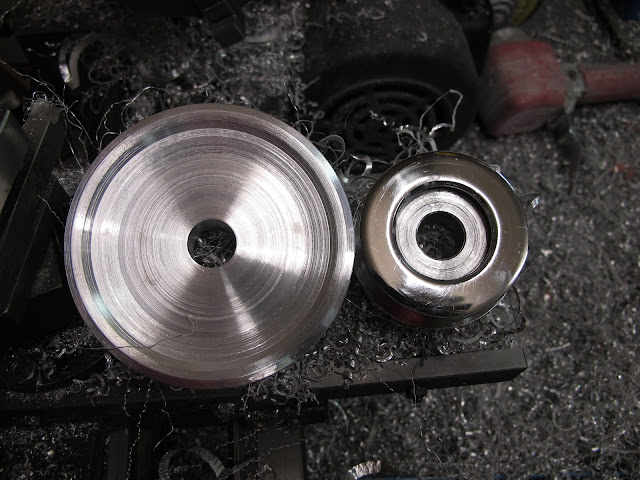
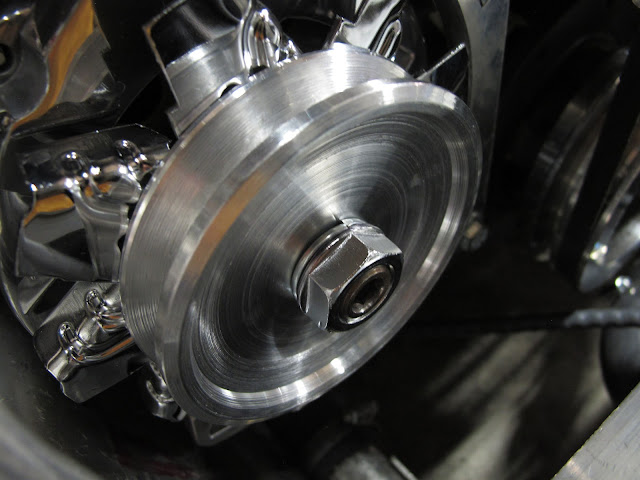
I had what I thought was an alternator issue. After a bit of discussion in the Engines/Induction/Exhaust subforum, it was thought it might be a pulley issue. Conveniently, I had some 4" round stock, a protractor, and a lathe.
I chucked up the alu and went at it. Results are functional and aesthetically acceptable, and the alternator charges just above idle without overheating the belt (no more burning smell...). I've put about 100 miles on it but am anxious to get a few more- for many reasons! It finally started raining here yesterday after ~3 months of consistent gorgeous sunshine so we'll see how quickly that happens.
Meanwhile, the creative process:
The Start-

In Process-

Before and After-
Fit Up... IT WORKS!!-
Still some work to do on the heater/defroster. Have had it out in the mornings and have minimal output from the windscreen side of the HVAC and still need to bleed the air from the heater core as all I get is COLD.
Chris
I chucked up the alu and went at it. Results are functional and aesthetically acceptable, and the alternator charges just above idle without overheating the belt (no more burning smell...). I've put about 100 miles on it but am anxious to get a few more- for many reasons! It finally started raining here yesterday after ~3 months of consistent gorgeous sunshine so we'll see how quickly that happens.
Meanwhile, the creative process:
The Start-
In Process-
Before and After-
Fit Up... IT WORKS!!-
Still some work to do on the heater/defroster. Have had it out in the mornings and have minimal output from the windscreen side of the HVAC and still need to bleed the air from the heater core as all I get is COLD.
Chris
Chris Kouba
Supporter
Nice work Chris!
Thanks Jack!
Very nice. It must be nice having a lathe at your disposal.
If by "nice", you really mean awesome(!), you're correct. I love it. I love figuring out the process of manufacturing something, and then actually doing it. The fact that it even works sometimes is pretty sweet!
What alternator are you using? How many amps?
It should look vaguely familiar as it is the one you're using (Powermaster 272-something?). As I write this, I am asking myself the question of why I had the issue and you didn't. I don't know.
I had it on the car and working fine for ~200 miles + a couple hours of cycling the cooling system, etc in the shop. No issues, no slip, no squeal, no smell, no heat. Then it started, and then repeated with a new alternator and belt, with a full spectrum of tension (light to tight) applied to the belt.
Is your pulley chromed?
Seems to be doing alright at this point, will check it after a few more miles.
Chris
Hi Chris,
What made you decide on the QA1 BAX104 kit? Was it thread sizing? For example, the BAX105 kit appears to have shorter threaded adjusters but I can't find any info on what the thread size is so it matches up to the Unisteer Rack inner tie rod.
Were you able to measure the bump steer values before installing the kit?
Are the new arms secured with 4 bolts or like the older setup that uses two. Not sure if you've seen the updated arm that Tom mentions. The picture I have does not show that detail.
Thanks,
Tom
The kit:
In addition, the tie rods favored shortening to work optimally with the bumpsteer kit, but shortening them reduced available thread length. The solution? New tie rods threaded up as far as the manufacturer could manage. Then cut 2" off them...
Chris
Chris Kouba
Supporter
Hi Tom,
The kit was recommended to me by others on the forum, specifically because the threads in the turnbuckle pieces go all the way to the center of the part. This was not the case with others.
I did not personally measure the bump steer on my car but others with identical set ups have it and there was no reason mine would be different. I felt an imprecise vagueness in transition while driving which has disappeared post-mod.
My steering arms are the original version with 2 bolts. Perhaps Fran or someone with updated arms could post a pic as I haven't seen any. I would definitely be interested in seeing what they look like.
Chris
Chris Kouba
Supporter