
You are using an out of date browser. It may not display this or other websites correctly.
You should upgrade or use an alternative browser.
You should upgrade or use an alternative browser.
Rcr 40-31
- Thread starter ckouba
- Start date
Chris Kouba
Supporter
Chuck,
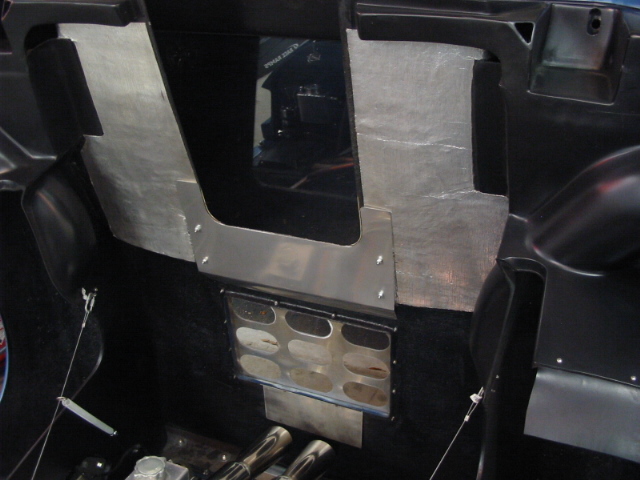
Got the stuff on order for the shield but what is/where did you get the additional heat shield stuff in this pic:
Thanks,
Chris
Got the stuff on order for the shield but what is/where did you get the additional heat shield stuff in this pic:
Thanks,
Chris
Chris Kouba
Supporter
It's been an excellent couple of days:
Weds - trip to the DMV: went with all the paperwork but no vehicle, was looking for a trip permit. After about 55 minutes with Lisa and Roberta, I found out what I needed to complete the deal (the VIN on a tag attached to the car). Went home with a trip permit!
Thurs - Went back with the car(!!) and all the paperwork (my first legal road drive and the first to venture beyond "push distance"). After another 20 minutes with Roberta, I walked out some $'s lighter but with a pair of plates!!
So the car isn't close to "done" yet but it does feel AWESOME to get it on the road. IT IS RIDICULOUSLY QUICK, even with my mere ~350h mill. I can't imagine what bigger motors in these cars will do.
Handling hasn't been pushed yet. I need to settle the alignment. I did a string job in the shop but must have missed something on it. Need to check tire pressures again too. This thing is a monster, I can't wait to get it sorted.
WOW.
Good job Chris. Having just been there I know how good it feels.
Bill
Bill
Ian Anderson
Lifetime Supporter
Congratulations Chris
I remember that time well when I first drove mine
I bet the "smile" muscles in your cheeks are still aching.
Ian
I remember that time well when I first drove mine
I bet the "smile" muscles in your cheeks are still aching.
Ian
Chris Kouba
Supporter
So I'd been taking smaller drives here and there as shakedowns but I hadn't really made it "out" yet and had still always been a little nervous when driving it around as well. That finally changed this past Weds.
I had plans to take the wife out for dinner and intended to use the GT so I took it upon myself to truly give it a thorough shakedown. The restaurant was less than 15 min away but I took the liberty of running around for ~2 hours, including my first venture to freeway speeds.
There is a ~3 mile stretch of 4 lane limited access state highway by my house and it was perfect for the occasion. I trundled down there (~5 min away), all up to temp and no funny noises, and rolled into it.
It was delightful!
I still have some alignment work to do but even so, it was super-stable at the extremely modest speeds which I achieved (in all honestly, quite respectably near the speed limit). Also, I simply can not get over how the car sounds. It is symphonic.
So after a few runs in the 'hood, I left the nest. I headed out a few back roads and leaned on the brakes and the loud pedal and things continued to go well- well enough that I started to lean on the steering wheel as well. Things went exceptionally well and I cruised back home quite content, but still not quite "at ease" with the car.
When we left for dinner, it was her first time (ever) just getting in the car. She got settled, figured out the harnesses and I gave her the tour of the door latches. I jumped in, buckled in, closed my door, turned the key and hit the starter button. She started laughing. It was awesome.
We idled out into the street and down to the main road. It was a rather mellow roll through the neighborhood and center of town, but after 5 min or so we were out on two lanes following a gorgeous river. She was laughing and I was smiling. I finally felt relaxed and truly at ease. I had made the transition from worrying about the build to enjoying the experience of driving the car. Now I couldn't stop smiling... It was a good night.
We went away for the weekend (not in the GT though) but I am looking forward to logging many more miles in it.
All the best,
Chris
GReat post Chris !
i´m full of respect for you taking the patience to go step by step. ´Much saver that way.
Couldn´t do it at my first roll out, just had to accelerate it throug the gears ( had the rev limit set to 6000 though).
Also congrats to your successfull introduction of your car to your wife.
My wifes first ride was not so funny , knowing me she was scared a bit, and as she already had assumed correctly, i let the GT fly after warming up. Had to stop that quite quick, because she shouted at me " are you crazy", so no laugh there. Next ride we went to the cinema and i realy behaved ( did not rev above 3500) and i got a big hug after we left the car.
When i took my daughter for her first ride she had a lot of fun, even me revving it all the way to 7200. When i took it a bit easier after a while of driving with her, she asked me iif i´m now on "eco fuel saving trip" and i should press the pedal to the metal again.
Should one understand women. Me not
TOM
Chris Kouba
Supporter
Been working on a number of things, one of which is weather-proofing. Living in the NW, I will inevitably eventually get caught in rain. I don't want to get wet.
I went through pains to try to make the upper doors waterproof but was at a loss to seal off the bottom of the doors. Then I thought about how to get a lip across the entire perimeter of the door aperture on which to install a single piece of weatherstripping.
I went down to Home Depot, got some 1" alu angle and did some measuring and cutting. I fired up the TIG and burned it together. I then stuck it on my mill and thinned down most of the long edge resting on the sponson so the sill covers could reside in their normal location. I left material for three tabs through which to fasten the end result to the edge of the sponson (NOT into the tank cavity!).
I applied a bead of silicone (should have used clear in hindsight) and used a few screws (maybe 5?) to hold it in place. The sealer has cured well and there's no massive gap at the top of the sponson to the bottom of the door. Additionally, I've had the pleasure of working under the dash a bit and crawling all over it- it is structurally stable and sturdy. I'm pretty happy with it.
Enough blab, on with the pics... although I didn't take many while I was working on it, but I have plenty of the finished product.
Simple concept- line the door with weatherstripping:

A section of the raw material, partially trimmed:

Driver's door hinge area:

Base of driver's side B-pillar:

Passenger's side hinge area, door closed:

Trimming of angle and sill panel at the base of Driver's B-pillar:

Driver's hinge area detail showing welded area blended back:

I used the silicone as a sealant for the metal pieces and as an adhesive to hold and seal the entire weatherstrip material to the flange (both the fiberglass and alu portions).
The end result:

Not rocket science but I thought it was a decent way to get marginal weather protection and to seal up the base of the doors. Not perfect but way better than nothing!
Chris
I went through pains to try to make the upper doors waterproof but was at a loss to seal off the bottom of the doors. Then I thought about how to get a lip across the entire perimeter of the door aperture on which to install a single piece of weatherstripping.
I went down to Home Depot, got some 1" alu angle and did some measuring and cutting. I fired up the TIG and burned it together. I then stuck it on my mill and thinned down most of the long edge resting on the sponson so the sill covers could reside in their normal location. I left material for three tabs through which to fasten the end result to the edge of the sponson (NOT into the tank cavity!).
I applied a bead of silicone (should have used clear in hindsight) and used a few screws (maybe 5?) to hold it in place. The sealer has cured well and there's no massive gap at the top of the sponson to the bottom of the door. Additionally, I've had the pleasure of working under the dash a bit and crawling all over it- it is structurally stable and sturdy. I'm pretty happy with it.
Enough blab, on with the pics... although I didn't take many while I was working on it, but I have plenty of the finished product.
Simple concept- line the door with weatherstripping:
A section of the raw material, partially trimmed:
Driver's door hinge area:
Base of driver's side B-pillar:
Passenger's side hinge area, door closed:
Trimming of angle and sill panel at the base of Driver's B-pillar:
Driver's hinge area detail showing welded area blended back:
I used the silicone as a sealant for the metal pieces and as an adhesive to hold and seal the entire weatherstrip material to the flange (both the fiberglass and alu portions).
The end result:
Not rocket science but I thought it was a decent way to get marginal weather protection and to seal up the base of the doors. Not perfect but way better than nothing!
Chris
Chris Kouba
Supporter
Been working on a few projects recently, the most interesting one being bumpsteer. There is a bit built in to the RCR chassis and it's been solved in various ways, the most popular seeming to be dropping the rack an inch and installing a bumpsteer kit. Needing no excuse to fire up the mill, I sourced a slab of aluminum and let the chips fly.
One spacer for each end of the rack, one inch tall:

Using a hole saw, started a larger hole an inch lower, finished it off with the die grinder and file:

AC hoses now go over the rack:

Pinion side:

Off side:

Whip up a cover for the larger hole with a smaller hole for the tie rod boot:

End result:

I didn't do this before getting the car running because I wanted to see what the stock chassis did. It would track straight and stable but was vague on turn in and transition. In the brief seat time I've had since adding spacers and the bumpsteer kit, I noticed an appreciable improvement with turn in and the car seems much more surgical with its ability to change direction- much more in line with what I expect for a rose-jointed suspension.
I've been working on sorting the car now but it's been hot and I haven't wired or charged the AC system yet. I am currently working through a project with Classic Instruments to get their gauges to work with the VDO senders I need for use with the bladders in the sponsons. It's been a journey but all the frustrations vaporize the moment I hit the starter. It's absolutely a drug!
Chris
One spacer for each end of the rack, one inch tall:
Using a hole saw, started a larger hole an inch lower, finished it off with the die grinder and file:
AC hoses now go over the rack:
Pinion side:
Off side:
Whip up a cover for the larger hole with a smaller hole for the tie rod boot:
End result:
I didn't do this before getting the car running because I wanted to see what the stock chassis did. It would track straight and stable but was vague on turn in and transition. In the brief seat time I've had since adding spacers and the bumpsteer kit, I noticed an appreciable improvement with turn in and the car seems much more surgical with its ability to change direction- much more in line with what I expect for a rose-jointed suspension.
I've been working on sorting the car now but it's been hot and I haven't wired or charged the AC system yet. I am currently working through a project with Classic Instruments to get their gauges to work with the VDO senders I need for use with the bladders in the sponsons. It's been a journey but all the frustrations vaporize the moment I hit the starter. It's absolutely a drug!
Chris
Chris Kouba
Supporter
For all the theoretical talk, here's a hard number for everyone. Ran the car across a weigh station this week. One tank empty, one tank half full: 2350 without me in it.
Yes, this was a truck weigh station so the accuracy for something in this range might be compromised, but it's good enough for the state government so it ought to be reasonably accurate.
It's not too far away so when I get further through the sorting process I intend to get back there all full-up and get the big number.
On the way there, I had a massive 4 axle diesel dump truck pull out in front of me in a "I don't care because you're WAY smaller than me" manner while in a 25 mph zone. About 50 feet later we were in a 45 zone, complete with a legal passing zone. Still being in 2nd gear from the slow zone, I poked my nose out and around the rear wheels and saw no one coming. I still cannot believe the thrust I get with just 350hp. I can't imagine what you guys running heavy firepower must be capable of. It was incredible. And the noise...
Chris