Rcr 40-31

Chris Kouba

Supporter
1 step forward, 3 steps back...

I had the occasion last week to lose something in the shop, so I spent about an hour or two tearing through it. Part of that exercise involved going through a box, in which I found something disparaging:

OXsvBM6yvucJsHcZznV5Ct4nuCcRotCODpxIGowdLOH7drNfJfz-D1jBbpxZD8CxIUXMac0SXGWqKA=w1144-h643-no


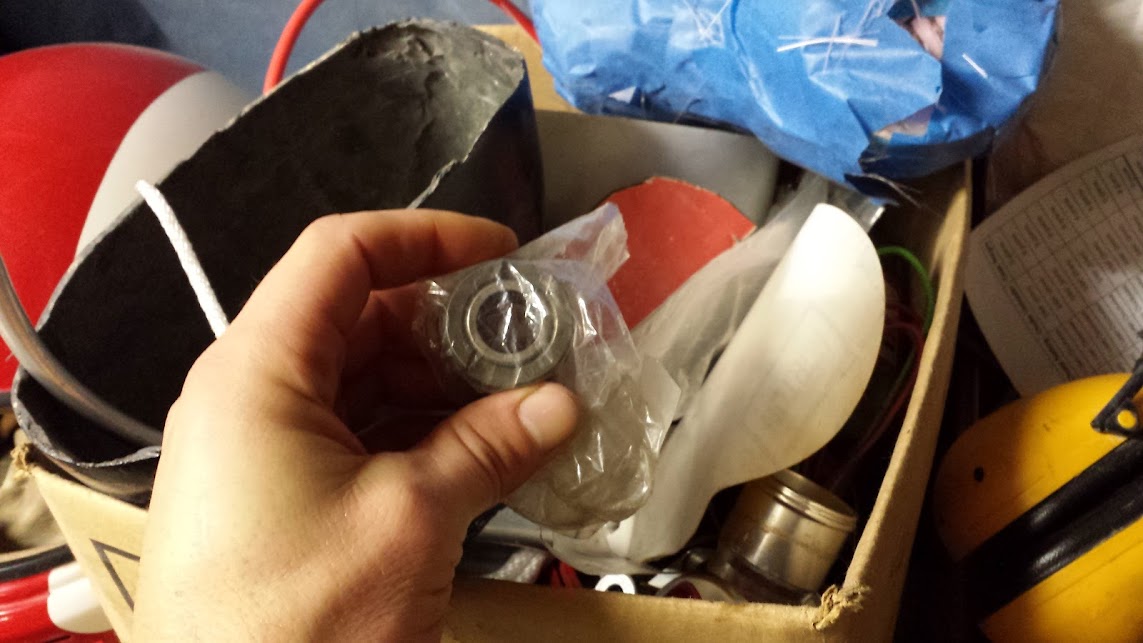
Yes, that is a random pilot bushing.

This greatly troubled me, as I don't have a reason to have a spare pilot bushing laying around. Surely I would not have forgotten to put one in?

What to do... As far as I know, there's no way to actually check if there's a bushing in place. Even though I have 1000 miles on the car and it hasn't appeared to have a problem, I couldn't bring myself not to look. Conveniently, I just had it apart and back together- running even(!), so I figured I'd probably be able to repeat it quickly. So... installation is the reverse of removal, and this time I got to take the headers off too!:

E7N1k0PKPg92rnLiaqv1FA-ip7XH-YnbdDCedMrFh6YFeC4PJuKbdSzW1GbjCZTfttmHWwZp1XxQseSvLD5BKI7589XNkJYbjLrUrCunzufwKTjPp-jdaVoJ7MJl4Q1bMm9UK1OB7pAAvuud6OjjYaHekaPEorH_Z59ooCiDh4tcpZjaxlTmM7Yk2qegdmHxds4thVdTaz1xS70Q0uS6IduWkxFdbbOKyzHcbcbzj2Cal0RqFL_cJvdwJXj3Tkl-3uoFEUHPFUfMTNJ6o7oIzRWUmpSHOdFx9LvtCVzKVrEtipwekbU0tT-lfoAl9fTc_3pS18DqwI1pwd8d6Xm7adJ2qg4NmwoFmQvHwEEerElLXOqm7mYLnwR4-tLLiWvujhChUjL3YoYCG3bCEyed1Ijw6e-Z2tHcy7ZqOYqiwXIAl4NLHSg9HEd_0HgyTxs5eAYOquZoonJWnut-WV02AsutzgcCxB0mWrSWCgcAVjSKnGqgEf5MmPnbIib3jEV9jcSxPQ7A_j-QaDkt1VGrf5ofGGIxYyNYV-8LcaQ-dyHgzhIVUwpyHffomaxKs73FolvVGA=w1144-h643-no


And then I took a look inside. Kinda like opening a Christmas present:

ZEB7We14l0aMhcdblqHh1xjemB8Ijz-UY1z8Di0Ju0oz6yXb_Lr8doqZYOHtOxHMEw5tN1uYZGoz8zJOpT3gj4N0jMr9mLxeYX3eW2kaAizWDfzjRzb9vOTv5MTLfT0XzBEjFUSfJLqGstdnjWFG7GDVoyXPhX54M98HJnU0wlkuDpyeGxCilgGyMin5UAfIDaZNgLhr9zLp2JWnrZiq8ajwESxXDbt5Q8LBUT_GfHM5ldUhAqgljQAnfGzMrbInX6jRpu7iWYeCBq4zz_XdUkuYySUoVMeKkvG-LBxe0J6ghqBkvv91ARihjEdohH9yyPqqJ2F_D8ZxGAiKIia6F6fmIkPiaeHCrp2mU4J1w343uhQwUpLP63PS9HomMbDkCUPGw8XTB8xyUnVqRhiudMJWlQEL6LQWjfymhNTepnlh1PMiAbBaBqbIhv-02ElVOS8bHW6WyhEN-5MnGW6sKeZe1cLhjYqFk8LFrI4mg6VKUdYjxheoAI36tdm0nRx79AKsaYPdVcoYie-DRZfseDaAw4C3iI47eZSL4eaj8HSKfuvKYM_UbdfIjyRllni24Zw62Q=w1144-h643-no


And the good news- I'm not an idiot:

EMDoSszj7J6Rd9FnFThvCw3teyU05S3rnDkAxnFyEt5fGIGzGzZSVSqCPLlPqBQvP7l3KiMrhKHX_Kw7eJ8WCxaVpNnvwWKsWgzxH4Y9DkmzpqZDNsXM7G-tWOkN__F6ReWs5WmF0Bcz0485Yrke7S3O-bzj6lcaA4pFEIrhIZ437p5Cvg4b4LcvelHj0aeFmMQuzPpSrK4gHkWbZ9oEWMGxDhtl4-eGItsAWvnV69zh5jyZaNBipuqa2G6h3KJk9Hdp9Xjkhpbkl1SXs8UKGdmu1VahjJJZX_0jVC0fZVkEqNaamQWnRn9yg-eqsnDo8V08DtPn015o3MkCTDo8GfzqBKx1ir-bA-iM2TobHHO5MQ18nlWM3U3xMGKp7T3WxSvV3eQby_QljRMh2iBYZbFGZK5k1R42ujqT2wfSmivYIyWPapgyN9DFH9QwHX4xivlfJQi7N4koDywL2KH9U0MvukAOldPgcsWdqtUc0JwnU7GIYQhD_revbwBTBpzzxzLYOhgrq3L00zfXi8ekfou_Qlzib3g1ssjS4h3TEYjj8CR5PLbEGgkPqWhVEF8g1kqVFg=w1144-h643-no


I still feel like an idiot though.

As I sit back and think about it, I can convince myself that remember getting a bushing with the clutch package and also with the trans as well, or one with the flywheel and one with the clutch- some sort of scenario where I ended up with 2 of them. I just wish I had a better memory and could have saved myself the trouble- although I would like to think I hadn't buttoned it up without making sure it was in there.

Now back to the originally intended list of things to do. Again.

Chris
 

Randy V

Moderator-Admin
Staff member
Admin
Lifetime Supporter
A lot of people woukd have looked the other way and just roll the dice... Good on ya for tearing into it to be certain..
 
If you hadn't been rummaging for parts for me, this may have never started! Glad you figured it out. I'm sure it put your mind at ease. Thanks again for all your help. Vaughn
 

Chris Kouba

Supporter
Back in one piece, kind of:

n4v-hCDCGfLaEIFJEVf3EAVkfFod1OpQD-CVoDCWxjnuGGG9AZOknaHmEje6kvCMNcH-H0YXeOPByktBGhGnn-VPJx5DAwFd6K7f4UaV52fWi7WbjWO_rGfsMjNdzaesafFdEYkbJuQ-t_bnZ0b8otAY-4GVf659PZZn9EenCd7Ndgm9aHLY6FtMDbI0wipij8_f88rYeVm34JZSShcRozWLS10Y940mTb7rOdayAgAZT247L4uAVekjgf2WeU-YZO-fTEO-ukAkCDSB-1qaCsZtycdX7bWrrEvN3Q-1HnR5NvKbaD1ZW1mnhIC-Ja0BPoeHWcskztDPQlNqZ5gktocp6vHqoTz6DlqcuueAC7k1Ca12tjcRrjrpFev6T0oHm5F8n_X9nLypW02Lo4B_AXRKN8YrHtt0h9HHKfrMA1oTgqG0oKHzwD0VbiQNLKi7a7tGAbtcY8aJEBW0gY3ADU9tIEelvESLGzvEezpSly7oprk-_TYAErXlkK9hBV0fK8rjACGuydnnc5qHP7fVLch7BUMAofbt7lQKxGMGMPBLJQyaU-OlgCzPc9YXqKyaEp8fJw=w1698-h955-no


I am finally making positive progress. Had a few challenges along the way- I snapped a pressure plate bolt in the flywheel, the water pump started leaking madly, the motor wouldn't sit back in the engine bay without the alternator leaning on the chassis... Plenty of opportunities to work on the car.

Got the bolt out without issue, actually went really well- like it is supposed to. I pulled the pump and put a new gasket on it which seems to have made the difference. For the alternator clearance, I actually made a new pulley and went down a size on the belt and now I have ~1/4" clearance again.

The new pulley, 3.25" dia:
KWj368B9Jx6sVjnoNsSvY-ssekMNkViGb_SWty3QwRDVClMAU57rhYjfow2cGcBshOcoQ2T9EeEBSzmIZ9SCHT6TWohwh58LIbuM_lkPXsZzcULlqcOPUO1ZYtt4FFp89OrV7Unbvf6-o1yg2gkG5fXoS-5f-N_mFWnKqA0I0XMyfvByiIW_VDmGSqrfSEhntHd6MORdV2QXuOTUhp5AQos7gxVsGssSgPMnGdbvX23SxSuV5HVzmga5YwhB0FTsNIT0HhQd5-_hQtEBGfiIQtIcPbQ8PCw9W1A_KvqEyVnv5WkB9mdICM_-CJJTtYPIHsr5N5P-tze1IeQsM8UD--Ds9VxD9Tjbr8crxHxu-tzLjNnKtNQ6rH3FFwwxvAXiR1Z3E2GqXQEfe0ZhmqM2WOlBD_Jy99SFsiod1TPI0gAxjLJj8MF48bTwprQXxjZ8FNzjlyUsLPJV1PcctkmdehQ2IQIjAnwZsrbFHkdYH1svrPoFdYB_KTkFlht8H54VjmIV7Xe4w6iJm7dCOrtIH5lWg-ImpuvaXhPNUGr2_oSkoF1tQyJaIDDnIyvQN20BVEbsFA=w798-h449-no


I wrapped the header pipes individually this time. Once it's together for certain, I will wrap the rest of the system. I am fairly happy with how it came out, other than not being able to see the gold hue of the stainless pipes anymore.

No more gold pipes:
5-KpsmUjnswTNHoKfRFrtJGEMqQyolDJ3krJkwoEJi5KC2a1V1ifpZzOpuoCkmHU_iiKcn6dB1-1KH4HzBOlgXrDIZ91WkoWh8_Ejny525mJSQ-2Z4XDM9x2gUu66RNV13z3tXaiYdiCUKNK6ceIQnHRf1uXdJhP30U397k32XNc3AJl4hP70r6NJwb5APv1FFN45Tmh4SYlTGnWK8W9TE3B9ZDCPR6qIx4H_Zdv24KwrcXWljKZqQMmMb3CGCH95MXv3UvkhThQVj9a6Jar7VZ7HK7eY1XwejK67L5Ua4fNzqvyST_sxgNsd6eGZfnh7k2UgnyOBiGOY-nXEXZpaLMM-M9Zc1Ay3ENs5mZgbS93l48hmj7WWKr6YqAhhDo8xWg3VNhQ34sGmYJhNQiFlSVE8dmZel-rmRzdGXV0yHHBWdKCyaGdCRZ3sTU0c39cevVwTEGn9EfigCTTYLpN6T6Q1h3mPaq78uA1Qu3F3Ur4uLrf1ImT_OpdcnAmo_wxb_BhotmFWGaEodPHMHuFhdnLMccAV8_3KZDguOpM9JHuojOBq8cK340X76JUORXNjJ5JgQ=w798-h449-no


I tightened everything up in the suspension and have it almost ready to get back on its feet. The big things before it moves again are building a new rear clip support and doing the CV boot replacement (first one is broken down already). After that, it's back to electrical, weatherproofing, and HVAC tasks, which can be managed in between drives (and weather).

Chris
 

Chris Kouba

Supporter
As part of replacing the CV boots, a Redline grease was recommended, along with completely cleaning out the prior grease type. Time for CV dis-assembly:

Breaking down
8_cQwSbXsjEEvHCBwCU-4cTdHtleLkt2B0kI5622Z2YnoA9pESsmsV4UwEVB4CEbADbu6aacGv7XTCEUiONSlINKPpvtDkwqdAV04KDFbmK9cLBsf-vPyQd2Ko50_J251X9TbP3qXU7hAZAllSRf_2dZZSMsIFpQo_tOJg04XxE1vGmZKlYd1JrrtUWs2kXKsFKS2ol4Sd4erd06HH5xGTZ4B0HTz1YkyLrVn7RJQuv_ccrIQogkrl4ERhGaACy7QQ2V-xqMOYBySPPUMJcv7LvZU2qu8cW88wBlS2arBXUlfryJmCln-VyuYVlRHOuxjPnAoPrvk5ZLSV812DfW1gyZkKKNYaP11czOdje8kWnRa6_zThedCVf-ICZ_C5-kGRv5_8ivKIb7LISGX-ppFYML4q8L-PqcNbdDUV8omNCXQdDabjZUU0LphkwYFS0TbL0U7L2h7Xc9dc2VwjLgnKY2l3AtujpHZ1VQ8025dLNvKRJ06cjDQ4Ab77l2--n9HU62C5nU7_twAPgCCrtH36Zcp_89YAGcbtyVgsJB6Owfq2T432Zey9nd9-C6YrRKzPbiNA=w1394-h784-no


Greasy parts in oily bucket
mi0XSr5BbVFjToTfy06FOVpWAG6SCkGux2hn_P4Kit-YDHcYS4o4nVFg9XqmxBzJulur5XyAlZNuQ6hNYNXgmeHcW-QpIypwoRw8wmIoy2nDr4GCTs2BG-N-O3OLTo66WL6AMNwVTT-0_CRAWCeGG4XFdUp90oa44Ebwm4v905gjW3GyuoD-Cj-LhOtLhoLy6i724uFpDKuIZqx64UIgt4YnE7_GcidlCHmUpURxF0khxoIZ1hDoi4KxLY4BL8tTumCrlLGbRbrO8XFATWo1UkyKKfO6eX9ZSeYYDFFWiXAUMzBG2lfkNLikkgQrldaZWjSmRoBaVRzHutj8xIqWDMM3mCnJVKpy_fG_yJhoBMMKZg4-6KAGBNxWmWBeSXS8zv-1QB_eezPlG1aR5t0Wspe7SMslbS2OMNJ0QIZJb8S0disAtwqn4xopK9YIqRz1nqGHFcB1GNfoB82gVoHl1JUDfJZ5YgzZ4FhyaQfkin-csXqEMaEHt5xbO6PJrqJkKC8nUzpa-fvFSVZrYUTrdgU131igZAXjilQKMXVyz2J-Pt8LQMUNgoB812l4Q_-DiZOOIg=w1394-h784-no


Getting cleaner
fpWPmrqft8tZkqyVNAktxxdl3c7pvHjnWg9xlTGgaeLbRTus_Rbwtphu_-XR-awb52iemeFUp1McDOVmav6j2udzlq2rKIOZwpLPYMS5xPykboiQxyrqqyfdWNKM7tzloG4oeDv_fvVCNMuu7kPpy1xxX3G2qGi1GZkRaCnj1fpOE0zJVm3oCuTT-axpZN5qahMwG-DLYbDx2-Cvn6eGNG74uuTrNdQoRJZpheQfJpbEXn5uaCT6L4MCU-N7vXV_PZjITgLKOOkrYdQvol1zcQCowuZ3ZHZ-clIPskzymvWYagwzjNRFZ7regTxzWuQljS1Lkr0h51z6K-CoSlAcKWnTBZK0dY7EWySFWicx83bOv6pGz95HyymuA6w8HNfZ8ft2QHalQq-_KHJWhNVXf4osOToZkgfbFjA0hm6heQnQIBksWV-IROzO845pAYlnW0ntkgzmxw9xHTOMoBBUnd2Ipngi1z5Z--rQRFjsajPygP_aBu_sDaUMs1G5CTvPEROAclqw9SJpMXX-6azwpfgXSJX_Qm00EynmzaMl1q9j0fbu6069PfdkqGNMz-l9Ea0Gsg=w1394-h784-no


Installed, bellows look MUCH better!
5TXyl6jEWavZl3T6ZMTLBN72568hhFWh8tQnNKXgvZH7vFYJ6AVAK6vGjBnIaxaRxkLE5f7uNLjaj6OpMleRa3wUuwIKYcwMJKK3yaBkZtIAhAqectuZ9LOQO4ZyuBOX9qHtRUxNeeD_YAsGxUWdtVYtDRtAlhzVbv3SwqcPFm5YeHLU0XAQN0bfoUNl1l0cfU3ngVqEUruI4_0Gwcv6DQTqVtKI8fAZi14TPZQ4ev9j-ogQ_XEicfRDnLX0k9zpzwiYKocImGeL-9fvNMIdhFz3TYYlGbmGXQJF-TOyug5Lp86Mdm_tYMgusML6b4eAro19odW5SQo9g2MEwpa5PZ3qgAPvX-hS_Ezw2PKMHyl7o8XgRKWmvbYBjEw32PtdfwvJ-pBV-kT2GYBzZ6Bvht7mykPY_o0Mw8zk7zBe-IG52qzD0RMmmvjxJfywNNiNYXPAGy5W61hd4aqAyGgT6VxRqECztXuslesOLcOmu9Cyp7y_VRYiiWV6IXsVm2F9_DFe6jnLvwWzDrxMv1_Qpc2AJAg_cnnQmQeaTi6_b282z26SIGA2-p1cGzObUjcRbMFcLQ=w1394-h784-no


The boots are standard Porsche 930's. I need to trim away the tab on the double shear bracket for a little clearance but other than that, I am much happier with the way these seem to set. Time will tell, but initially it looks encouraging.

Chris
 

Chris Kouba

Supporter
Success!

oOkQ21A7b7iF4Jb7CdfnAVahlEHVFItsY67-M8ww_MEhPgmEv2eBn5KzKWDGDiNycEkZK7SL1EivK_WhzTtSwWaQ4xeidTLeKQyjLX_RyiLLqMOaKB_4EEvAjXjm69MXgfElsl4tdRvEEwSVvsFOPi5L3koysc1EyhZ77mnVKQd9g4mi2p-5GF3SFzjfbvIGpCU9wUMhfknjk2ATx9RCnXi3sEdOBYg3CMlF5Y0eplYd4FU_LpsTDy4Yzznq0vHThHJToyzf2E5FqpRy6kAXTC37aHU8gpiXK5wT9X_JpFYbOVfxCfZQNNjr6eVVMcMYNkcn2q3-sKOpqyE5tHb-LxNUjccCIwLeogTRSk_cmq_o1o-mv7y5uXLblzZXWZ-gJDft4QBTFX71UwzGWSLdjitoN-XNMbV0yJemgE541e3IzbfgROqFzri0lvrDStYJvc5qLSVQgJqYhjaYNB2dOzexm1j92RndSKHhZfEO2F53f51g8eZMr_mM-SEO4TfERgMX_A9cn2jyQ7qUeUe-KqnDcp_1heI8MlvSoueRldW4Zs70zcSXSQYfGeDNg4WF1unbGA=w1616-h909-no


After constructing a succession of different supports, the rear clip has been mounted. It took three evolutions over the last five weeks to arrive at the final design and I learned a lot about fabbing with aluminum in the process. My welding got better with every version as well and things got better when I simplified them.

The new support structure:
qsfl7uC4x6t0Sy6XPkfJlKQT7PUdHXXX9vdONhAqJzP7mCYTAhos_8ovuFJR5tiAxK8WtTT2IAj8PEsJeV8SfOb60IHk4CjFH0Eleei4mU6LzMeMaLrGjExk7FyTXVjHMMigZ_1uucv4DsflCUTzUmeLlnUnudy_JijCp7tXmPCqMQvML89K5gm6oIsC1x8Ij4GuIpJjsaHW2xzgfiNW0s9BbP3kKJKSoEt0he3ONJ98NBilJy8adWbIpSKb-lgIdX3zOnRhHxFcJR29uoW1lwsw7-TR-oPqkLHkaK_c81bAfnrT1es9BaWZocRihUrD58Sz8b8pW95HQO3b1gQgB4_o72veNIA1k8mnnjdw5Htt9Agq0tENAIAbBbJdHh4xA7sI_OEZekonmwrDzYXXGmj5qJlkUxE12CWqiGdZQwbT7mg6q6E29i1iUmsjA18YVNVarNg8d1Jb0M45XyES0PbAIXAPHsnn1CppA4-d-gh3rvdrjzEKlTkWom1-A8x55BMroMd5ofdIQK4xxp2crcrPKj7EtiMHWJd44sxGV4HobAHTP50lsg7E-0IznxMLH2HjLg=w1616-h909-no


The two parallel legs attach to a crossmember I bolted to the pickup points for the lower rear A arms.

Installed:
ufJu4Kj0mDtDsRYObM0PSN10k7at-FL1NcQC3Xw27UEI8vjCSN4z_85W-Z7OZgFqYvhjsp4oBhQNnvNGsX7lXLuhDsCG7LqZnmqqy9xjnXRhik6Uaeec3Eqm8ysi75Zr1shz9ty-sCND7nKsIb1eYjkPpGn6hbtrAVJRbKsAA4VRZ_ZLNqievYUBOo1EzS1bIqajjq-oJYO6mcGXaYXkpifYmuBhhNo1SXjCzhSchS9_T24UWEqp8JXhbBQojc1Qli9bbWTGynbw8asg0t9srmKmL_4DHDj4laNcoK2iLHtu5Ix62KIjDrUe8auSI-TYTZPlJlnp7GRibLUww7cmAGbPe_-DC4TGhxGv_R9ztVEdNyOFmx9ZF8rfkqx1oukRoGXTPaEy75jAZH3HOIpFA3iOQh9yiovBdQbK2pT9Hk7LKaVzMD-gdrSo9WTC6_hn02zc5NP37kwYjMB9oNZsgY0QhVFoDhK7S9S3yZrdwFoo22nrrxXSLRGG4M3m5SMFm1WowdbSDi_MLTyOPIx0wyEnsIO9r1BET7UVdTX4QhW_xdxP7KcEWFzgQoYJwHgPlRtlEg=w1616-h909-no


Turnbuckle links re-purposed from stock design (jam nuts have been tightened):
I8VI1W-xu4fPHd9y8kj7wAzOOSxFrMdJIC2SLMy3lrJqXO347Tgo2NCjvGXUORFaQcLxdw58JOfcScHYDUR9f9FRkYQPvKOeWjE_Ho80wrXuGk8tIXc_PvhByxNJQi3V5-jfsi-k59LYhZSiqPxPvTeDlXxMKFTCIrRKpXgIvJp2_PUmTLeUlWthMZ1WzrT57FZYLcR-eX9nbS6lbKD5rIlPLnjws5ImZW4c8sErcpV-1xHBXSzfFLFlMzrMS0HmGlbnZM9L6DUxoiBlMkHDE5owTu5hjxMAOo0z-j5b8IINv8THyzZfLMpo9c9bjY2dX4RIBMkfNQ9sm-V4Lu3p6QEcc0mkU4YIXlqLwsXg7Aolel8Jf2xPBKP1DYQTOVvoHCG9J-D8Oyz7VW4GvYqZCsifjOwkqaa9hwfyiDm-ZMVaUbYCxNEyLKI8h6-mWl7ji6WF98oh07hNyENYFla4LuTFFCW83ERL34Sz98KuHfRjh7VGCrN12oGZWcMPL2xmeGmusckKauXP37Tb3jMptRD_XyxGCGeHPTV-htWqRqHDppLUz7Rb3xJrosdfQE9ByivADw=w1616-h909-no


Heim joint to raise/lower rear clip pivot point (~.75" range):
bkx_PhX8aW1Tgztt0bJrSPIHTAp0IeZxY0y4U-t_nU_8Fpj_xgtuLPMdbtqume20eGKgomJlyAf4ureLD-akIPGBplcM2BjzPCwGoygKimUuBrIaftrKQiZDqH1QSLIRs5NvCobNsX5Fao6tpCO3fVYRwJ-fAQwx_vYaq4n5nbEplUAEluUfGcPw8Exv0uhwCQoP-mLoPH16ZQhKVTGA06NxKubVhI6dghYlXpkB79xmN_pUzUbWqzfbexCSQ3zKbZWDpFEjM3kFT96g8vqdctuPbWuEi2JGwd6zLNvDN9EhiPpjWyG67ydnEscciQEG556PDTeL-AXUNpyHW6lyWEC_p3eEeCwjZf3WIUwQcAN-JzjEw2Jem3fZi_mw2qCznrEBQHareJqrl6AK_UDa-_xe1bXFEqNTiBXvmMGC_iRMi-HrynAVcBmkzbGeU3HrXtN1oEcMzbceMWFl28qdu_xC_7SBHwdXTCFzRurkNFkfGsFVdkZn_0iN0rjvAWG62hedp2yNMUta1FXgkIVuY9etu8kBMPa2jgSD1RScYZeE2WA1Vh6aQAh2N2utJK6c_GbnTw=w1616-h909-no


I am very happy with the end result. I connected the two parallel legs with another piece to reinforce it and will shortly add gussets for them as well. Even without, the structure is equally as stiff as the stock one and much easier to adjust as well- plus I have ~1/4" between the bodywork and the headers now too!


I also tackled something which had always frustrated me. I could never tighten the front lower A arms enough to lock them in place (they slid slightly fore and aft along their locating bolt). The residual gap was smaller than the thickness of the washers in the stack which were used to space them and I couldn't make it work.

My first attempt to resolve this was to turn a spacer of the proper width to replace the washer stack and compensate for the slop. Great idea but to get it in place required making it shorter than the remaining gap, resulting in a bit of remaining slop. I thought I didn't measure or turn things properly, so I made another- and it didn't fit either. Still more slop. After making a third (and then fourth) spacer, I realized I needed to do something different. I needed it to expand upon install, but I haven't ever seen metal do this.

My solution was to turn two smaller spacers to combine into one for just a little more than the needed gap. I then turned one face slightly off axis on each one, giving a slight wedge profile to each one. If I aligned the narrow side of one to the wide of the other, I could slide it into position. After getting the bolt through the spacers, I rotated one spacer with respect to the other and had them fill the gap. Worked like a charm!!

Hard to see, but two spacers on the front left pickup point:
lFdtuftSkFnGoX_J02cGdFbndE_4o05DMXFSUSaApuAeaLDQ7MT45CgZdHbrfh2nBpFmzURVcnk1XLGRsHBELwHXMo2toyXJkDkfVDx3utC2zDXECrRDLBjk5wf6mONR8GyFbO0bF8zWxr9MtzdKvsdCMBZnHD53UFD9c2SikopR7C_-urQoSfGIUGvjx7tzqUprgllkQL-UlWK-Ua9q0mBPR75mp_l5Sr6tsamb-s962IxUZ87he2pN0aeKkGF96scI2L6OkDO07qw_3SaSpqZYcLDrkoF9Pwn2L_KwR5RyLlUhcGEi1RtkFVtOxHE7d_JOuipBdrXLVOCb1hoEFpcbyqbx0H11RGQYHMHPa1QWMb_sBEKHF5zdJAyDGKvYPVJYBYlcYz5biZ7hu9aTq6WYvC2r0JkVucq_iNOxxCS1TAfCoPGNruMp9HHQ0ZAzCdN8IiAtJ5gk0a5GyHnI53SBHKzxt1BqPGqLpoe3vAJWFrloSgLdmviyAW0Wq4vc4Y7obh93YNFYn3tPz6wIu33sIxxtWTnsntq50AjvkndOY7KdgBAg9YteHmUYzLbNPDmBmg=w1616-h909-no


I'm willing to bet someone else already had that solution figured out, as it seems so simple, but I've not heard about it before. I couldn't bring myself to just wedge crap in between the washers either- seemed too crude. I was very pleased with myself for figuring it out elegantly. Now my front suspension is rock solid in place and it doesn't sound like I have a knocking heim joint anymore.


The car left the nest this weekend too for a splash of fresh fuel and then to knock out a few more miles including a dash home in the rain (always a risk here, especially in winter). It is just as strong as when I decommissioned it in September and it felt great to dip back into it. It still amazes me how quickly it gets through the gears.

It was also reassuring to have all the temps and pressures and sounds in the proper range. No issues with having pulled the motor two or three times and splitting the trans off as well. Fairly reassuring to do such major work and get it all back together without issue.

Having knocked out a few things on the list (and some unlisted ones as well), there are still a number of different things remaining to tackle:

  • Dash electrics to sort out
  • Make some door adjustments
  • Improve "weatherproofness" of cabin
  • Make the AC functional
  • Clean up the engine bay & its wiring & hose routing (partially done)
  • Trim down the wiring harness from the truly extra circuits not being used
  • Improve the HVAC performance- specifically defrost on the windscreen

A few other tasks have gotten on the list as well- a little more insulation and finally get the carpeting in, maybe a heel rest as well. Regardless of things which keep getting added to the list, if the above get knocked off the list, I'll be a happy camper!
 

Randy V

Moderator-Admin
Staff member
Admin
Lifetime Supporter
:thumbsup: Nice work Chris! :thumbsup:
Have you considered using the old aluminum pan that was your rear clip mount as material to cover / further strengthen your new mount?

I still have this on my "To do" list on my car...
 

Chris Kouba

Supporter
:thumbsup: Nice work Chris! :thumbsup:
Have you considered using the old aluminum pan that was your rear clip mount as material to cover / further strengthen your new mount?

Thanks Randy. It's fun to get creative and make stuff.

For the bracing, I won't need any of the old pan once the gussets are in. Truth be told, it's already rigid enough and it'd be difficult to get the flat pan in place due to the lump of a transaxle in the way. I have thought of bending or otherwise cutting and welding some additional pieces to tie the legs together with triangulation but have passed on it so far.

In other news, I moved on to the dash wiring...

I was never really happy with the plastic connector I had with 10 circuits connecting to the dash. There was another adjacent one which had 6 circuits on it and I wasn't really happy with that one either. Occasionally I would have issues with gauges reading correctly if I knocked the nest of connectors under the dash with my knee.

Problem solved though. There's a place called "Surplus Gizmos" by my work and I walked out of there with a brand new, 16 circuit cannon plug for... SIX dollars! Several hours and a few burns on my fingers later, I have a VERY robust (soldered) connection for all those circuits and the gauge issue I had is now gone. I was also able to secure the female end to a bracket WAY up under the dash which does two things- keeps it secured so I won't knock it, and keeps all the wiring up and out of the way and not hanging down below the dash (see last pic).

I have three remaining plastic connectors which I am disinclined to replace. They allow me to remove the switch panels on the dash or are the power connections for the heater and wiper which I would like to keep independent (and they are currently fully functional!).

Out with the old:
CNllWKlP3-nhfwucUdV4V9YgGvxztJciyOxj4cv175_ArRE7yeTuTkpvZL0A-kTXNzLfZwNHy9mSrpx8tSOS1S7rv4uvOI4KAZQveUlMNfZNFtcQYsaAqXTFQZvcaQLVgkudaIc4KJ6A1-CvHGnQm7Szuljx2zOcYQa5Uq3d8NSo7oEabSZXnNcJi4Z-pK2RAIS-quxchrASC3cczTXUGEm8-nJ3fDAjiAzhIIW-3pyj_1aBdlLKGpSSbMBeFkkuL8aS1lHFXPIwVAj1Mk4TMSG03pEV8tWs0c7m2GA2Z0LwQ0w7GMAgMz7X8OvNpg26ObfrqZlpP7sJtkU8oo1gWvWAJfhc7MzhWhE6HJveuChmxtZMHONd2uI4DKtiv-7waGufJhLoH0cHtLSEA5OIqtrWLtR7el_Blh32SH32UE6ZQ0wd9bu_W0XXnFHt3U56dz6wsJLKX6TLS7g5Coir5svbBDvlZyg2S08ItS1o4ml0IwE4jf4WTVfO3-h_vbtEF4JpuVJ2xTfs1-XcwX7J-Nl9Rw80IKt_31c19xTg-55Wgyq-XE2ORHxKx3UMBHrAv_9ChA=w1698-h955-no


In with the new:
LsYPTQxdPgjhrSvL1JaQ_3A5owT5EkiTiOrDSOQujoUNEWpi1LcHohOHIoZJtFhDlv99NLAu5pIEKNypma-0xcklzETIZ7D1aw_I1jF9x_xcQ34ut-3UdX2I9Cyqgxfn9fhNySh1zS2ghyKXDmerA6ZI4I3dsgZd-SmIxCDKPdlZNqN7k7k1qpwWqdFqBnto97c84s_t6s4x3XMZI0whECIftyg7AEYs7kp6rarl8WsBcTNbdlmSYjiCwWU1IDHfqKpx_dmblIQQwzTT1yoz6BIUSxX0LbQfodQrRIkrFro08xKBaQCDuc8873bOOXM-DIkz6fSXQeIADMj1XOPjFpSzJlq1kNPBVVB6HYusi4Jh_iQ9S-zj_TylDI7x-FHFWFaSkvLhPv1SCMQ8fv-lV5veK2TqvDqoY_j_nqtrhBU8-uFboEevsjK7B_eB3FOKVrznYcgLLK2yzMLrqMRnua0_SDI5nwUBSIAkiMAsKoA0Miik7gI-26b3TFGyhFgTFh9tdIHdnne2f0DElZHSLy1qmhppXak57GnBCKrj-CBCoN-XcIbNBFzsDNgqoug4qllJ3g=w1698-h955-no


Finished product:
e7OYHyfWPS-e1nE7NLC4UcdYVnCsljfU4A8S68CF6TrhVEnYPMq7jX8Ww0IifhwHwtL9AnM6LTdcZ70c5amSCBHeR95cjXdYUpD6dESXdNF6RkjwT1lpGyx_NyjBgbigLzU_AmocKqu0XkzJc-gUy2tyC1hnm9Ebz16vk8wML_ANV-SIiElkj-NOkgYq1KBLH0H8x9dxMGGgVjKuewQiy9nSyoibImiVrk5W4qcu6q6m9smXx55F1IgK3nnNKBJsZZJyWqqdKE3a38Dz9GZfuOYzcOhq4VBOn5C6_m_zkT_6wudNZNhOvxuBKJZX6nwk5wB9Pt9o7zk-yk8YAktkLnbrUAGgBZu1lW0f-mLx0B2QMXVJhWx9AdphEx6hQtLaPAVfIETXLMCNA_NJp5PG1NMHNei_DXAxEfjqBSW65LZCFTrcDBGC-gSMYe6lRB-CeoptSZQSxgjomrHSp7Id6qYWl0kCGD6uY1UTbwT38NYBZEWP3Vuqg1LaTeQPCGTmiPIfpt9vj-nC0sAp9Z-ZLI-2JmkYgBIIOn2JG9BBPNwXeN1N4HSe3Z9DvlOiTmOeezz7aw=w1698-h955-no


Next two big items are weatherproofing the cabin and getting the AC functional, but things are definitely moving along in the right direction. I've been chatting with Vaughn about going to a car show in Redding, CA at the end of April (long weekend away, ~7h drive one way) and I would like to take the GT for that. Definitely motivational...

Chris
 
Chris- Nice work! I'm really looking forward to seeing the finished product on my way through to Alaska or maybe Cool April Night's.
 

Chris Kouba

Supporter
Been doing quite a bit of work to try to weatherproof the car and thought I had made a bit of progress. I knocked out 100 miles on Thurs (at least according to the odometer, which I believe to be a little optimistic- but the speedo is fairly accurate...). Part of this included driving in an absolute deluge, during which I did get water into the cabin, so back to the drawing board. I think I am on the right trail though.

The rain was quite late in the run though and I can honestly say I had a fantastic trip. I got onto a few roads on which I hadn't been before and thoroughly enjoyed them. It was definitely a bonding experience with the car. No crazy speeds, but got to lean into the corners a bit and that sound is still symphonic...

Interestingly enough though, today (literally, the next day), a friend sends me a link to facebook, of someone who posted a pic of the car on the freeway. It's my 15 seconds of fame!

Regardless, more proof it moves. Things are good here.
 

Attachments

  • GT on the ROAD!!.jpg
    GT on the ROAD!!.jpg
    113.9 KB · Views: 527
Chris,
Great to see you're up and running. Please feel welcome to join me with Cascade Cobras in Portland for some drives this year. We could use more than one GT40!
 

Chris Kouba

Supporter
Chris,
Great to see you're up and running. Please feel welcome to join me with Cascade Cobras in Portland for some drives this year. We could use more than one GT40!

Hi Dave,

Sounds like that could be fun! I assume it's these guys:

Cascade Cobras

Will check them out. If it's someone else, please feel free to point me in the correct direction.

Chris
 

Chris Kouba

Supporter
My car was registered and logged its first legal miles in May of 2012. I took it apart to address a few build items this past September (2015) after running it just barely over 1000 miles (1008 I think) during that time. I got it back together and drove it again in Feb- the 18th to be exact, and as of this evening, it's showing 1803 miles on its clock.

On Thurs, I put it together and ran it ~100 miles to shake it down for a drive with my wife. I worked on it all Fri, and Sat we put ~120 miles on it out along a local gorgeous river. Everything worked the way it should and we had a great time. Today, I put another ~140 miles on it following Dave and 10 other cars from the Cascade Cobras car club through the hills NW of Portland. Great cars, great roads, fun drives, and really nice people.

Along the river:
2016-04-17.jpg


This coming weekend will be its greatest challenge so far- the plan is to take it to Redding and hang out with Vaughn who's putting his car in the Cool April Nights show there. It's a little over 400 miles each way, so it's going to be a big chunk of seat time, and I am quite looking forward to it. My goal is to get over 1000 miles for the weekend (Weds through Sun).

Cresting a pass east of Estacada:
2016-04-17.jpg


The last several months of working on it has truly made a massive difference in its usability and validity as a vehicle. I've fixed the wiring issues, added some ventilation, have CV boots which are clearly up to the job, rebuilt the rear clip support into something functional, adjusted the front end alignment, fixed the knocking heim joints, weather-proofed the wheel wells/firewall, and re-made the alternator pulley. In addition, my thermostat got wedged open, so I got to replace that too. Once I get the AC working, this thing might become my daily driver!

Since joining this forum, I've had the pleasure to chat with and meet a handful of people, and without fail, they have all been really nice people. There are a good bunch of people out there with a car habit just like mine and I must say, it's been nice getting to know them. I've enjoyed building my car and I am finally starting to enjoy DRIVING it!

I look forward to posting the next update, hopefully with great tales of travel under our own power and more good times with great people. For now, I leave you with 57s of hand-held cell phone video uploaded in low res with crappy sound. All I can say is you should'a been there:

GT40 by Bethany | Photobucket

Chris
 
Back
Top