Its just like Christmas.....

- Forums
- GT40 Replica Manufacturers' Corner
- RCR Forum - RCR40/SLC/917/Superlite Aero
- The SLC Clubhouse
You are using an out of date browser. It may not display this or other websites correctly.
You should upgrade or use an alternative browser.
You should upgrade or use an alternative browser.
Rumbles SLC Build
- Thread starter rumbles
- Start date
-
- Tags
- g50 gear ls3 powernation rumbles slc superlight yellow
What no pics already....
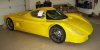
My SLC Arrived!
My SLC arrived late Friday. I spent Saturday inventorying all the parts and was very pleasantly surprised. All parts were shipped except the e-brake cable and the wiper arm. I give RCR an “A+” for completeness!
Fran recently added Darin to the RCR team to handle parts/fulfillment. Darin tells me that the remaining parts should come in a couple weeks.
Well done Darin!
Attachments
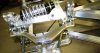
I've had a few busy days preparing the engine bay.
- I polished all 4 of the rear A-arms and the 2 bell cranks. That's the jewelry!
- Then I sanded and scotchpaded all the other aluminum in the engine bay.
- Then a coat of Ballistal to preserve the sheen.
- Today I finished all the brake and clutch hard lines.
- It was a 60 degree day here today, so I painted the engine cross member as well as all 4 brake calipers. There's no more "Chevrolet" on the Brembos.
Attachments
And you have had your car for how many days.?....wow
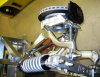
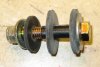
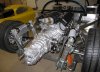
I got the motor, transaxle and half-shafts installed today.
I made some "Redneck" isolators for the front motor mounts. It uses 1/8" rubber washers to cushion the light load. One washer goes on top of the LS3 mounting ear, the 2nd one goes between the LS3 mounting ear and the SLC cross member, and 3rd one goes betwwen the cross member and the nut/washer. The bolt is Gorilla taped to prevent any metal to metal contact. Total cost was $5.
The vast majority of the load is on the rear motor/trans mount points. I left that stock for now, since that's further away from my ears.
Attachments
Last edited:
Bill
Thank you so much for letting my wife and I come up to your place to see your car. I was very impressed with what you have done. I can't wait to see the finished product (which will most likely be soon as quick as you are going). Again, thanks for letting us take some of your time.
Phil Weeks
Thank you so much for letting my wife and I come up to your place to see your car. I was very impressed with what you have done. I can't wait to see the finished product (which will most likely be soon as quick as you are going). Again, thanks for letting us take some of your time.
Phil Weeks
Phil ,
as you are a machinist I am sure you have a good idea how much work goes into designing and manufacturing an SLC.
as you are a machinist I am sure you have a good idea how much work goes into designing and manufacturing an SLC.
The workmanship of the chassis, machined parts and attention to detail (both RCR and Bill) is incredible. I am more excited than ever about becoming an SLC owner. As a matter of fact, my wife seems to be coming on board as well (lucky for me). Bill was very gracious with his time and showed us a lot of things and shared a lot of insite on this build. Also the quality of the parts, pieces and design are top notch.
Phil,
It was great meeting you and your wife. Here are a few of the references I mentioned to you:
It was great meeting you and your wife. Here are a few of the references I mentioned to you:
- Currentperformance.com is a good place to go for a electrical harness for your LS1. They start at $525 and come complete, so just add 12V to make noise. I suggest you let them flash your ECM as well so if you have any problems you are dealling with just supplier. Their Tech support has been very helpful with my LS3 harness and ECM.
- Here is a YouTube video I did a while back on "How to Build your Kit Car Fast". I presented this at the May 2012 Carlisle Kit Car Nationals. It may be a bit elementary for you with your race car building background.
Last edited:
Electrical is Done!
I finished the electrical system today....almost. The ISIS system installed fairly easily. The instruction were pretty good and it’s mostly plug and play.
The things that took a while were:
I finished the electrical system today....almost. The ISIS system installed fairly easily. The instruction were pretty good and it’s mostly plug and play.
The things that took a while were:
- I changed the locations of the Master Cell and the 2 Powercells to hide them from view. I put all the motor electronics and the rear ISIS Powercell on the driver’s side in space between the chassis and body. It all fit but it was like stuffing 10lbs of potatoes into a 5lb sack. I mounted the ISIS Mastercell and front Powercell to the underside of the dash on the passenger side.
- There was a problem in the ISIS Mastercell cable where the start button line was not connected. ISIS Tech Support is sending me a new cable. In the meantime, the basic ignition and starter connections are working.
- There were a few things missing in the ISIS manual. I gave ISIS Tech Support some constructive feedback and they plan to make the updates.
- Use the key fob to ensure security is turned off. If security is turned on, nothing works.
- There is no instruction for where the front Powercells "A" vs "B" connectors go (they're interchangeable). Plug in the P1 connector first, then let the cable lengths on each of the A/B plugs guide you to their nearest connector on the Powercell.
- Go to ISISpower.com and download their 3 cell manual. Printout the 3 pages on troubleshooting and how to read the Insight readout on the Mastercell. You will reference it frequently.
- You can file the next one under "Stupid Builder Tricks". I assumed that the advanced technology in the ISIS included over-current sensing circuitry instead of good old fuses...AAACK...Wrong again! You do need to remove the clear plastic cover on the Powercells and install fuses for each of the circuits. There is no guidance on what fuse size each circuit requires, so use your best judgment. ISIS Tech Support tells me they will add that guidance to the instructions as well.
Similar threads
- Replies
- 26
- Views
- 8K
- Replies
- 7
- Views
- 6K
- Replies
- 4
- Views
- 10K