
- Forums
- GT40 Replica Manufacturers' Corner
- RCR Forum - RCR40/SLC/917/Superlite Aero
- The SLC Clubhouse
You are using an out of date browser. It may not display this or other websites correctly.
You should upgrade or use an alternative browser.
You should upgrade or use an alternative browser.
Rumbles SLC Build
- Thread starter rumbles
- Start date
-
- Tags
- g50 gear ls3 powernation rumbles slc superlight yellow
I'm working on the fuel system now.
How are you all setting up the tank vent line and check valve. With the SLC's big lateral Gs, I'm worried about fuel sloshing out the vent.
Mine is not tested yet, but I am using a modified fuel cell vent. Modified, in the sense that the spring was removed, so air can pass freely in and out, but in a rollover or if for any reason the fuel tries to slosh out the vent, the ball seals against the seat, preventing fuel actually escaping.
That's going into the carbon canister that Allan used on his car.
Fuel System and Mid-pipe
I made some progress on the fuel system. I prepared the compartment behind the cockpit for the tank. My SLC has a single solid floor pan under the tank and cockpit, so I need to ensure any spilled fuel is not captured in there. I drilled a hole in each corner of the outboard smaller sections (8x). In the larger center section I drilled drain holes in the corners as well, plus 2 in the center (6x). The brace that separates the tank compartment from the cockpit is only partially welded along its length. That’s fine for strength, but those gaps could allow spilled fuel to seep under the brace and flow into the sunken seat wells. The thought of sitting in a bathtub of fuel makes me twitch, so I sealed the gaps with RTV. I finished-off the tank compartment with some sound deadener to keep the pan from rattling.
The tank was full of aluminum filings, so heed the instructions in the manual to thoroughly rinse out the tank. I scuffed the back of the tank to match the rest of the engine compartment. I positioned the tank as far forward as possible. I’ll go into more detail about why when I do the engine cooling and the heater/AC. Moving the tank forward leaves about a 1 ½" gap between the tank and the lower aluminum chassis structure, so I added some covers to “Mind the Gap”.
I had 2 of the fuel surge tank bungs changed to AN-6, so all the connections are the same size and easier to run a standard 3/8” fuel line that links all the other components.
I wanted the fuel pumps to be as quiet as possible since they are right behind my seat. I thought I had 2 vane style pumps, but the lift pump was a noisy solenoid thumper type. I’m waiting for another low pressure vane pump to arrive, so that will delay the first start of the motor.
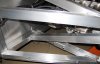
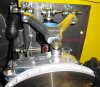
Wow, Trying to fit a surge tank, 2 filters, 2 pumps, and a regulator in that little space next to the tank is like stuffing Fat Albert into size small tighty-whiteys. It fits, but it ain’t pretty.
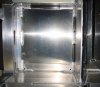
I also fabricated cover for the tighty-whitey compartment to give the engine compartment a clean look.
On the bright side, the ISIS ignition circuit is actuating the motor harness relays and the ISIS starter circuit does turnover the motor. Just add fuel to make noise!
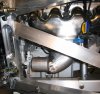
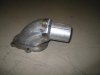
In the meantime, I fabricated a mid-pipe for the LS7 headers. The transition from 4” to 3” pipe is a bit abrupt, but there just isn't room for a smoother transition. I’ll cut the end to length once I fabricate the rest of the 3” system. One mid-pipe down, one to go…
I made some progress on the fuel system. I prepared the compartment behind the cockpit for the tank. My SLC has a single solid floor pan under the tank and cockpit, so I need to ensure any spilled fuel is not captured in there. I drilled a hole in each corner of the outboard smaller sections (8x). In the larger center section I drilled drain holes in the corners as well, plus 2 in the center (6x). The brace that separates the tank compartment from the cockpit is only partially welded along its length. That’s fine for strength, but those gaps could allow spilled fuel to seep under the brace and flow into the sunken seat wells. The thought of sitting in a bathtub of fuel makes me twitch, so I sealed the gaps with RTV. I finished-off the tank compartment with some sound deadener to keep the pan from rattling.
The tank was full of aluminum filings, so heed the instructions in the manual to thoroughly rinse out the tank. I scuffed the back of the tank to match the rest of the engine compartment. I positioned the tank as far forward as possible. I’ll go into more detail about why when I do the engine cooling and the heater/AC. Moving the tank forward leaves about a 1 ½" gap between the tank and the lower aluminum chassis structure, so I added some covers to “Mind the Gap”.
I had 2 of the fuel surge tank bungs changed to AN-6, so all the connections are the same size and easier to run a standard 3/8” fuel line that links all the other components.
I wanted the fuel pumps to be as quiet as possible since they are right behind my seat. I thought I had 2 vane style pumps, but the lift pump was a noisy solenoid thumper type. I’m waiting for another low pressure vane pump to arrive, so that will delay the first start of the motor.
Wow, Trying to fit a surge tank, 2 filters, 2 pumps, and a regulator in that little space next to the tank is like stuffing Fat Albert into size small tighty-whiteys. It fits, but it ain’t pretty.
I also fabricated cover for the tighty-whitey compartment to give the engine compartment a clean look.
On the bright side, the ISIS ignition circuit is actuating the motor harness relays and the ISIS starter circuit does turnover the motor. Just add fuel to make noise!
In the meantime, I fabricated a mid-pipe for the LS7 headers. The transition from 4” to 3” pipe is a bit abrupt, but there just isn't room for a smoother transition. I’ll cut the end to length once I fabricate the rest of the 3” system. One mid-pipe down, one to go…
Attachments
Last edited:
Ken Roberts
Supporter
Bill you may also want to get your tank pressure tested before you button it up,
you just never know ?
I agree as mine had a leak at a factory weld.
Ken please send us notice of this kind of issue and its location, I would really like to be able to track a problem like this and remove the potential for a repeat occurence.
Thanks
Thanks
Does anyone know the answers for the following:
- What model and year of Cadillac did the steering column come from?
- What is the size of the fluid line fitting for the G50 clutch slave cylinder? Like many of you, I'm using the Wagner SC103451 (BMW PN:28-103451) cylinder. I think the fitting is the same size as the stock G50 cylinder.
Ken Roberts
Supporter
Steering column is from a Cadillac XLR. I believe the model year on mine was 2004 or 2005. I have the pinouts for the various connectors.
Hi Bill,
Like many others here, I'm following your build with huge interest. What's the latest? Going into Rumbles withdrawal.
I'd really like to get up there sometime soon and see your build.
Mike
Bill,
As am I. :thumbsup:
I've been heads down on my SLC, so I haven't posted in a while. A lot has been happening and a lot hasn’t been happening. I seem to make progress in one area, but then I’m not quite able to finish for lack of a part, technical problem, etc. As a result I’ve been skipping around a bit.
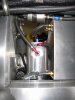
I finished my Fat Albert fuel system yesterday. I wanted a quiet low pressure pump to fill the surge tank. The first 2 pumps I bought/returned were very load. I finally spoke to Carter Pump Tech support and they recommended the Carter P60430. It was a great choice. It flows 30GPH, draws only 2AMP, and is whisper quiet. Best of all, it was just $29 and that includes a filter. Then I broke one of my AN fittings and had to wait for another. I decided to go old school on my tank vent. I ran a line from the top of one corner of the tank, over to the opposite corner and then down and out the bottom of the pan. That will keep fuel for sloshing out whether I’m on my side or on my skid lid. I’m ready to add gas now, and fire the motor now.
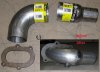
I made some progress on the exhaust system. I finished the 2nd exhaust mid pipe. Then I mocked up the rest of the exhaust / muffler with some PVC pipe and cardboard (See PICs). Due to limited space I’m changing mufflers from the rectangular DynaMax VT to 6” round Flowmaster DBX/PRO.
I finished my hard brake lines and flex lines as well. I was missing the banjo bolts and fittings, but they came today. The only areas of note are:
I solved the clutch slave cylinder fitting mystery. My local Advanced Auto store allowed me to go into their back room and rummage thru all their connectors. It’s a Brake Adaptor - 3/8-24 x M10-1.0 by Dorman (part#327850). I haven’t added fluid to the system yet, but it looks right. I just need 1 flex line to finish the clutch release system.

I finished my Fat Albert fuel system yesterday. I wanted a quiet low pressure pump to fill the surge tank. The first 2 pumps I bought/returned were very load. I finally spoke to Carter Pump Tech support and they recommended the Carter P60430. It was a great choice. It flows 30GPH, draws only 2AMP, and is whisper quiet. Best of all, it was just $29 and that includes a filter. Then I broke one of my AN fittings and had to wait for another. I decided to go old school on my tank vent. I ran a line from the top of one corner of the tank, over to the opposite corner and then down and out the bottom of the pan. That will keep fuel for sloshing out whether I’m on my side or on my skid lid. I’m ready to add gas now, and fire the motor now.
I made some progress on the exhaust system. I finished the 2nd exhaust mid pipe. Then I mocked up the rest of the exhaust / muffler with some PVC pipe and cardboard (See PICs). Due to limited space I’m changing mufflers from the rectangular DynaMax VT to 6” round Flowmaster DBX/PRO.
I finished my hard brake lines and flex lines as well. I was missing the banjo bolts and fittings, but they came today. The only areas of note are:
- Clearance is tight around the banjo bolts on the rear calipers, so you need to remove them to install the brake lines
- The hard line connector that goes thru the tub to connect to the front flex lines is in an odd spot, so I moved it forward. I wanted to use the area where the lower A arm protrudes into the foot well as a dead pedal, but the brake line connector was in the way. Also, I couldn’t find a good way to route the flex line without it rubbing something or kinking. The new connector location seemed to fix both problems.
I solved the clutch slave cylinder fitting mystery. My local Advanced Auto store allowed me to go into their back room and rummage thru all their connectors. It’s a Brake Adaptor - 3/8-24 x M10-1.0 by Dorman (part#327850). I haven’t added fluid to the system yet, but it looks right. I just need 1 flex line to finish the clutch release system.
Attachments
Ken Roberts
Supporter
Nice progress Bill. I'd rethink your choice of hose clamps. Traditional "worm" type of hose clamps are not rated to handle the increased pressure of fuel injection. They may be okay on the low pressure side but change them up after the high pressure pump.
I like the idea of relocating the hard brake lines in the tub that exit to the front wheels. Doing so gives you more room for the feet. Did you just loop them forward a bit or did you cut and shorten the pipes?
I like the idea of relocating the hard brake lines in the tub that exit to the front wheels. Doing so gives you more room for the feet. Did you just loop them forward a bit or did you cut and shorten the pipes?
Last edited:
Bill - I now know why you stated the fuel system components were a tight fit.... you have your lift tank in that cavity. Most are outside of that area IIRC.
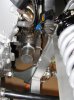
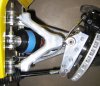
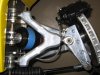
I have yet to remove and turn around my suspension upper mount bolts - but need to do this so that removal of the two upper bolts (to allow access and turning of the rod end) doesn't become a PITA. Look at the bolt orientation and removal access in relationship to the shock upper bracket & clearance -- see picture below.... unless I'm missing something.
I have yet to remove and turn around my suspension upper mount bolts - but need to do this so that removal of the two upper bolts (to allow access and turning of the rod end) doesn't become a PITA. Look at the bolt orientation and removal access in relationship to the shock upper bracket & clearance -- see picture below.... unless I'm missing something.
Attachments
Ken,
Good point on the clamps, I'll change them out for the proper ones. Although, I used the worm type on the EFI lines on my Hot Rod without any problem in the past 3-4 years. I do inspect them annually.
I used a tube bender to loop the original brake hard lines to the new forward position.
Shark,
When I do my alignment, I'll re-orient the upper A arm bolts to make them accessable. The center coilover bolt is captured in either orientation.
Good point on the clamps, I'll change them out for the proper ones. Although, I used the worm type on the EFI lines on my Hot Rod without any problem in the past 3-4 years. I do inspect them annually.
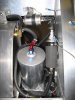
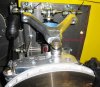
I too would only use the proper crimp on clamps ... also, is that push loc hose or just regular fuel hose shoved onto a push loc fitting? If it's the latter that's asking for it to blow off one day.
I too would only use the proper crimp on clamps ... also, is that push loc hose or just regular fuel hose shoved onto a push loc fitting? If it's the latter that's asking for it to blow off one day.
Those are the proper push lock quick disconnect fittings
Similar threads
- Replies
- 26
- Views
- 8K
- Replies
- 7
- Views
- 6K
- Replies
- 4
- Views
- 10K