
- Forums
- GT40 Replica Manufacturers' Corner
- RCR Forum - RCR40/SLC/917/Superlite Aero
- The SLC Clubhouse
You are using an out of date browser. It may not display this or other websites correctly.
You should upgrade or use an alternative browser.
You should upgrade or use an alternative browser.
Rumbles SLC Build
- Thread starter rumbles
- Start date
-
- Tags
- g50 gear ls3 powernation rumbles slc superlight yellow
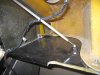
The small one in the corner is not a standard part ...Nice creative job on hinging Bill
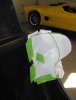
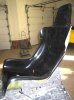
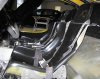
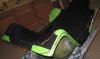
When I bought my SLC, I opted for 2 gentleman seats to fit my gentlemen's posterior. I knew the gentleman's seat would not fit on the passenger side, and I finally got around to installing & trimming it.
Before you can trim the passenger seat, you need to:
When you are satisfied with the shape, make a template to cut the other side to match. Use that same template to cut the driver's seat to match as well.
While you are trimming the seats, you may want to do a final trim around all the edges as well.
Once the seats are upholstered, I think they will look fine.
Before you can trim the passenger seat, you need to:
- Install the driver seat and adjust it to your liking. This gives you the height and reclining angle so you can match it on the passenger seat.
- Install the shifter. The left front corner of the passenger seat will hit the shifter box, so the shifter's left/right position on the center beam will make a difference. For example, I wanted my driver's seat aligned as close as possible with the steering column, so the seat needs to be as far right as possible. To allow the driver's seat to slide forward/aft without hitting the shifter, the left side of the shifter needs to be flush with the left side center beam. That means that the 3" wide shifter hangs about 1" over the 2" center beam onto the passenger side.
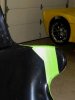
- Install the interior passenger door panel. The passenger seat shoulder wing will interfere with the interior door and need to be trimmed. Depending upon the passenger seat height and angle, the headrest may interfere with the door panel as well.
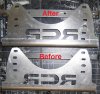
- Install the passenger seat shell into its brackets. For a cleaner look, I mounted the seat brackets at just above the floor level, but with the seat bottom extending down into the sunken well. That allows a flat floor to be fabricated around the seat when I trim it out with carpet. That required that I drill 2 more lower adjustment slots in the brackets.
When you are satisfied with the shape, make a template to cut the other side to match. Use that same template to cut the driver's seat to match as well.
While you are trimming the seats, you may want to do a final trim around all the edges as well.
Once the seats are upholstered, I think they will look fine.
Attachments


Last edited:
Since I tend to over-think everything, I took another close look at the depth behind the center console, and I think a 1 DIN head unit may fit. There is a space above the top of the aluminum structure that looks big enough to slide a 1 DIN into. The head unit would have to be mounted at the very top of the center console and you may need to do some minor modification to the top of the console opening.
If you want a touch screen for Navigation and rear view camera, your choices are limited. The majority of touch screen 1 DIN units mount their screen upwards, and that would interfere with the console visor. There are a few 1 DIN units with a touch screen that extends downward that might work.
The problem is that they are all Chinese brands that you probably haven't heard of and they all have a very low screen resolution, so a backup camera image would be fuzzy.
Click here for example 1:

Click here for example 2:
U!BS!LwPjNF!~~60_3.JPG)
[ame="http://www.amazon.com/ACOUSTIK-PTID-7000NR-NAV-READY-IN-DASH-TOUCHSCREEN/dp/B005BZQSJG/ref=pd_sim_sbs_e_3/192-0318243-0851503"]Click here for example 3:[/ame]

If you want a touch screen for Navigation and rear view camera, your choices are limited. The majority of touch screen 1 DIN units mount their screen upwards, and that would interfere with the console visor. There are a few 1 DIN units with a touch screen that extends downward that might work.
The problem is that they are all Chinese brands that you probably haven't heard of and they all have a very low screen resolution, so a backup camera image would be fuzzy.
Click here for example 1:
Click here for example 2:
[ame="http://www.amazon.com/ACOUSTIK-PTID-7000NR-NAV-READY-IN-DASH-TOUCHSCREEN/dp/B005BZQSJG/ref=pd_sim_sbs_e_3/192-0318243-0851503"]Click here for example 3:[/ame]
Fascinating. I didn't know there was even a class of headunits like this (a 7" screen in a 1-DIN size format) that dropped down.
You'd probably have to make a custom console or lower the stock one to make the screen fit-- or have you tried it with the stock console?
I wonder if there are better quality ones out there?
Still, a tablet solution is pretty cheap, and offers great resolution if you choose carefully.
You'd probably have to make a custom console or lower the stock one to make the screen fit-- or have you tried it with the stock console?
I wonder if there are better quality ones out there?
Still, a tablet solution is pretty cheap, and offers great resolution if you choose carefully.
Last edited:
I just made some preliminary measurements. I think the drop-down screen would fit within the stock console, because the 1 DIN unit would have to be mounted high in the console..
Yup, I think I'm still going with an Android tablet mainly because of the higher resolution screen and the flexability to do just about anything you want with it.
Yup, I think I'm still going with an Android tablet mainly because of the higher resolution screen and the flexability to do just about anything you want with it.
Bill,
I looked on Ebay for the android tablets and found a bunch for around $40. Does that sound about right?? What sizes do they come in, and what should I look for when looking to purchase. I have a bunch of room beneath my dash. Maybe 9" or there about. Would still have to fab a frame to hold it. Still looking at the other parts of the puzzle.
Bill
Yup, I've seen those low cost Android tablets as well, but you get what you pay for. If you don't plan to demand a lot of your tablet, then a cheaper tablet may work for you.
Here are some things to think about:
Here are some things to think about:
- Google allows manufacturers of Android tablets to add their own wrapper with the look and functions they want. Some of these wrappers severely hamper and hide the underlying Android system from fully functioning. For example, Amazon Kindle, Barnes & Noble Nook, and most tablets sold by cellular providers limit access to many core Android functions.
- External dimensions: Ensure the tablet will fit withing the space you have.
- Button and connector location: Once mounted, you will need access to the tablet’s buttons for power, volume, home, etc. These buttons may be on the front, sides or even the back side of the tablet. Conversely, you will want to hide the connectors for power, audio ear bud jack, USB, lightning, etc.
- Tablet Speed: An info-tainment system requires only enough speed to run apps for Navigation, maps, MP3, internet music streaming, and travel apps. Even a low end tablet will be faster than the typical units that auto manufacturers use.
- Tablet memory (RAM): Your MP3 music library will probably be the single largest memory hog. However, you will need enough memory for offline maps and a few apps as well. Most tablets come standard with at least 8M-16M of memory, which is usually enough. Many tablets come with a SD memory expansion slot if more memory is needed.
- Screen Brightness: Depending upon where you mount the tablet, it may be in direct sunlight, so ensure it's bright enough for your use.
- Screen Resolution: Many new cars have touch screens with 480 lines of resolution. That works fine for displaying the MP3 data, radio station and even a close range backup camera. However, if you want to display a video image of the traffic behind you while driving, you need to step up to 800 – 1200 lines of resolution to get a decent image.
- Wireless connection: Many info-tainment features require a wireless connection for things like music streaming, navigation maps, travel apps, etc. Some data can be preloaded onto a tablet, but App function will be limited. Types of wireless connections include Bluetooth, WiFi, or telecom modem. A data connection can be made thru a Hotspot enabled phone or by a telco modem inside the tablet. Either way, a 3G or 4G connection speed is needed for apps to run properly. That means you will need a monthly data plan from your wireless provider.
- Compatibility with Peripherals: If you plan to connect other devices to your tablet, you should make sure that they are compatible. A common peripheral for info-tainment systems is a rearview camera.
- Power input: Some tablets get power from their USB plug. If so, you are using a USB peripheral, you will need a powered USB hub with enough amperage to power your tablet.
- Operating System (OS) version: Some less expensive tablets are sold with older versions of the operating systems. Ensure this will not restrict the apps you want to run, or ensure the OS can be updated.
I just got a pre-registration notice for the 2014 Hot Rod Power Tour. The route is different than I expected, and bypasses Detroit.
A detour thru Clinton Township, MI is a possibility, but it adds 150 miles to the trip.

Here is the Clinton Township detour route. It would be a 424 mile 6.5 hour day.

A detour thru Clinton Township, MI is a possibility, but it adds 150 miles to the trip.
June 7: Charlotte, NC - ZMAXX Dragway at Charlotte Motor Speedway
June 8: Knoxville, TN - Chillhowee Park
June 9: Charleston, WV - Downtown (Kanawha Blvd)
June 10: Norwalk, OH - Summit Motorsports Park
June 11: Crown Point, IN - Lake County Fairgrounds
June 12: Bettendorf, IA - The Isle Casino
June 13: Wisconsin Dells - Chula Vista Resort
June 8: Knoxville, TN - Chillhowee Park
June 9: Charleston, WV - Downtown (Kanawha Blvd)
June 10: Norwalk, OH - Summit Motorsports Park
June 11: Crown Point, IN - Lake County Fairgrounds
June 12: Bettendorf, IA - The Isle Casino
June 13: Wisconsin Dells - Chula Vista Resort
Here is the Clinton Township detour route. It would be a 424 mile 6.5 hour day.
Last edited:
Bill, Do you have a link to that tablet your using?
Bill, that's quite a detour to come by the shop....you may have to be pretty keen to add that kind of distance to your drive...
Dave,
I'm using an old Motorola Xoom tablet to mock-up the interface. It's a 10" device and too large to fit where I want to mount a tablet.
I've been looking at the many Android 7" tablet choices out there and have narrowed the field down to either a 4G enabled Samsung Tab 3 or the latest Nexus7.
I'm using an old Motorola Xoom tablet to mock-up the interface. It's a 10" device and too large to fit where I want to mount a tablet.
I've been looking at the many Android 7" tablet choices out there and have narrowed the field down to either a 4G enabled Samsung Tab 3 or the latest Nexus7.
- The Samsung Tab 3 has a a lower screen resolution, but ATT has several good deals on it right now. In fact, ATT will give you a the Samsung Tab 3 if you get a Samsung Galaxy S4 phone!
- The updated Nexus7 was recently released. It has one of the best screens on the market (better than the new iPad Mini Retna) and its narrow overall height (when mounted landscape) gives it the ideal form factor for where I want to mount it. The down side is that it's pricey at $349. I think I'll put it on my xmas wish list and hope for the best...I've been a very good boy this year!
Bill, Do you have a link to that tablet you're using?
Fran,
I was very surprised that the Hot Rod Power Tour bypassed Michigan to go on to Wisconsin. It seems like blasphemy since the vast majority of participants will be driving hot rodded American Iron, but skip past the iconic mecca of Detroit, the "Motor City".
I was very surprised that the Hot Rod Power Tour bypassed Michigan to go on to Wisconsin. It seems like blasphemy since the vast majority of participants will be driving hot rodded American Iron, but skip past the iconic mecca of Detroit, the "Motor City".
Bill, that's quite a detour to come by the shop....you may have to be pretty keen to add that kind of distance to your drive...
Can the Nexus 7 run the GPS app without being connected to a wifi or having a data plan? Similar to say a garmin GPS just connected to a satellite.
PeteB
GT40s Supporter
Can the Nexus 7 run the GPS app without being connected to a wifi or having a data plan? Similar to say a garmin GPS just connected to a satellite.
Yes, but you have to use a navigation app that allows you to pre-load the maps. Google maps requires a connection.
I just bought The Samsung tab 3 / 8 it just fits in Horizontally so with a little massaging it will fit with hard wires for power, I email Samsung they told me it will not work with a WiFi camera so I am going to see it it can be done with a USB connection and a splitter out of the Micro USB port.
I just bought The Samsung tab 3 / 8 it just fits in Horizontally so with a little massaging it will fit with hard wires for power, I email Samsung they told me it will not work with a WiFi camera so I am going to see it it can be done with a USB connection and a splitter out of the Micro USB port.
Why wouldn't it work with a wifi camera? It only needs wifi, which it has. I suspect that there may have been a mis-communication.
It's more likely that it doesn't support host mode, which would be required, among other things, to support a wired camera.
But let us know if you can make a wired cam work with a splitter. Do you intend to get power to both the camera and the tablet at the same time? That has traditionally been the issue.
One thing to keep in mind with touchscreen interfaces is that they can be difficult to use in a vehicle in motion. That is why built-in places to brace a couple of fingers and thumb while trying to manipulate a UI element can provide a better user experience than trying to poke at the right place on the screen with your hand bouncing around un-braced in front of the screen.
See the rails molded around the edges of the touchscreen of this aviation interface for one example of how to do this.
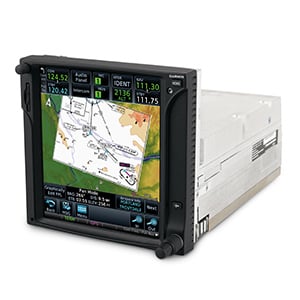
See the rails molded around the edges of the touchscreen of this aviation interface for one example of how to do this.
Similar threads
- Replies
- 26
- Views
- 8K
- Replies
- 7
- Views
- 6K
- Replies
- 4
- Views
- 10K