Hey Bill…. hope the build is going well! I am considering attaching my body to the splitter and hinging it much like yours. In order to keep the hinge behind the body, it sets back a distance. That keeps about 10" or so of the splitter in front of the hinge. My question is this: How far back can you have this hinge without the splitter hitting the ground when opening the front end? I don't have my shocks yet so I am unclear about clearance.

- Forums
- GT40 Replica Manufacturers' Corner
- RCR Forum - RCR40/SLC/917/Superlite Aero
- The SLC Clubhouse
You are using an out of date browser. It may not display this or other websites correctly.
You should upgrade or use an alternative browser.
You should upgrade or use an alternative browser.
Rumbles SLC Build
- Thread starter rumbles
- Start date
-
- Tags
- g50 gear ls3 powernation rumbles slc superlight yellow
Hey Bill…. hope the build is going well! I am considering attaching my body to the splitter and hinging it much like yours. In order to keep the hinge behind the body, it sets back a distance. That keeps about 10" or so of the splitter in front of the hinge. My question is this: How far back can you have this hinge without the splitter hitting the ground when opening the front end? I don't have my shocks yet so I am unclear about clearance.
Michael, I'm curious; your original post read:
“I don't have my shocks yet (not sure they will ever come???)”
Did you edit out “(not sure they will ever come???)” or did Fran delete it? :sad:
There is no indication that the post was edited by you!
Jim
Nothing deleted or modified by me
...
...
Nothing deleted or modified by me
...
Now, now Fran.....you know that's technically not true....you just modified your own denial! :laugh:
Your original post read: “I didn't delete anything.....”! :shrug:
Jim
Out of respect for the build thread, I would delete post 702-705!
Sorry for the delay, I've been out of the country for the past week, in Cuba.
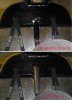
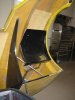
The hinge pivot point needs to be as far forward and as low as possible. My pivot point is deep inside the fangs of the nose and about 3/4" above the splitter. It misses the ground and the front of the tire by very close tolerances. I trimmed the rear edge of the splitter for tire clearance.
Also, the rear of the clam hangs up on the door hinges when swung open. I trimmed the clam flanges for clearance, which is right where the rear alignment pin is mounted. So I removed the rear alignment pin. The remaining front alignment pins and latches seem to securely hold the clamp down and maintain a consistent gap with the door edge.
Last edited:
I used the Pfadt C6 steering wheel adapter to mount my Momo wheel. It works fine, but the adapter is a little ugly.
I had some 4" pipe left from fabricating my exhaust, and that was the perfect size for a cover. Just weld a flange on the end to fit the 6 hole steering wheel mount, shoot a little paint and Vualla...a cover.
I had some 4" pipe left from fabricating my exhaust, and that was the perfect size for a cover. Just weld a flange on the end to fit the 6 hole steering wheel mount, shoot a little paint and Vualla...a cover.
Attachments

Here's a shot of my waterfall panel. I mounted a fire extinguisher between the seats, and then hid it with a cover that align with the center console. The cover is mounted with Velcro so it can be removed quickly if there is an emergency:flameon:
I decided to go with a 3 point safety harness. That allows a bit more shoulder movement to look over my left shoulder in traffic, and it cleans up the firewall as well. The harness is wrapped around the rollbar behind the firewall panel.
I decided to go with a 3 point safety harness. That allows a bit more shoulder movement to look over my left shoulder in traffic, and it cleans up the firewall as well. The harness is wrapped around the rollbar behind the firewall panel.
Attachments
Here's a shot of my waterfall panel. I mounted a fire extinguisher between the seats, and then hid it with a cover that align with the center console. The cover is mounted with Velcro so it can be removed quickly if there is an emergency:flameon:
I decided to go with a 3 point safety harness. That allows a bit more shoulder movement to look over my left shoulder in traffic, and it cleans up the firewall as well. The harness is wrapped around the rollbar behind the firewall panel.
Bill, another quality job of fabricating the fire extinguisher cover; :thumbsup: however, the fire extinguisher appears to be a plastic valve model. With all of the first class quality work that you have done on your car, I'm a little surprised that you wouldn't have gone with a quality metal valve fire extinguisher on something as important as fire protection.
Because you have a cover and the extinguisher gauge is not readily visible, I would suggest adding a visual inspection of the fire extinguisher to your maintenance check list. :idea:
Even though I have given up on my project, I love following your blog and all of the innovative ideas you've incorporated into your build!
Jim
Hmmm, this is the first I've heard of that concern.
What's wrong with a plastic valve?
Bill, plastic valve portable fire extinguishers are notorious for leaking. The next time you are board and want to amuse your self, go down to your local home improvement store and peak into the boxes of the brand new plastic valve fire extinguishers sitting on the shelf and count how many gauges actually indicate within the “Green Operating Range”. I'm fairly confident that you find a disproportionate number of “leakers”.
These are brand new units never put into service. Imagine the number of problems when one of these units has seen service in a hot bouncing, vibrating car or boat.
Additionally, there have been numerous incidents of operators and service technicians be injured. For this reason many fire extinguisher service companies in the U.S refuse to service/recharge plastic valve portable fire extinguishers.
Here is a link the the Consumer Product Safety Commission Kiddie recall notice:
Kidde Recalls to Replace Fire Extinguishers Due to Failure to Operate | CPSC.gov
Although Kiddie is probably the largest manufacture of plastic valve fire extinguishers, American LaFrance, BECO, First Alert and others have had problems.
St. Clair Shores, MI - Official Website - Product Recall Information
Personally, I would opt for a quality metal valve extinguisher.
Hope this was helpful.
Jim
This is a Kiddie ABC extinguisher. I had this unit in my last hot rod, so its 3-4 years old now and still well within the green zone.
Guess I was lucky and didn't get a leaker.
First I've heard of this too. I too have a Kiddie ABC that is 6 years old and still in the "green".
Sounds like they served you guys well.
Jim
QuickSilver VMax200
Check out this video of the QuickSilver VMax200 event. It pits the world's best supercars against each other to determine which is fastest. As I watched this video, I couldn't help think that the SLC belongs in the running for the Top 10.
Heck, the Ultima placed 3rd. I feel confident that the SLC is quicker than an Ultima.
[ame=http://www.youtube.com/watch?v=6kE4_aQHO7U&feature=em-uploademail]QuickSilver VMax200 Highlights - XCAR - YouTube[/ame]
Last edited:
Re: QuickSilver VMax200
I didn't see them mention the specs of it, but since they called it an Ultima 1000 I'm pretty sure it has 1000+ hp.......
Check out this video of the QuickSilver VMax200 event. It pits the world's best supercars against each other to determine which is fastest. As I watched this video, I couldn't help think that the SLC belongs in the running for the Top 10.
Heck, the Ultima placed 3rd. I feel confident that the SLC is quicker than an Ultima.
I didn't see them mention the specs of it, but since they called it an Ultima 1000 I'm pretty sure it has 1000+ hp.......
Sorry I haven't posted in a while, but I've been heads-down in the garage making progress on my SLC. One of the things I recently completed was the inner wheel wells.
Rear wheel wells: The rear wheel wells come in 2 pieces, a flat backer and and curved barrel section that goes over the wheel.
Front wheel wells: I did not have the front inner wheel wells, so I cut a section from the rear wheel wells and repurposed them in the front. They are mounted via threaded click-bond fasteners so the can be easily removed.
Rear wheel wells: The rear wheel wells come in 2 pieces, a flat backer and and curved barrel section that goes over the wheel.
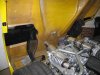
- Start with the curved barrel section: Trim the outer lip to fit the body and then bond it to where it contacts the body. I applied 3M 8115 panel adhesive to the lip and the top of the curved barrel section. I applied a liberal amount of adhesive to the top to spread out the load. Overall, I used just about 1 and 1/8 tubes of the 3M 8115 adhesive, so buy 2 tubes.
- Then bond the flat backer piece: The flat backer is made to fit the track tail. I have a street tail so the flat backer needs to be trimmed to fit the contour of the front curved barrel piece. The lower edge also needs to be trimmed to fit around the upper A-arm and shock cantilever. Then I used the same 3M 8115 adhesive to bond the backer to the inner lip of the curved barrel section and to the underside of the tail. The lower rear corner of the backer is unsupported, so a bracket is needed there. I made my bracket wider just to block the sight-line when looking from the rear grill thru to the wheel well.
Front wheel wells: I did not have the front inner wheel wells, so I cut a section from the rear wheel wells and repurposed them in the front. They are mounted via threaded click-bond fasteners so the can be easily removed.
Attachments

I finished the center dash panel. Along the way I did 23 drawings/mock-ups before I refined it down to something I was satisfied with. Yea, you could say I over-thought it :bigcry:
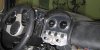
I completely cut the center section out and replaced it with a 1/8" aluminum structural panel. I then covered the panel with 3M Carbon Fiber Di-Noc and trimmed the perimeter with 1/4" Aluminum extrusion from Clayton Machine Works. The HVAC vents are from Billet Specialties. I swapped to the same Billet Specialties vents in the dash's outboard pods as well, so all 4 vents match.
The controls are all mounted on a separate brushed aluminum panel below.
- The panel is made with hidden mounting tabs. so it easily slides out for maintenance.
- The toggle switches have billet handles with blank onix tips, as well as aircraft style switch guards.
- I decided to go with an ignition switch vs start button. This is because the ISIS system draws 0.3Amps when sleeping and will kill the battery within a week or so. The ignition switch is from a 1997 Miata and is part of a matched key set, so the doors lock with the same key. Here is a video on how to make the Miata doors lock.
- The HVAC control knobs that come with most aftermarket AC units are pretty ugly. So I machined some decorative knobs that go around them. Once part of the rubber is cut back, the original knob is bonded to the machined aluminum.
Attachments
Last edited:
Yes, I plan to be at the Charlotte AutoFair next weekend.
The latest count is that 6 SLCs are planning to attend.
For the latest info on the event, see the Charlotte AutoFair thread
The latest count is that 6 SLCs are planning to attend.
For the latest info on the event, see the Charlotte AutoFair thread
Similar threads
- Replies
- 26
- Views
- 8K
- Replies
- 7
- Views
- 6K
- Replies
- 4
- Views
- 10K