Brett's RS GTD

Yes will be at Detling, as its May 20/21, right?

Hopefully if I can get to IVA over the summer, it woul dbe great. Then I could get it road ready over this winter
 
So the bathroom is taking longer tahn expected, some of it down to sheer incompetence on the people how have tried to deliver it. I will soon be on attempt 9 to get all the bits that are missing.

I managed to be 'allowed' some time int he garage this afternoon, so I decided I would do something nice and vuisual to cheer me up. Especially as I spent yesterday in A&E with a hand 3 times the size it should have been; I swear insect biotes are getting worse.

Rather than do stuff like starting to put the loom in; I've put one of the tanks back in and started to offer up the fuel cap tot he body. I think I will mull it over tonight which exact height I will have it.

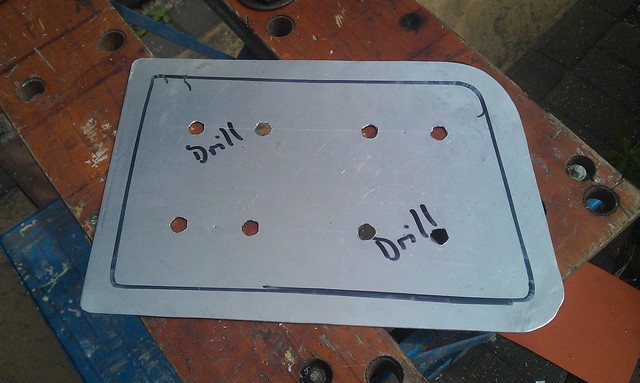
The other was a really visual thing for me. A few years ago I borrowed a home-made tool from a club member for doing a 9 port panel.

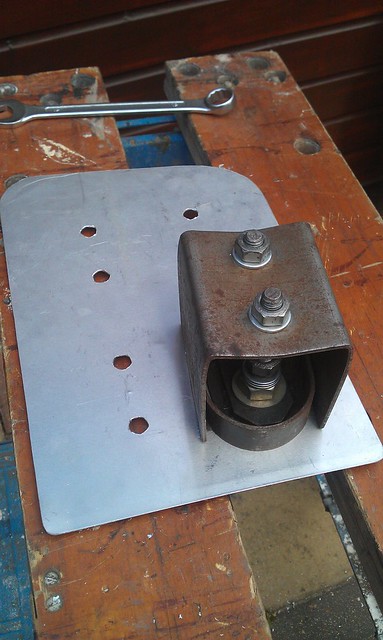
It requires you to drillout 12mm holes and then use a 50mm Q cutter, which you pull until just before the last piece cuts through. Then you then put on the press and bolt down. Finally it requires a bit of filing and cutting and tapping on the other side to clean it up.

I am very happy with the results. It may not be inch perfect, but will more than do for me. I think I am going to have a go at making the lower panels in a few weeks!
 

Attachments

  • DSC02169.JPG
    DSC02169.JPG
    197.4 KB · Views: 388
  • DSC02170.JPG
    DSC02170.JPG
    229.2 KB · Views: 463
  • DSC02172.JPG
    DSC02172.JPG
    265.6 KB · Views: 477
Hi Brett,
that looks really neat. Now you've got the hang of it can you do one for mine :thumbsup:

Keep up the great work,

Andy
 
Andy,
Can do if you want buddy. I'll be up your way in a few months for a weekend of camping; so if you can wait till then...

Brett
 
Last edited:

Randy V

Moderator-Admin
Staff member
Admin
Lifetime Supporter
Nice work Brett... I'd kinda like to see what the backside of the tool looks like. I think I can visualize what it must be but... :)
 
Hi Brett,
I have now problem waiting, I don't think I'll be need it for another couple of years at my rate, or I could borrow the tool if the original club member is OK with this.
Look forward to see you in Norfolk.

Regards
Andy
 
Randy, here you go here's a picture of the underside of the tool.

Here's one of the fuel caps in roughly showing alignment to the body. I decided not to use the 1/4" spacer that came with it in the end.

Finally, 3rd picture I am looking to put in an old Lucas switch for my wipers. It came without the nut. It appears to be 9/16 but can't seem to match the thread anone have any idea?

Oh and if you are wondering about the switch, it is quite a nice piece of kit. When hookd up to an appropriate relay it will provide 1, 2 speed delay wipe and also push for screen wash. My only extra thought is that modern cars the wipers come on and then have 'run-on' when the switch is pushed - do people think I could use a interior light delay relay for this function?
 

Attachments

  • DSC02174.JPG
    DSC02174.JPG
    236.3 KB · Views: 416
  • DSC02173.JPG
    DSC02173.JPG
    182.7 KB · Views: 440
  • DSC02176.JPG
    DSC02176.JPG
    315.5 KB · Views: 375
So some progress made this weekend just gone.

Picture 1 may look like I've pulled an old photo up. However, when the new spider section was fitted, it showed that the old one was out a bit and the panel no longer fitted. So that has now been remade and bonded and riveted on.

Other pics are me starting to put the oil cooler in. Any thoughts from people?
 

Attachments

  • DSC02177.JPG
    DSC02177.JPG
    232.2 KB · Views: 458
  • DSC02178.jpg
    DSC02178.jpg
    52.8 KB · Views: 398
  • DSC02179.jpg
    DSC02179.jpg
    105.4 KB · Views: 416

Randy V

Moderator-Admin
Staff member
Admin
Lifetime Supporter
Thanks for the picture of the tool Brett! That brings it all together...
 
Hi Brett,
Regarding the positioning of the oil cooler, I would look to try and turn it through 45 degrees in order to improve the air flow through the unit. This should also make the routing of the oil lines easier

Keep up the good work
Regards,
Andy
 
Hi Andy,
Tried positioning it that way and it did not line up well with the air intake (and space). Maybe I'll take another look, or bend a piece of ally to direct the irflow through. Any other thoughts?

Brett
 

Keith

Moderator
Hi mate, I haven't got a picture but the oil cooler on my Penske Camaro was positioned at right angles to the airflow in the intake 'tunnel' at the front of the car. I believe that this was a tactical decision to avoid rocks/marbles puncturing the radiator. This probably would not be an issue in your case, but the oil cooler air flow was facilitated by an angled aluminium plate such as you describe and proved perfectly adequate for the task.

I should point out that this installation was in a very strong airflow and the ali plate simply directed/deflected the air into the oil rad at a beneficial angle. If you have relatively low airflow in that area I'm not sure what could be achieved using this method in your case.

I do know one thing from experience of racing and that is that proper oil cooling is essential for engine longevity! Sounds pretty obvious but you would be amazed at the lack of attention to this area. I only had 4 gauges and large 'idiot' warning lights on each, Oil pressure, oil temp, water temp and revs as checking gauges regularly can be hazardous to navigation!

Car looks nearly there mate, hope you don't mind me butting in... :)
 
Well, I finally got some time in the garage today.

Really not much has been done at all over the past few months with work/family/training commitments. So I finally moved the oil cooler round and managed to connect the fuel lines back up again. I've also started to seal off the gearstick area, which is a pain in the proverbial.

Also, roughly ran the throttle cable and mounted it to the pedal box - Hoorah - the butterflies are now mated to my right foot :)

and to finish things off, I started to put the loom in... though I forgot about the size of the connectors, so had to unpeel a piece of panelling; but a little more done. Not quite the blistering pace of Mr.Baker, but I will get there one day.
 

Attachments

  • DSC02182.JPG
    DSC02182.JPG
    223.9 KB · Views: 2,040
  • DSC02183.jpg
    DSC02183.jpg
    95.7 KB · Views: 353
  • DSC02184.jpg
    DSC02184.jpg
    73.3 KB · Views: 361
Remember the Hare and the tortoise Brett !
Also the longer the wait, the more your enjoy it or so the wife says

Keep it up mate
 
Wow - nearly a year betwen updates! Well that's what having a loft conversion/new kid will do for you :)

I have finally managed to get some time on the car, just a few hours and am finally getting round to putting int he loom I got from Mick about 16 months ago!!!

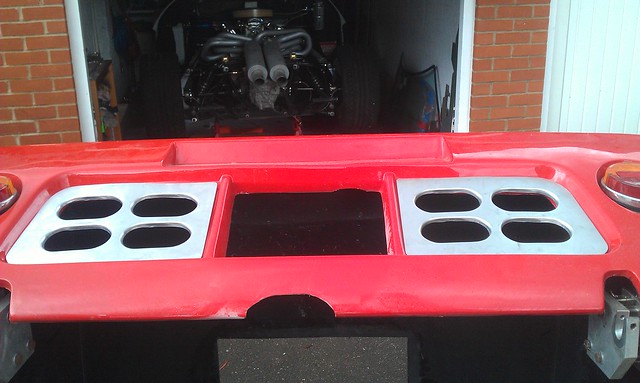
Because of where I have placed the fuel pumps, 1 in each sill area; it meant I spent a few hours unpicking the loom to re-route the RH side pump wiring. I was allowed a few hours this morning, so decided to cheer myself up by doing something less boring instead (all hail 80s kids TV) and made up the rear covers.

7667979034_e37dc6f63f_z.jpg


7667982346_7c61e4375f_z.jpg


What do you think?

7668057842_726acfc733_z.jpg
 
Wow - nearly a year betwen updates! Well that's what having a loft conversion/new kid will do for you :)

I have finally managed to get some time on the car, just a few hours and am finally getting round to putting int he loom I got from Mick about 16 months ago!!!

Because of where I have placed the fuel pumps, 1 in each sill area; it meant I spent a few hours unpicking the loom to re-route the RH side pump wiring. I was allowed a few hours this morning, so decided to cheer myself up by doing something less boring instead (all hail 80s kids TV) and made up the rear covers.

Looks great but but how did you cutter thing work? Why don't you tell us?


(see what I did there) ;)
 
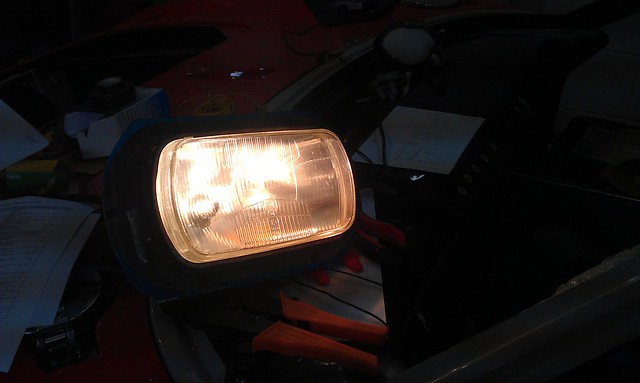
Progress is slow as per usual, but starting trying to get things working electrically. A few weeks ago I started connecting a few things and had a few minor wins (for me at least) when I got the horn and windscreen washer going!

However, the same could not be said for the lights. A quick call to Mick showed that I was using the wrong switch on one of the connections, so just had a go and well... I sort have it working. I can get the lights on, and the main beams - but the dips are on when the sidelights should only be on and when the main beam is off the warning light is on... Another call to Mick tomorrow I think!!

 
Back
Top