Keith Stafford
Supporter
Nick, my floor was in when I got the car, it has caused me two headaches, FWIW:-
(1) there were no straps on the floor for the seat support,... not relevant to you.
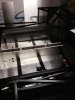
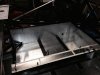
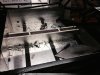
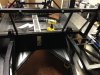
(2) At present the tanks are held with straps which are bolted through the chassis, just at the top and bottom of the sills. I want(ed) to drop the tanks down 1/2", one way to achieve this would be to weld brackets to the bottom of the sills (cantilevered out to the sides) the tanks then sit on these brackets which also mate with straps that bolt to the top outside of the sills, but I can't do this because of the floor panels.
(1) there were no straps on the floor for the seat support,... not relevant to you.
(2) At present the tanks are held with straps which are bolted through the chassis, just at the top and bottom of the sills. I want(ed) to drop the tanks down 1/2", one way to achieve this would be to weld brackets to the bottom of the sills (cantilevered out to the sides) the tanks then sit on these brackets which also mate with straps that bolt to the top outside of the sills, but I can't do this because of the floor panels.
")