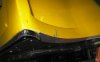
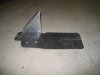
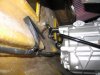
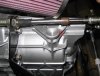
You may have noticed in my AutoFair Cruise-in PICs that I put used 60mm high beams. They require a little fabrication.

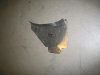
  1. I glued the standard SLC fiberglass light cups to the nose.
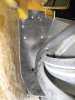
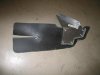
  2. I used the springs that came with the 60mm lights, but replaced the screws with long 10-32x2" screws. I then made a mounting plate from thin aluminum sheet with 10-32 rivnuts for the adjustment screws. The thinking is that the thin sheet will flex to allow the angle of the adjustment screws to skew as you aim the lights.
  3. The SLC light cups were cut to allow the rivnuts and screws to pass thru.
  4. Lastly, I used 2 rivets near each of the adjustment screws to mount the aluminum mounting plate to the fiberglass light cup.

The result is a solid mount with a good range of adjustability.

Good idea - the plastic adjuster cups tend to pull out and I'm having trouble getting a good headlight adjustment. I'll put together something similar this winter when the car is mostly parked. Thanks for posting up Bill.
 
I've been taking my SLC to local cruise-ins for the past 3 weekends and I'm over the 100 mile mark now.

I like to use the "Rule of 10" when breaking in a new car:
  • For the first 10 miles, don't drive it any further than you want to push it back. That means terrorizing the neighbors as you stay within a quarter mile radius of your home. At the end of each excursion, check the vital systems to ensure nothing catastrophic is happening like fuel leaks, brake fluid leaks, oil leaks, etc. I typically have a few things to work on after each trip.
  • For the first 100 miles, don't drive it further than you want to tow it back. Adding a towing feature to your car insurance is prudent at this point. During the first 100 miles, listen to all the noises, pay attention to the smells, do the fine adjustments and increase your speed up to a freeway pace as your confidence builds. When the odometer turns over to 100 miles, do a complete bumper to bumper inspection. Look for fuel leaks, brake fluid leaks, oil leaks, wear on all hoses, wear on electrical harness, spots where the fiberglass panels are rubbing each other, then pull out your tools and tighten every bolt, screw and hose clamp. I found a few minor things in my 100 mile check.
  • When the odometer hits 1000 mile mark, do another complete bumper to bumper inspection.
  • Then each Spring before the cruising season, do a complete bumper to bumper inspection again.

The "Rule of 10" has allowed me to find problems in the comfort of my garage that would have otherwise left me stuck on the side of the road.
 
Last edited:
Yes, I used the ISIS system, but did a few modifications:
  • I hid the rear cell and mega fuse panel in the driver's side pod. That gave me an absolutely clean firewall in the engine bay.
  • I hid the front cell and master cell up under the dash structure. That gave me absolutely clean kick panels in the cockpit.
  • Because I relocated the rear cell, the harness to the rear lights were not long enough, so I fabricated the light harness and added a weather-pack connector so the tail can be removed.
  • The ISIS system draws a continuous 0.3 amps in standby. That will drain your battery in a matter of a week or 2. I installed a battery cutoff relay that is actuated by the ignition switch to cut all ISIS power.
  • The ISIS wiring to the front marker lights assumes you have a 2 filement light, but the SLC lights are single filament. I posted a $5 fix for that problem, or you can swap out the lights for a 2 mode LED light.

There were a few defects with the ISIS system:
  • The wiring pin for the Start button that goes into the front cell was not stripped before it was crimped, so the start button wouldn't work. FYI, the ISIS ignition system does not have an "ACC" position
  • The wipers would not go into the park position, due an incorrect relay.

ISIS was good about quickly fixing these problems, but its clear that they do not test their system before they ship it out.
 
Last edited:
Hey bill,

im just south of you in charlotte. i would love to see your finished product and ask some questions. there are 2 partially completed SLC projects i am considering but am unsure which would he the better of the two cars.
 
See my PM to you.

Hey bill,

im just south of you in charlotte. i would love to see your finished product and ask some questions. there are 2 partially completed SLC projects i am considering but am unsure which would he the better of the two cars.
 
I fabricated these simple panels to cover the opening just behind the front wheels.
 

Attachments

  • IMG_3533.jpg
    IMG_3533.jpg
    109 KB · Views: 507
  • IMG_3536.JPG
    IMG_3536.JPG
    75.6 KB · Views: 545
Jims would make a cracking car.... shown under "Jimer" in the build threads...has all the right parts and is unmolested

And it appears to be roughly 75% complete. :thumbsup:

I guess timing is everything...

Mike


Michael, yes my build is probably around 75% complete with most parts sourced. Most of the mechanical is complete leaving the body and interior to finish.


I don't want to high jack Bill's excellent build thread, so for further details, see my Ad in the classified section or go to Jimer's Build.
Jim
 
I'm starting to work on getting the interior a bit quieter.

Event though my exhaust is only 20" long, the 3" tube, Flow Master DBX mufflers and the Dynatech vortex give a good exhaust note, while keeping the Dbs down. In fact, most on what I'm hearing is road noise.

I'm adding Dynamat to dampen the cabin's interior surfaces. Then comes a layer of MLV (Mass Loaded Vinyl) to block noise. I also have some 3M Thinsilate acoustic absorber mat to stuff in the side pods and waterfall.

Quite a bit of noise travels from the engine bay forward thru the side pods. I fabricated some MLV barriers to plug the complicated shape of the opening.
 

Attachments

  • IMG_3528.jpg
    IMG_3528.jpg
    94.7 KB · Views: 465
  • IMG_3532.jpg
    IMG_3532.jpg
    101.3 KB · Views: 408
  • IMG_3531.jpg
    IMG_3531.jpg
    106.2 KB · Views: 367
Bill,
Nice. Remember to decouple the MLV from the dampener (every where you can). If you place it directly in contact with the dampener it will act as additional dampener instead of a noise blocker/barrier.
 
Jim I was looking at doing something like this as well but thought leaving it open would allow air flow through the sills and help with heat sink from the water lines. So now I am thinking of putting in some small scoops to push some air through and into the engine bay ?
 
Quite a bit of noise travels from the engine bay forward thru the side pods. I fabricated some MLV barriers to plug the complicated shape of the opening.

Another/additional cover panel idea that will go under the f/glass interior trim pieces - left & right. Cuts down on noise and heat that would migrate up and into the cabin.
 

Attachments

  • IMGP2932_zpsb2c20084.jpg
    IMGP2932_zpsb2c20084.jpg
    50.8 KB · Views: 567
  • IMGP2920_zps67ff5f80.jpg
    IMGP2920_zps67ff5f80.jpg
    72.2 KB · Views: 576
Yup, double sound barriers on each side should quite it down about as much possible. I'll probably adopt your design for my second barrier, but add some MLV sound block to it.
 
I’ve had my SLC on the road for a month now, and thought I’d give you an update on the shifter.
  • I worked with Jim at Cable Shift on the prototype for the shortened "Fran-Kin Box" G50. The bracket mounted to the G50 with some minor filing to fit the contour of the case. The fore/aft cable hit the threaded boss on the G50/20, so I used a rat tail file to grind a clearance slot into the threaded boss. These are very minor modifications.
  • Clearance is very tight between the shift rod and the street tail. If you have the race tail, its wide open and there is no clearance issue. I fashioned my own ¾” wide cable coupler and it barely fits within the street tail. This is an area where a 1/8" difference in how you shortened the G50 can make the difference between success and failure. Fortunately, the G50 shift rod is just behind the licence plate. If you have to, you could cut a hole in the tail for the shift rod and hide it behind the plate.
I ran my shift cable along the right side of the motor and clamped it tight to the side of the oil pan. I used 3 layers of heat protection to protect the cables from the exhaust header:
  1. The cables are covered with heat sheathing
  2. I fabricated an aluminum heat shield
  3. The headers are wrapped

With the engine idling for 20 minutes and at full temperature (200+), I can comfortably hold on to the cable, so I think it will be ok.
 

Attachments

  • IMG_3523.JPG
    IMG_3523.JPG
    234.7 KB · Views: 463
  • IMG_3519.jpg
    IMG_3519.jpg
    160 KB · Views: 429
  • IMG_3517.JPG
    IMG_3517.JPG
    312.6 KB · Views: 410
S5 Mendeola sequential gear box I ordered, there is a wait, but the car isn't going to be built is a month either.

They let you pick your gear ratio's for how fast you really want to go, I like shifting, and cornering about the windy park roads, I dont like being in 1 gear to 90 mph, I geared mine for 160 at 8000 rpms, 20 B turbo rotary, 650 dependable RWHP, and still be in high gear at 40 mph going thru the city.

Plus it is good on gas, ha ha
 
After exploring every possible option I can think of, I've decided to use a 7" tablet for my info-tainment system. The tablet will consolidate the Navigation, Traffic, MP3, FM, rear camera, etc onto a single screen. The tablet will be mounted high in the traditional rear view mirror position between the roll-bar tubes. The center section of the dash will be just HVAC vents and controls.

The main challenge with the center section of the dash is that the depth from the face plate to the underlying chassis structure is very shallow. The space is 3.5" - 4.25" deep, while a typical audio head unit is 7" deep. This requires some digging and/or a creative solution. Here are some of the other options I considered. Even though I decided not to go with these options, they might fit the needs of other builders.
  • The Henhao head unit for a Citroen has a thin 7" HD touch screen and separate electronics box that can be mounted elsewhere. It features Navigation, backup camera connection, AM/FM radio, Bluetooth, rear aux input, and USB to play music. Henhao is a Chinese brand that you don't normally see in North America. I submitted some simple questions to their tech support via email. They were responsive, but there was a significant language barrier. It took 6-7 email volleys to get some very basic questions answered about things like dimensions and whether Nav included North American maps. The Henhao dimensions should fit OK and North American maps are included, but at $340 the tech support made me nervous.
  • The JBL PRV-170 MARINE radio is round, 3.5" deep and features AM/FM radio, Bluetooth, rear aux input, and USB to play music. Output is just 20 watts RMS/45 peak x 4 channels, but 4 pre-amp outputs are provided if you want to add a more powerful amp. At $200, this is a good option for a basic audio head unit.
  • The Magellan RoadMate 9250T-LMB is a navigation unit with a thin 7" Touchscreen ($200). It can be parred with the Magellan Wireless Back-up Camera ($100). Like most auto backup cameras, it has a wide angle and a low resolution to view only close objects, but it's not suited to provide a rear view while driving. There is no FM or MP3 support, so a separate audio head unit is needed, like the JBL PRV-170 above.
 

Attachments

  • x822PRV170-o_front.jpg
    x822PRV170-o_front.jpg
    87.6 KB · Views: 281
  • 7-HD-in-dash-head-unit-car-dvd-player-gps-navi-for-Citroen.jpg
    7-HD-in-dash-head-unit-car-dvd-player-gps-navi-for-Citroen.jpg
    71.1 KB · Views: 291
  • Magellon option.jpg
    Magellon option.jpg
    21.3 KB · Views: 263
Last edited:
Back
Top