Wow,
Allan is a closet UToob publisher? Who knew?
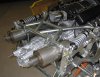
BTW: He has built many SLCs for customers (besides his own) and will be doing many more from what I hear.
Hey. . . my car's a star!!

Wow,
Allan is a closet UToob publisher? Who knew?
BTW: He has built many SLCs for customers (besides his own) and will be doing many more from what I hear.
That Zakari guy looks familiar.
Bill,
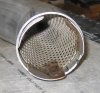
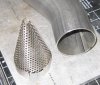
On the Vortex Cones.. About 10-12 years ago, I tried this on an SCCA American Sedan car in order to make the 100dB sound limit at one particular track. While the car did go from 103 to 98, it also refused to rev to its normal max RPM of 6800. It just flat could not breath hard at all over 6000 and would barely make it to 6200. This was with a 5 liter engine.
I ended up tossing it in the bin and installed a SuperTrap end on the pipe. It was similar in that it was restrictive, but the car could at least rev to 6800..
 epper:
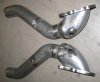
The comments here about whether the HushPower (Flowmaster DBX) muffler and vortex cone are restrictive got me wondering. I did an "exhaustive" internet search on the topic this morning. I found in other forums where HushPowers and vortex cones were installed on LSx motors, Mustangs, Vipers, etc.s generally agreed that they are both good solutions to quiet your exhaust. I feel better now!
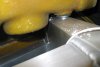
Most builders don't have a left hand tap, but you can use the turnbuckle itself to press the threads in. It helps if you drill out the hole first with a 7/32" bit and then use some oil.