
You are using an out of date browser. It may not display this or other websites correctly.
You should upgrade or use an alternative browser.
You should upgrade or use an alternative browser.
917 Scratch Build
- Thread starter MrNoo
- Start date
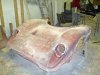
Morn all, almost done doing the moulds, one left to go (the brake/rad duct and underside of it) and started to trim/tidy up the flanges. Will get and order some steel to make the frames up for it too later in the week. Will then "pop" the lot off, clean up and bolt back in place and glass the frames on and can then stay on for a week of so while it fully cures.
Pic is as it is now, again there are a load of the moulding process on my Flickr page
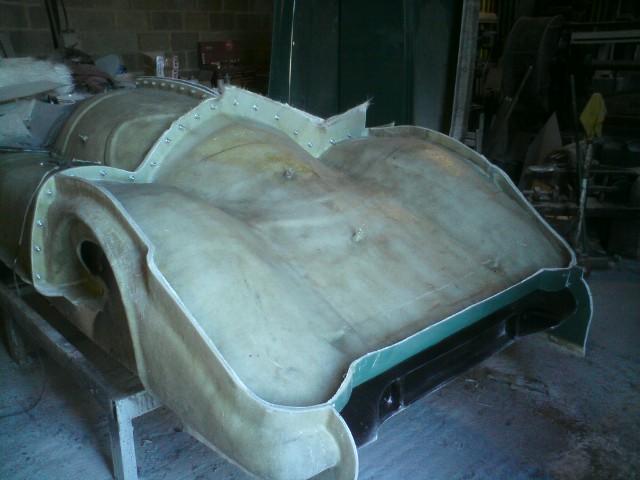
Pic is as it is now, again there are a load of the moulding process on my Flickr page
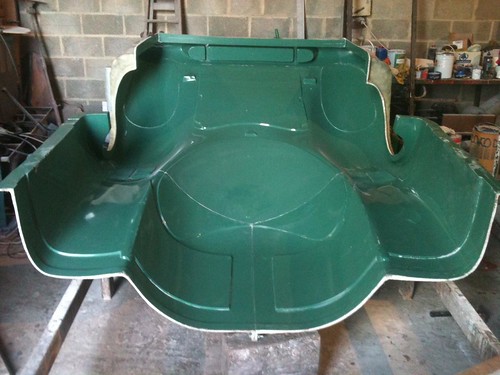
Moulds done, came off ok although the main central one took a bit of work that resulted in some damage to the plug (it is scrap anyway, it`s job done) Pic is of it all bolted together ready for some wax
Also the "donk" has arrived in the shape of a 3.4ltr DFI Boxster s 310bhp along with the trans, am going to run this with a standalone system (which will end up costing more than the engine by the time a loom has been made and it`s been on the dyno:cry") , so with a decent fabricated exhaust system and a GT3 throttle body should see it poking out around 330/340bhp (fingers crossed) and with a target weight of around 800/850kg should mean it will go ok
, so with a decent fabricated exhaust system and a GT3 throttle body should see it poking out around 330/340bhp (fingers crossed) and with a target weight of around 800/850kg should mean it will go ok
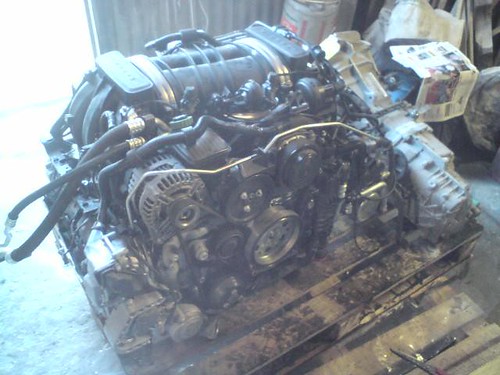
Also the "donk" has arrived in the shape of a 3.4ltr DFI Boxster s 310bhp along with the trans, am going to run this with a standalone system (which will end up costing more than the engine by the time a loom has been made and it`s been on the dyno:cry
, so with a decent fabricated exhaust system and a GT3 throttle body should see it poking out around 330/340bhp (fingers crossed) and with a target weight of around 800/850kg should mean it will go ok
Very nice mould
be shure to take care of the engines oiling system. They are known for there issues to keep the oil supplied during track usage ( that´s the reason why all GT3, GT3 and turboengines main housings are still based on the last air 3.6l 3.8 l drysump engine case design)
TOM
TOM
be shure to take care of the engines oiling system. They are known for there issues to keep the oil supplied during track usage ( that´s the reason why all GT3, GT3 and turboengines main housings are still based on the last air 3.6l 3.8 l drysump engine case design)
TOM
TOM
Morn all, moment of truth today, popped the first body out of the moulds, came out a treat, put a plastic wedge in and away she came, there are a couple of corner/edges where I didn`t manage to get my first layer of mat into but they will tidy up just fine. Not weighed it and prob won`t do untill I cut all the various hatches, door cut-outs ets out, anyway pic is of body, needs trimming up and mould lines cleaning up.
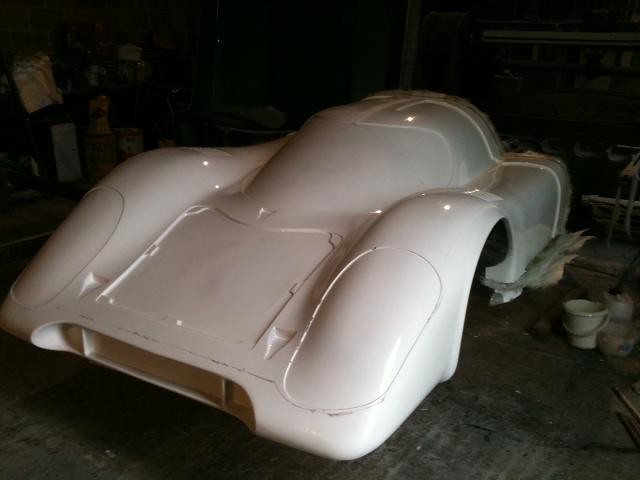
And picture of it just out the mould, was on my own so it had to stand there while I cleaned the workshop up for it!!
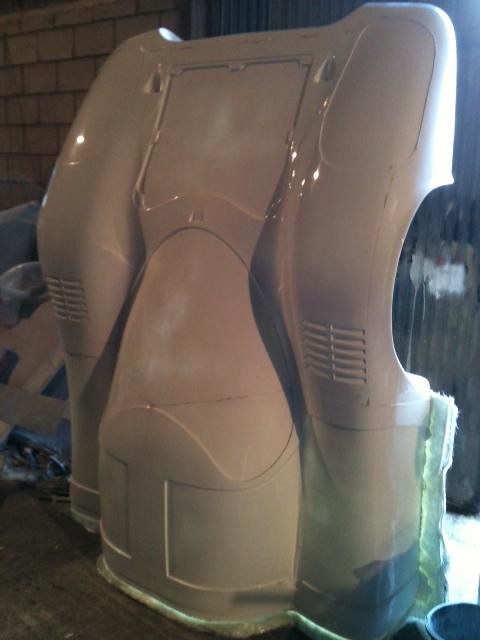
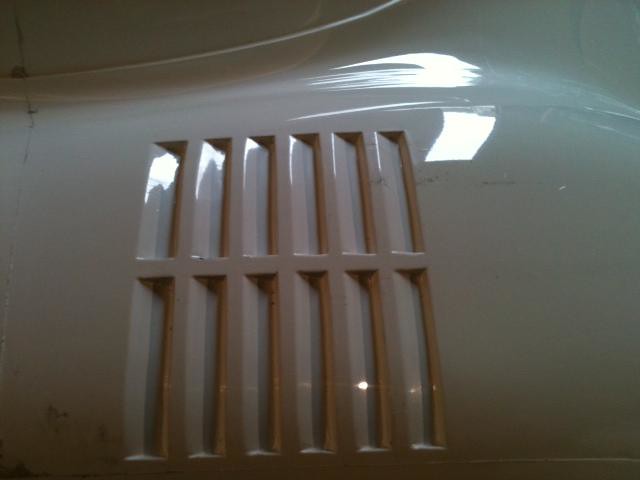
One area where I thought I may have problems turned out fine, the wheel vents
And picture of it just out the mould, was on my own so it had to stand there while I cleaned the workshop up for it!!
One area where I thought I may have problems turned out fine, the wheel vents
Absolutely outstanding !!!! You must be very proud of what you have created. It is a great feeling to see the results of untold hours toiling away with an image of the finished product in your minds eye .
Leon,
Look's like he used lots of wax. I used PVA and it left a bit of a satin finish. You exchange one for the other. You get a good pull with no damage to the part with PVA or you get a nice glossy finish and use lots of wedges and hope the part does not hang up when you pull it. Look's good Chris.
Dave
Leon,
Look's like he used lots of wax. I used PVA and it left a bit of a satin finish. You exchange one for the other. You get a good pull with no damage to the part with PVA or you get a nice glossy finish and use lots of wedges and hope the part does not hang up when you pull it. Look's good Chris.
Dave
After sticking a large part in a mold (once), I wax the mold (5 times) and then apply a light sprayed-on coating of PVA. You can always polish the gelcoat later should the part be too dull. As most of my parts are painted anyway, it matters not. NEVER have stuck another part though! There are some mold release agents available that require no additional preperation and are good for multiple "pulls".
That is a work of art, I just hope I have half the resault when I finally get to do my body. Whats the trick to getting the moulds to pop that clean. Lots of polish and wax or do you use a special parting agent?? Cheers Leonmac.
I just used wax, spent a lot of time getting a good surface finish on the plug (it`s easier on the plug than on the moulds!), use tooling Gel (harder surface although more expensive). Angles are important for a good release. I used a total of 5 coats of maguires No 16 High temp wax, put on then left to dry between each coat(sometimes overnight) and then buffed up with some yellow polishing cloths, I then left the recently polished surface for a couple of hours (sometimes more) before putting the next coat on (to give the wax time to harden). It seemed to work ok and I used just one wedge for the front and all it required was a small tap and off she came!
I think that you can get problems spraying PVA over wax (it will fish-eye) unless you "mist" it, I did the front hatch with PVA and to be honest the surface of the mould took circa 8hrs of flatting/polishing to get it up to a decent standard, I would not use it again unless the surface of the plug was rough, so you could say i`m a "wax convert" now.
Very hearty congratulations Chris on getting to this point. Part looks excellent.
Wheel arch vent must have been a tricky bit to lay up.
That was the advice I was given very early on in my project.
Cheers
Fred W B
Wheel arch vent must have been a tricky bit to lay up.
so you could say i`m a "wax convert" now.
That was the advice I was given very early on in my project.
Cheers
Fred W B
BTW: I do chemical engineering as a day job, PVA based products are part of my work. A PVA product needs very high performance surfactants to wet over the wax, if it does not have them forget it - you can and may spend forever misting over wax. With the proper formula one can lay it on like a clear coat of paint.
Chris Kouba
Supporter
...I have many 'heros' on this site, Chris you are one of them. Fantastic work...
+1
All I can say in fantastic work! I am supremely jealous of your talents.
Mesa,
I am just using PVA for the first parts pulled. After that is will be wax. Problem with these older disgned cars is that they had lots of curves. Sides were not flat like todays cars. I have yet to pull a part from this mold. Did extra seam on the sides and the wheel wells can be a problem if they curl under. Rear Spoilers like Chris said also a problem getting material into tight spaces.
Dave
Attachments
Very hearty congratulations Chris on getting to this point. Part looks excellent.
Wheel arch vent must have been a tricky bit to lay up.
Fred W B
Thanks Fred, will be your turn soon!!! Vents were a pain, so cheated and laid them up first only 3 layers of 300g/m!
Thanks for all your comments guys, the encouragement helps more than you could think when things don`t go according to plan or you get to the stage of despair!!! Thanks again.
best regards Chris
Similar threads
- Replies
- 13
- Views
- 3K
- Replies
- 5
- Views
- 2K
- Replies
- 14
- Views
- 5K